When we talk about how fast your computer works or how smoothly it can run, the Memory, or more often known as RAM (Random Access Memory), is one of the most important factors. The more RAM your computer has, the better it can handle doing lots of things at once; however, it doesn’t always mean the more the better.
But sometimes, you might see some of your computer’s RAM is locked away for “Hardware Reserved Memory.” This happens with both Windows 11 and Windows 10. In this guide, we’re going to explain what Hardware Reserved Memory is, why some computers have a lot of it, and how to reduce it.
Page Contents
What is hardware reserved memory?
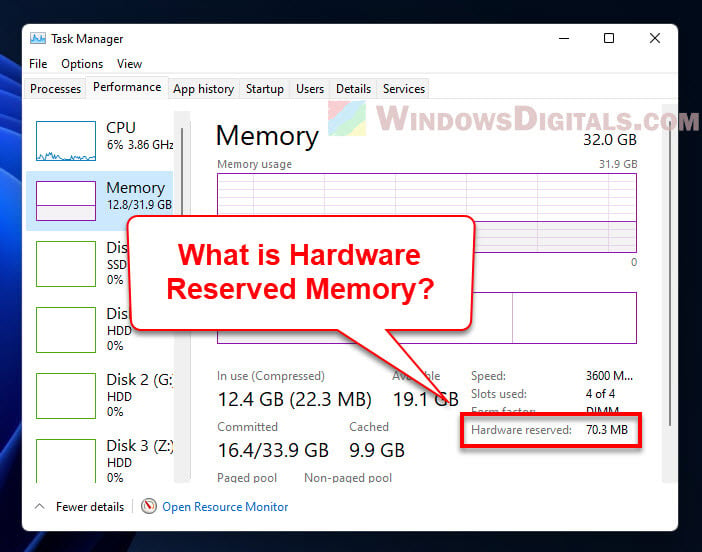
Hardware Reserved Memory is part of your computer’s RAM that’s saved for stuff like your GPU (Graphics Processing Unit), sound card, network adapter, and other pieces inside your computer. This memory is kept aside so these parts can work well.
How to check the hardware reserved memory in Windows 11?
Want to see how much Hardware Reserved Memory your Windows 11 computer has? Just do this:
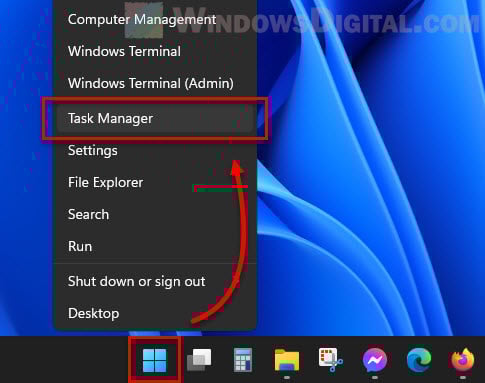
- Right-click on the taskbar and pick “Task Manager” from the list. Or, you can press “Ctrl + Shift + Esc” to open the Task Manager straight away.
- Click on the “Performance” tab in the Task Manager window.
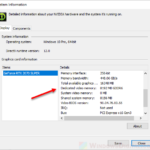
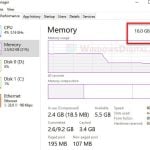
- Choose “Memory” on the left side. You’ll see the total memory your system has, how much is being used, and how much is free.
- Scroll down to the “Hardware Reserved” part to check out how much memory is set aside for hardware stuff.
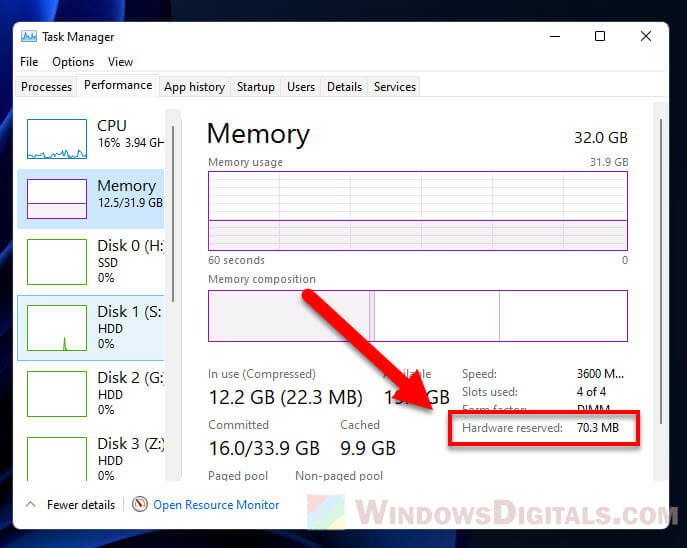
And there you have it! Now you know how much Hardware Reserved Memory your computer has.
Why do I have 2.1GB, 4GB, or 8GB of RAM hardware reserved?
The amount of Hardware Reserved Memory depends on what hardware you have in your computer. If you’ve got fancy GPU, sound card, and other stuff, they need more memory to work right. So, if your computer has 16GB of RAM, you might find that only 8GB is usable because the rest is Hardware Reserved.
Related issue: 16GB RAM Installed Only 8GB Usable in Windows 11
Why is hardware reserved memory so high?
Hardware Reserved Memory can be high because of the hardware in your computer needing more memory. Also, some software and drivers can make it higher too.
Suggested read: Why is My Memory Usage So High When Nothing is Running?
What impact does hardware reserved memory have on system performance?
If a lot of your RAM is Hardware Reserved, it means there’s less memory for running apps and multitasking. This can make your computer slow or take longer to load things. In the worst case, your computer might run out of memory and crash or freeze.
How to reduce hardware reserved memory in Windows 11/10?
Here are some things you can try to lower the amount of Hardware Reserved Memory:
See also: How to Clear RAM Cache in Windows 11
Adjust the amount of RAM allocated to your integrated graphics card
If your computer’s CPU uses some of your RAM for video, you can change how much RAM it gets in the BIOS settings.
- Restart your computer and hit the right key (like F2, F10, or Del) to go into the BIOS setup when it starts up.
- Find the “Advanced” or “Chipset” menu.
- Look for an option that says “Integrated Graphics Share Memory“, “Internal Graphics Memory Size“, or something similar.
- Change how much memory it can use and save your changes.
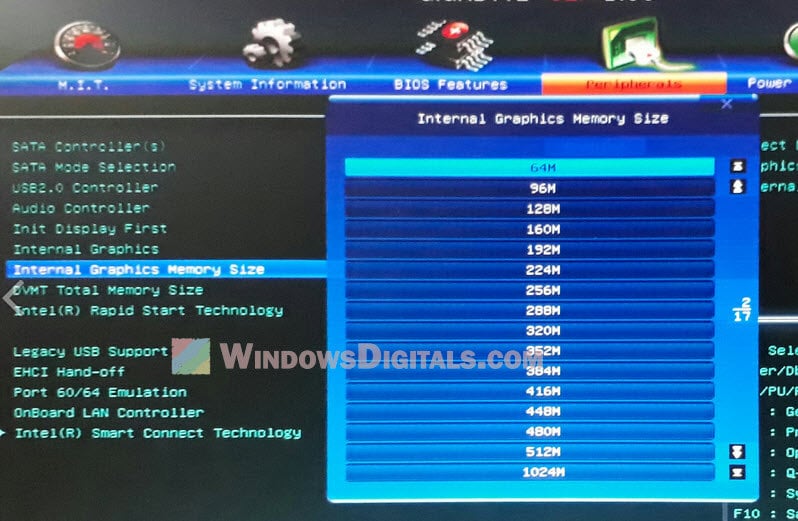
Be careful though, lowering the memory for your graphics can affect how well games or other graphic stuff works. Test your computer after making changes.
Warning: Be really careful with BIOS settings. Wrong settings can mess up your computer. If you’re not sure, ask someone who knows or check with your computer’s maker. If things go wrong, you might need to clear the CMOS to reset the BIOS settings.
Disable the integrated GPU if it’s not in use
If you have another graphics card, you might turn off the built-in GPU to save some memory.
- Restart your computer and get into the BIOS setup by hitting the usual key (like F2, F10, or Del) as it starts.
- Go to “Advanced” or “Chipset” in the menu.
- Find the “Integrated Graphics“, “Onboard Graphics” or a similar option.
- Choose to “Disable” the built-in graphics.
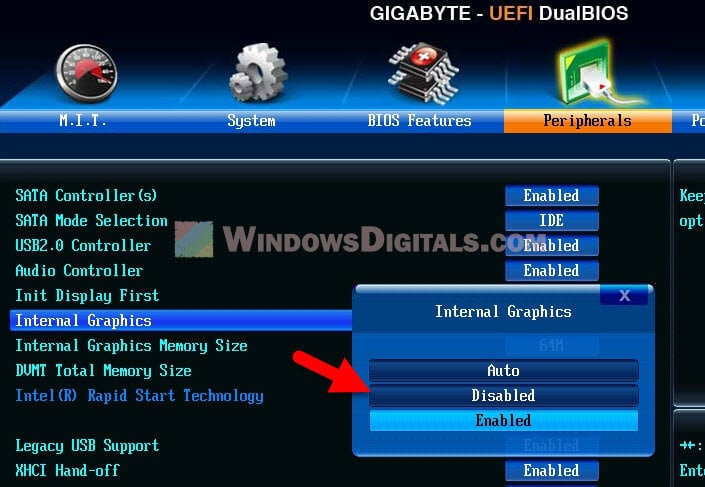
- Save and exit the BIOS setup.
Also see: How to Force App or Game to Use Dedicated GPU or Integrated Graphics
Just make sure your other graphics card can handle everything you need. Check everything works well before turning off the built-in GPU.
Adjust the maximum memory setting in the system configuration
In Windows 11/10, you can set a max limit for system memory use. Here’s how:
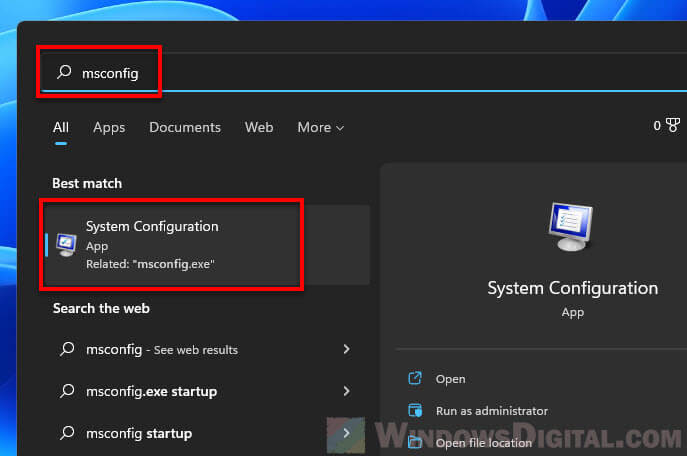
- Hit the Start menu and look for “msconfig“.
- Choose “System Configuration” from the results.
- In the window that pops up, hit the “Boot” tab.
- Click on “Advanced options.”
- In the next window, tick the “Maximum memory” box and set your desired max memory.

- Hit OK, save your settings, and reboot your computer.
This won’t change how much memory is Hardware Reserved though.
Disable unnecessary hardware devices
Some devices you don’t really use might still take up memory. Turning them off can free up some space. Here’s how:
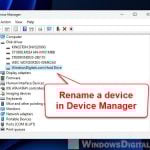
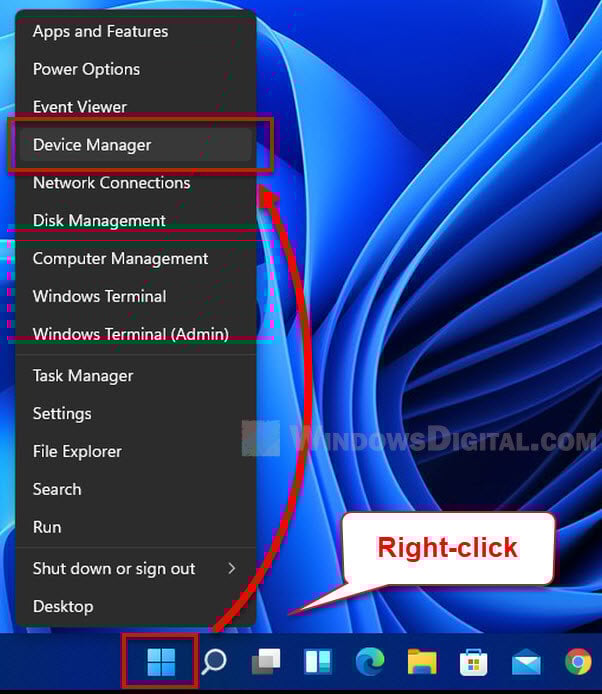
- Press Windows key + X and pick “Device Manager.”
- In Device Manager, find the device you don’t need and right-click to select “Disable.”
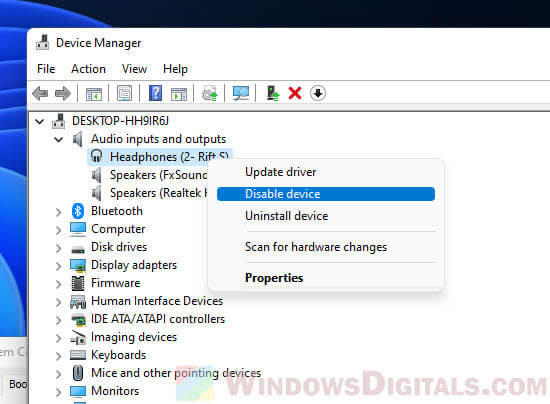
- Do this for any other devices you don’t use.
But, be careful not to turn off anything important. You don’t want to accidentally cause problems.
Update your device drivers
Sometimes old or broken drivers can mess with memory. Updating your device drivers, especially for graphics card, might help.
- Right-click the Start menu and pick “Device Manager.”
- In Device Manager, find the device you want to update, right-click it, and choose “Update driver.”

- Follow the steps on the screen to update the driver.
One last thing
Hardware Reserved Memory can really affect how well your computer works by limiting how much memory is available for your apps and multitasking. It’s very important to find a good balance when trying to reduce the Hardware Reserved Memory. You want to make sure your computer’s parts have enough memory to do their job as well.