When you run a program or a game, Windows will use some of your computer’s RAM as cache so that whenever the same data is requested by the program, it can be quickly retrieved from the RAM cache.
When the cached memory reaches the limit of your RAM (high memory usage), especially when you run too many programs or games at once, you will often encounter issues such as sudden slow down and lag when you use the application, out of memory errors, or even crashing of apps or games.
Also see: How to Clear DirectX Shader Cache (Windows 11)
In such situation, you can close some programs you don’t use to free up some RAM. However, when you close a program, Windows will sometimes not clear the cache the program used. The data will stay in the cache so that when you open the same program again, it can launch faster and run faster due to required data being still in the cache.
In spite of that, Windows is still smart enough to know that when RAM is required for another program, it will automatically free up the unnecessary memory cache so that other programs can use it.
Despite all that, you can actually manually clear the RAM cache in Windows 11 by using a simple community made tool called Empty Standby List. This tool is able to clear the cached memory even when the programs are running. The instruction below will show you how to clear memory cache and free up RAM in Windows 11.
Learn more: How to Clear Cache (Memory, Browser or Temp Files) on Windows 11
Page Contents
How to clear RAM cache in Windows 11
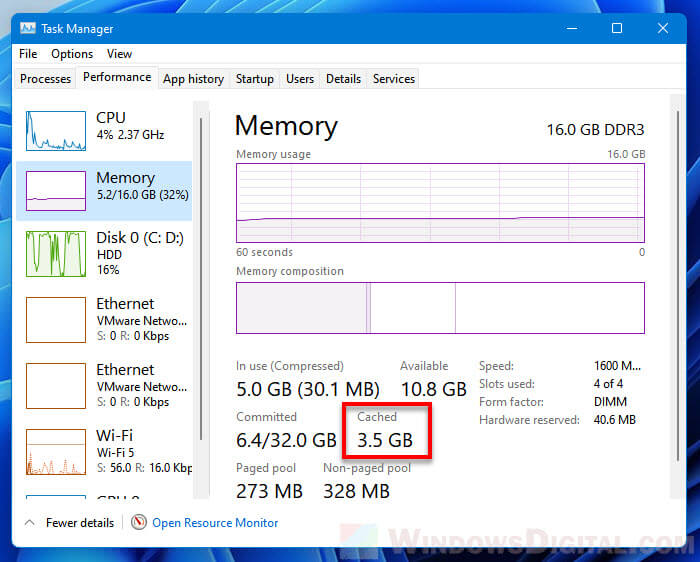
To learn how much RAM is currently being used for cached, first open Task Manager by pressing Ctrl + Shift + Esc keys. Next, select the Performance tab then select Memory from the left pane. You can see how much memory is currently in cache under “Cached” (next to Committed).
To clear the cached memory (RAM) in Windows 11, follow the steps below.
1. Download EmptyStandbyList.exe from the following page.
https://wj32.org/wp/software/empty-standby-list/
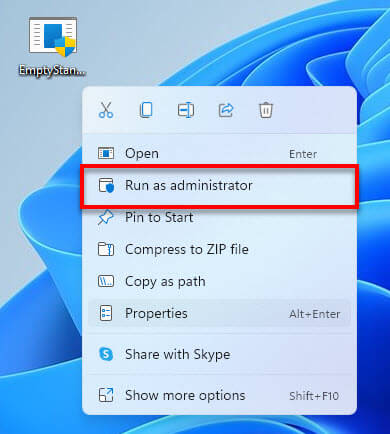
2. Once downloaded, place the executable file to the desktop or anywhere else you want. This is the file you need to run every time you want to clear the RAM cache. To run the executable file, right-click it and select Run as administrator. The tool requires administrative privileges to run, otherwise it won’t work.
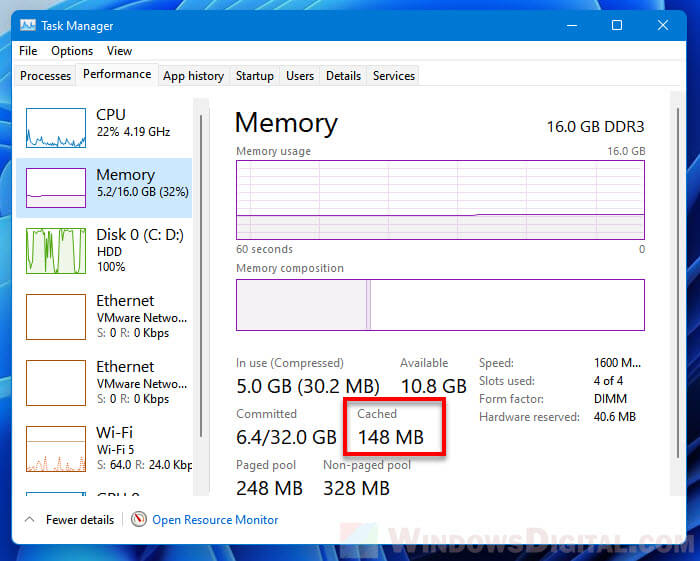
3. Once you run the file, a command prompt window will appear for a split second. It means that the tool has been executed and the RAM cache is cleared. You can now open the Task Manager > Performance tab and check how much cached RAM has been cleared. If the EmptyStandbyList.exe is executed successfully (with administrative privileges), you should see that the cached memory is significantly cleared.
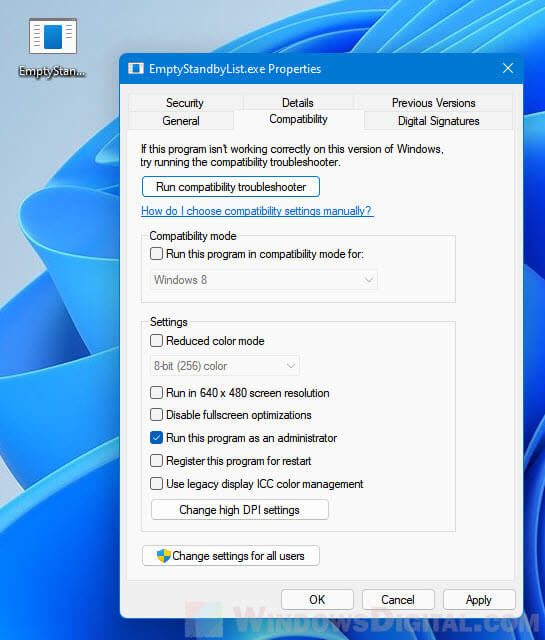
Since the executable file has to be run as administrator, to make it much easier to run the file as admin without first right-clicking it, you can change its properties so that it will always be run as admin whenever you double-click to open it.
Related: How to Fix Game Lag and Stuttering on Windows 11
To do so, right-click the file and select Properties. Select Compatibility tab and enable the checkbox that says “Run this program as an administrator” in the Settings section. Then, click OK to save the changes. After doing so, every time you double-click to run the file, it will automatically be run as administrator.
How to free up RAM in Windows 11
The workaround above to clear cached RAM may not be useful if you continue to run excessive amount of apps or games that your computer’s RAM couldn’t sustain. Even after force clearing cached memory that way, the running apps will eventually fill up the RAM cache again.
It’s a good practice to always check what else is running on your PC and terminate whatever process that you don’t need. Some programs may have background process that is running without your knowledge. You can check what processes take up most of your RAM and kill the processes that you don’t need running to free up some RAM.
See also: How to Force Close Program in Windows 11 Without Task Manager
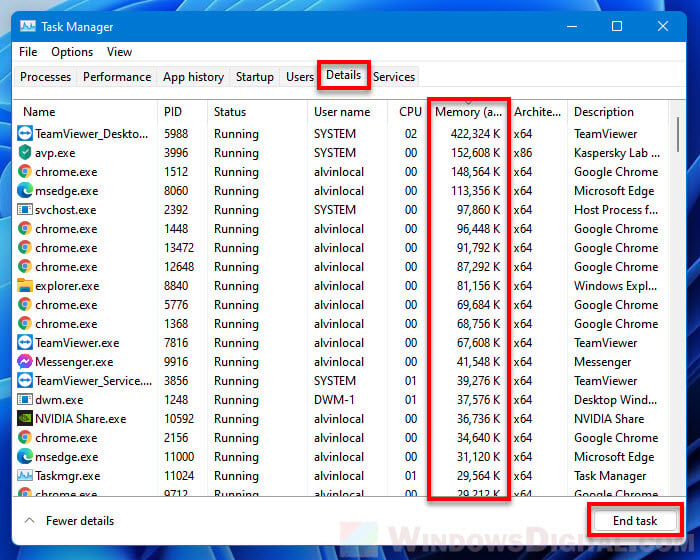
To terminate unnecessary processes to free up RAM in Windows 11, first press Ctrl + Shift + Esc to Task Manager. In the Processes tab, click the Memory column to sort the processes by their currently consuming memory from the most to the least. Select any app, program or game that you want to terminate, and click End task to kill it.

Alternatively, you can check the same by going to the Details tab in Task Manager. Click the Memory column to sort processes by memory (RAM) usage, and then decide which process you can safely terminate. To terminate a process, select the process and click End task.