When you get some warnings from certain apps or Windows itself telling you that you’re close to running out of space on your main C: drive, that’s the time when you would think about what you can actually delete from the C: drive without breaking anything. Well, to be honest with you, it takes some decades of experience to know the files in a Windows-operated system drive. This guide will talk about what you can safely delete from the C: drive to make some room and how to do it properly.
Also see: How to Clean C: Drive in Windows 11

Page Contents
Delete temporary files in the C: drive
Temporary files pile up in different folders on your C: drive over time and take up a lot of space. These might be in places like C:\Windows\Temp or C:\Users\[Your Username]\AppData\Local\Temp. Luckily, Windows has a pretty useful feature that lets you find and delete these files easily without having to dig through folders.
How to delete temporary files
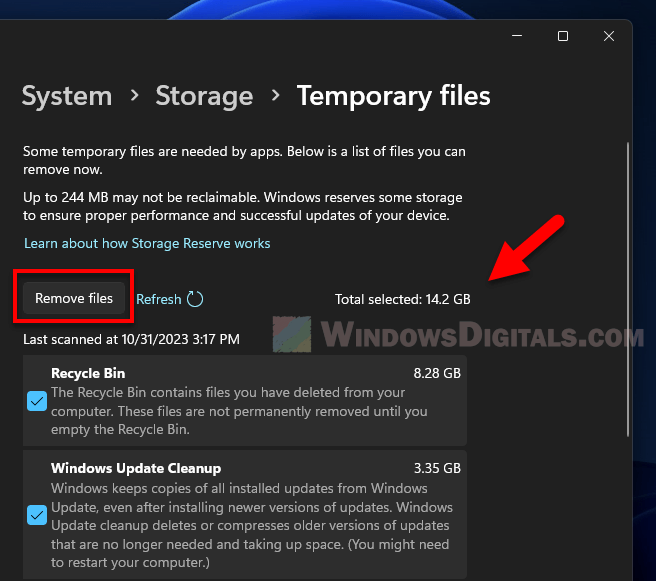
- Press Windows Settings by hitting Win + i.
- Click on “System”, and then click on “Storage”.
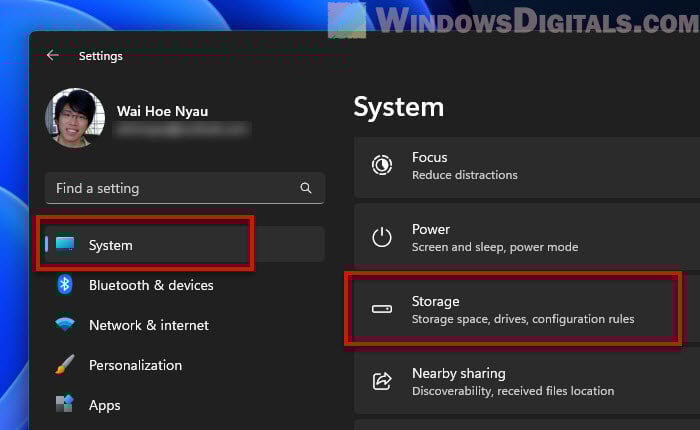
- In the Storage section, find “Temporary files”.
- Pick the types of temporary files you want to delete, like cache files, downloaded files, and thumbnails.
- Hit “Remove files” to delete them.
Doing this once in a while can help you get back a lot of disk space, especially if you haven’t cleaned out these files in a while.
Related concern: Can I Delete Delivery Optimization Files in Windows 11?
Clean up the Windows Update and Software Distribution folder
Windows stores files related to updates in several folders, especially in the Software Distribution folder and the Windows Update Cleanup cache. Although these files are important for updating, you can safely remove old or unused ones to clear up space.
Method 1: Windows Update cleanup through Disk Cleanup
This method only gets rid of files you don’t need anymore for system operations like update rollbacks. It’s a safer and easier way for those not very familiar with Windows Update details.
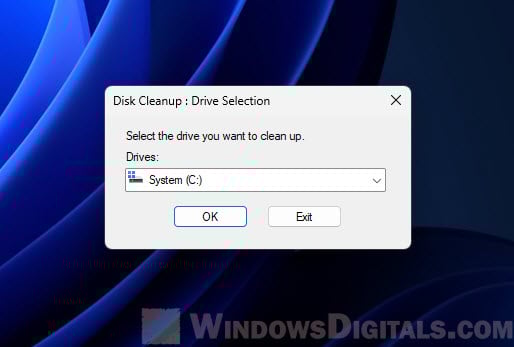
- Search for “Disk Cleanup” in the Windows search bar and open it.
- Pick the C: drive and hit “OK”.
- Press the “Clean up system files” button.
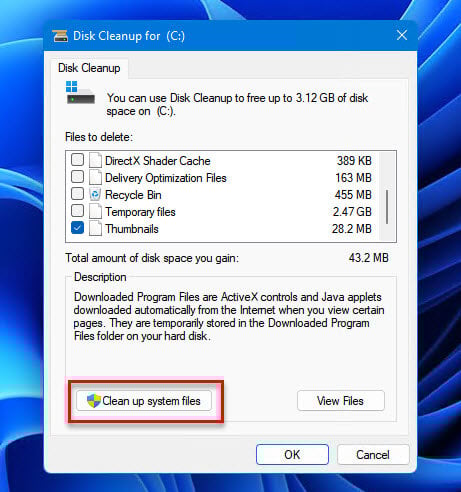
- After the scan, find “Windows Update Cleanup” in the list.
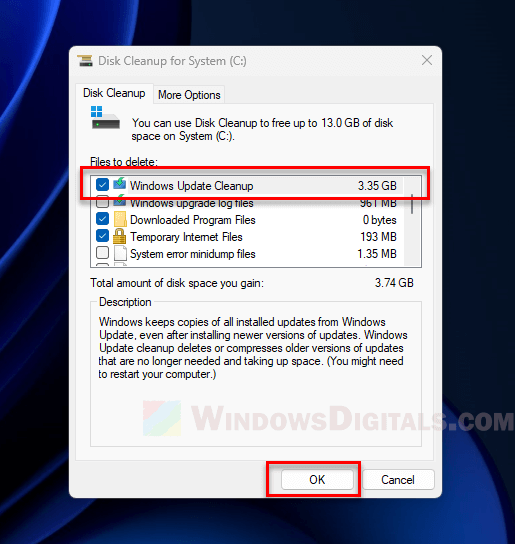
- Tick the box next to it and click “OK”, then “Delete Files”.
Pro tip: How to Change Windows 11/10 Update Download Location
Method 2: Manually delete the Software Distribution files
This is a deeper cleanup that removes all Windows Update-related files, including the current update cache. Be careful with this one, as it might affect your system’s ability to get future updates if not done right.
- Open Command Prompt as an administrator.
- Stop the Windows Update Service by typing
net stop wuauservand hitting Enter.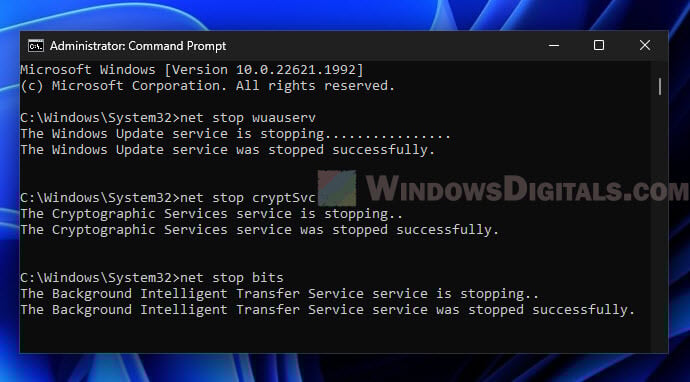
- Go to
C:\Windows\SoftwareDistribution. - Clear out all files and folders inside.

- Go back to Command Prompt and start the Windows Update Service again by typing
net start wuauservand hitting Enter.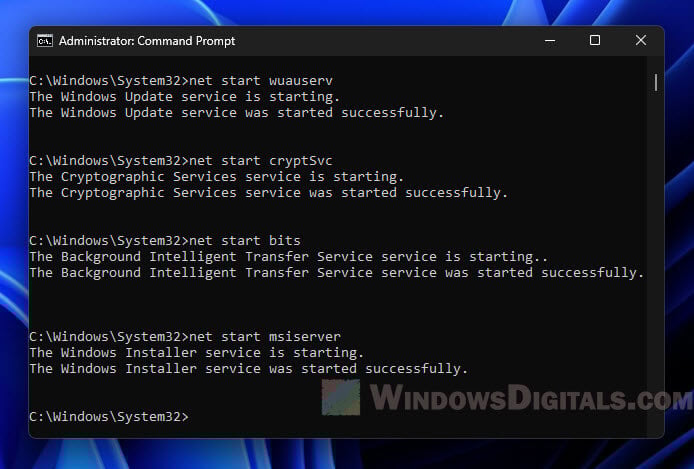
Important: Always restart the Windows Update Service after deleting files, or you might run into problems with Windows Update.
Recommended guide: How to Clean Up AppData Folder in Windows 11
Remove the Prefetch files
Prefetch is a feature in Windows that helps start commonly-used apps faster. But over time, the Prefetch folder might fill up with files that aren’t useful anymore. Cleaning out this folder can help free up some space.
How to delete the Prefetch files
- Press Win + R to open the Run box.
- Type
prefetchand hit Enter. - You might see a permission window. If so, click “Continue”.
- Select all files in the folder by pressing Ctrl + A.
- Right-click and choose “Delete” to remove the files.
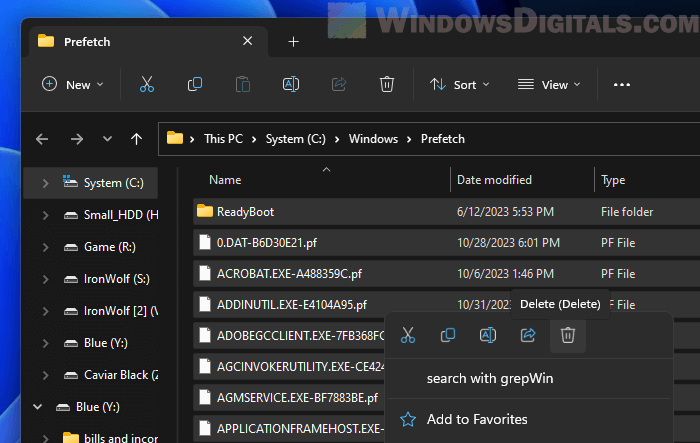
Don’t worry, deleting these files won’t hurt your system or apps. Windows will just make new Prefetch files the next time you use your apps.
Learn more: How to Disable Superfetch and Prefetch in Windows 11 or 10
Delete files on the desktop
The Desktop is a handy place for keeping files you need quick access to. But since these files are on the C: drive, they can take up a lot of space. Over time, you might find a lot of files on your desktop that you don’t need anymore, which not only uses up space but can slow down your computer when starting up.
How to delete files from the desktop
- Close or minimize all open apps to see your desktop clearly.
- Look through the files and folders on your desktop.
- Find the ones you don’t need or use anymore.
- Select these items by clicking on them while holding the
Ctrlkey. - Right-click on the selected items and choose “Delete”.
![]()
Note: Make sure you are not deleting shortcuts to apps unless you want to. Shortcuts usually have a small arrow icon in the lower-left corner of their icons.
Might be useful: How to Delete Pagefile.sys in Windows 11
Old Windows installations
If you’ve upgraded your operating system or installed a major update, Windows often keeps a backup of the old version in a folder called “Windows.old”. This folder is usually right in the root of your C: drive.
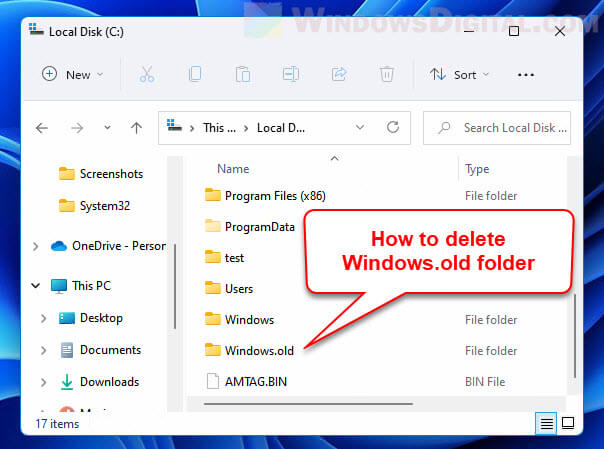
If you try to delete the “Windows.old” folder by just right-clicking and choosing “Delete,” you’ll probably see an error message saying you need permission to do this, even if you’re logged in as an admin. This happens because the folder has important system files from your old Windows installation, and the system doesn’t allow just anyone to delete it to keep things safe.
Linked issue: Delete Windows.Old Folder in Windows 11/10, Access Denied?
How to delete old Windows installations properly
- Open Disk Cleanup by searching for it in the Windows search bar.
- Pick the C: drive and click “OK”.
- After the scan is done, click on “Clean up system files”.
- Again, pick the C: drive and click “OK”.
- Find “Previous Windows installations” in the list.
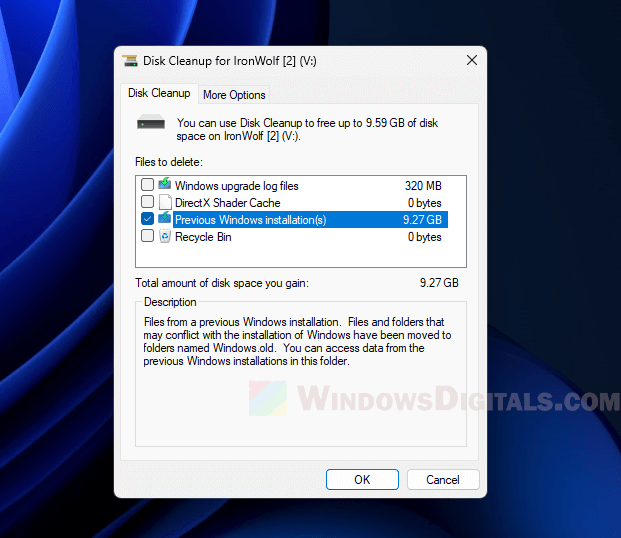
- Tick the box next to it and click “OK”, then click “Delete Files”.
Note: Deleting the “Windows.old” folder means you can’t go back to a previous version of Windows. Make sure you’re happy with your current setup before you do this.
Deleting this folder can usually free up quite a lot of space, sometimes even tens of gigabytes.
User Downloads folder
For most people, the Downloads folder is on the C: drive by default. Specifically, it’s usually under C:\Users\[Your Username]\Downloads. This folder often fills up with things like software installers and media files that you might have downloaded once and forgot about. Since it’s on the C: drive, cleaning this folder can really help free up a lot of space.
How to delete files from the user “Downloads” folder
- Open File Explorer by pressing the
Win + Ekeys together. - Go to
C:\Users\[Your Username]\Downloads(replace[Your Username]with your actual username).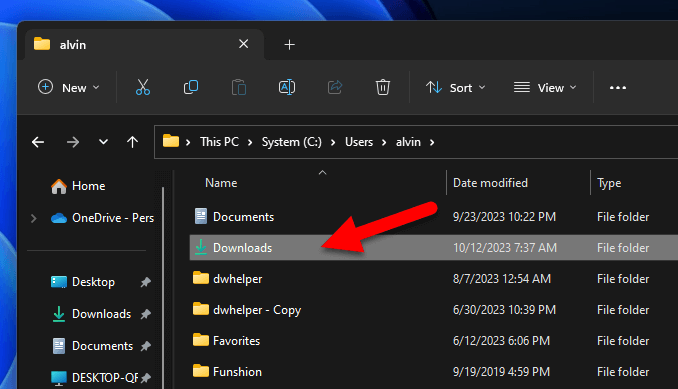
- Look over the files and folders to find the ones you don’t need anymore.
- Select these unnecessary files and folders.
- Right-click and pick “Delete”.
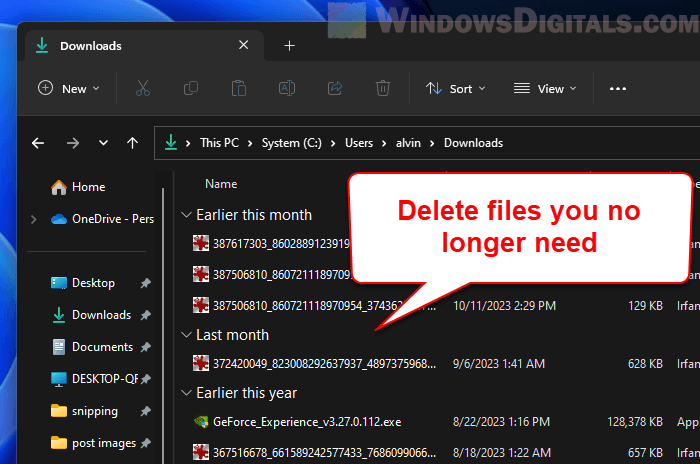
Reminder: Always double-check that you’re not deleting any files you might need later. Be extra careful when removing files from the Downloads folder, especially if you’re not sure what they are.
Checking and cleaning your Downloads folder regularly can make sure it doesn’t turn into a “junk drawer,” storing everything you’ve ever downloaded even though most of them are no longer needed.
Clear the browser cache
Web browsers store temporary internet files like images and scripts on your C: drive to make web pages load faster the next time you visit. This space is called browser cache. While it makes browsing faster, it can take up a lot of space on your C: drive over time.
The good news is you don’t have to dig through the C: drive to find and delete these files. Modern browsers have settings built in to handle this, making it easy to get rid of these cached files without having to look through complex folder structures.
See also: Clear Cache (Memory, Browsers, Temp Files) in Windows 11/10
How to delete browser cache in different browsers
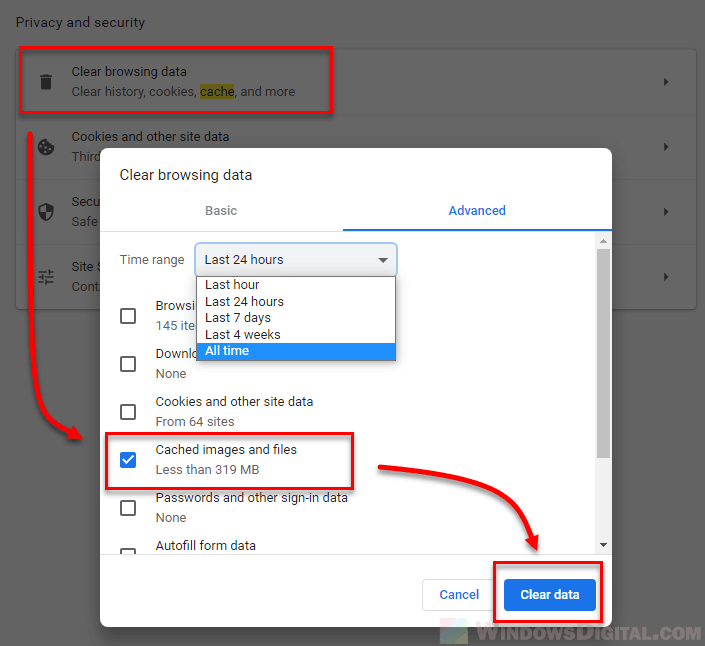
For Google Chrome:
- Open Google Chrome and click on the three vertical dots in the top-right corner to open the menu.
- Go to “Settings”.
- Scroll down and click on “Privacy and security”.
- Click on “Clear browsing data”.
- Tick the box for “Cached images and files” and hit “Clear data”.
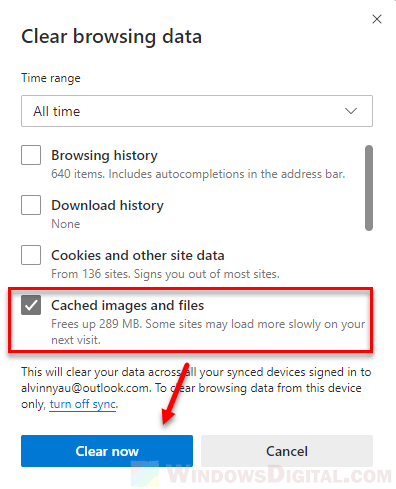
For Microsoft Edge:
- Open Microsoft Edge and click on the three horizontal dots in the top-right corner.
- Click on “Settings”.
- Scroll down to “Privacy, search, and services”.
- Under the “Clear browsing data” section, click “Choose what to clear”.
- Select “Cached images and files” and hit “Clear now”.
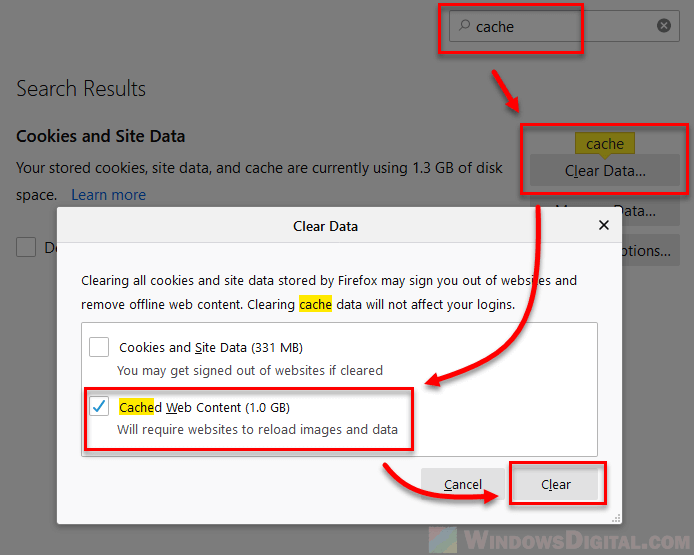
For Firefox:
- Open Firefox and click on the menu button (three horizontal lines) in the top-right corner.
- Click “Settings”.
- Go to the “Privacy & Security” tab.
- Scroll down to the “Cookies and Site Data” section and click “Clear Data”.
- Uncheck “Cookies and Site Data” and keep “Cached Web Content” checked, then hit “Clear”.