uTorrent is one of the most widely used torrent file sharing apps. When it comes to sharing files through torrenting, “seeding” is a common term, referring to continue sharing the files even though you’ve finished downloaded it. Seeding make sure files are always available to other peers later. But sometimes, you might need to stop seeding the files due to different reasons like limited bandwidth. This guide will show you how to disable upload and stop seeding in uTorrent.
Also see: How to Stop Seeding (Disable Upload) in qBittorrent
Note: Please know that sharing is the nature of torrenting and what keeps the community healthy. Stopping seeding might save bandwidth but can hurt the torrent community. Some private torrent groups have rules on seeding to make sure things run fairly for everyone. Think carefully and ethically before you decide to stop seeding (try to at least seed for the amount you’ve downloaded).
Handy guide: How to Know Which App is Using The Internet in Windows 11
Page Contents
What is seeding?
Let’s first talk about what “seeding” means. In torrents, seeding is when you continue to share files you’ve downloaded with other peers who haven’t completed their downloads yet. So, when you download a file using a torrent, say with uTorrent, you’re not getting it from just one place. Instead, you’re picking up little bits of the file from a bunch of people who already have it. These people are “seeding” the file to you.
After you finish downloading, you don’t just take your ball and go home. Your torrent software keeps the door open, letting others pick up pieces of the file from you. This sharing back and forth is what we call seeding and torrenting. By doing this, you’re giving back to the community, making sure the file stays available for everyone, and keeping the whole torrent sharing world healthy.
Useful tip: How to Enable Net Speed Monitor in Windows 11
How to stop sharing and seeding in uTorrent
Decided to stop seeding with uTorrent? Follow these steps, made for uTorrent on Windows.
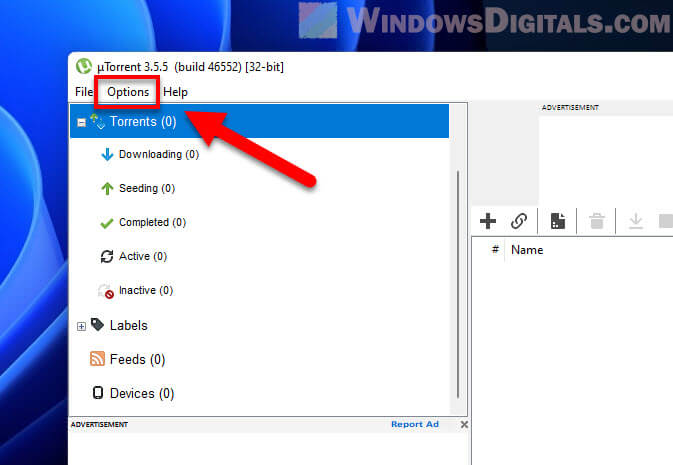
- Start by opening the uTorrent software on your computer.
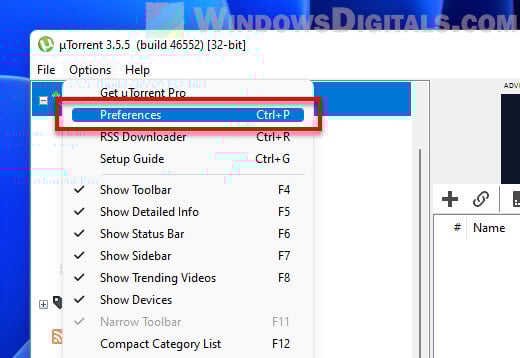
- Look at the top of the uTorrent window for the “Options” tab. Click it to see more choices.
- In the menu that shows up, click “Preferences” to see all the settings you can change.
- In the Preferences window, find “Queuing” on the left. This is where seeding settings are.
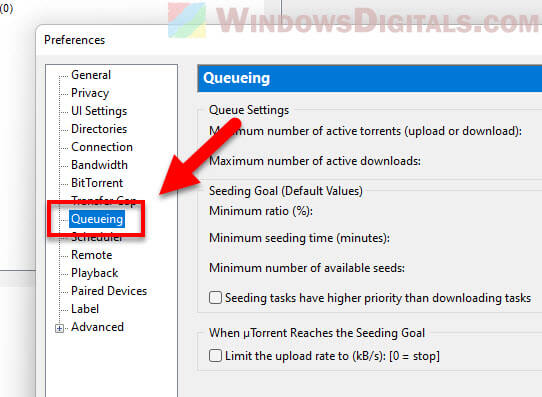
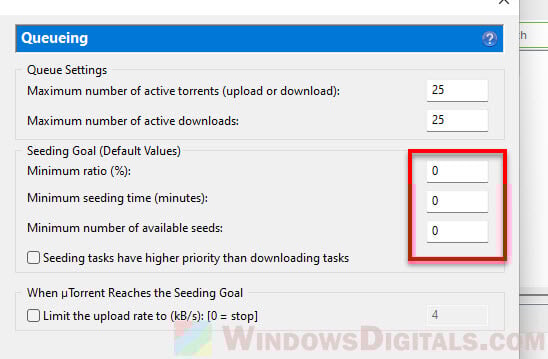
- In “Queuing,” you’ll see options for “Seeding Goal.” Set “Minimum ratio (%),” “Minimum seeding time,” and “Minimum number of available seeds” to zero.
- Go back to the left side and pick “Bandwidth.” Find “Number of upload slots per torrent” and set it to 0. This makes sure no upload slots are open for seeding.
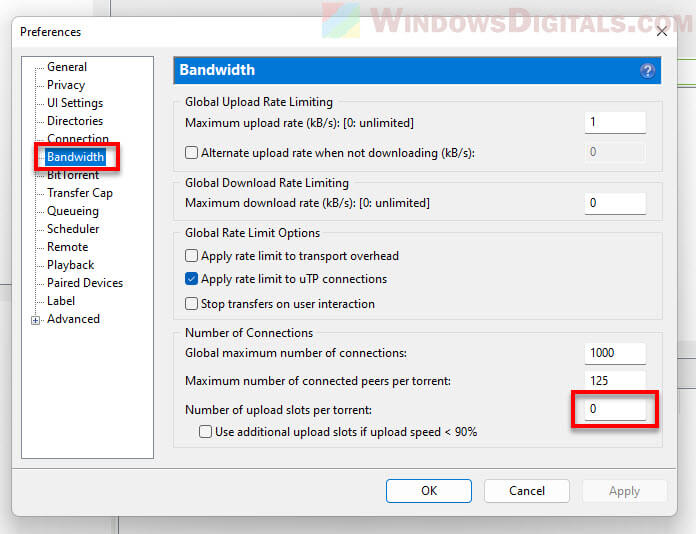
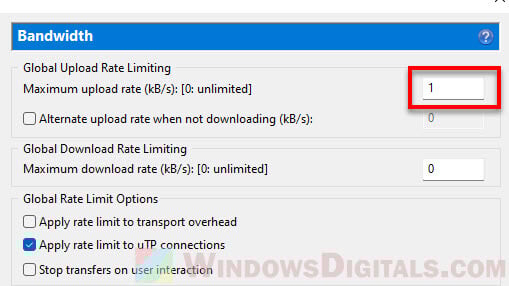
- Still in Bandwidth, you’ll see “Maximum upload rate.” You can set this to “1 kB/s” to really slow down seeding. This way, you’re still helping a tiny bit without sharing too much.
- Don’t forget to save by clicking “Apply,” then “OK” to close the window.
You’ve now stopped your uTorrent from seeding. Your downloads will still work, but you won’t share completed files with others. And again, please consider seeding for at least a while to keep the sharing community healthy.
Related resource: Change Ethernet from 100Mbps to 1Gbps in Windows 11/10
One last thing
This guide showed you how to stop seeding in uTorrent, but please keep in mind that seeding is still very important in torrents. Seeding keeps files available for everyone. If you can, try to share until you’ve uploaded as much as you’ve downloaded (the best practice). This helps keep the torrent community strong.
And, most importantly, always be careful with torrents. Respect copyright, and make sure you’re safe from any online threats.