Many users have run into a problem where Malwarebytes won’t uninstall from Windows 11 or 10. Clicking “Uninstall” seems to do nothing after the User Account Control prompt, the uninstall gets stuck at 5% with a setup error, or the Malwarebytes Service keeps running even after the app is supposedly gone. This guide will walk you through the ways to remove Malwarebytes completely, from the normal uninstall to the last-resort options.
Also see: Windows Cannot Find unins000.exe on Windows 11
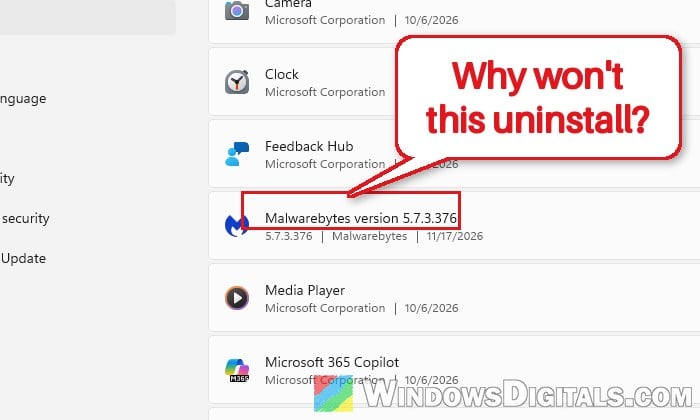
Why won’t Malwarebytes uninstall?
Malwarebytes protects its own files and service, so it’s harder to remove than a normal app. Some common reasons it won’t go are:
- Self-protection: Malwarebytes has a “self-protection module” that’s turned on by default. That’s most likely why deleting its folder or ending its service in Task Manager gives you an “access denied” type of message, even on an admin account.
- A half-removed install: If you deleted the Malwarebytes folder by hand first, the uninstaller is gone too. Windows may stop listing the app while its service still starts with Windows.
- An outdated setup: On Windows on Arm laptops, Malwarebytes has said that installs made with an older setup file can have an uninstaller that Windows refuses to run.
- The uninstaller is still waiting: Malwarebytes’ uninstaller opens in its own window and asks a few questions before it removes anything. If that window sits behind your other windows, it looks like nothing happened.
Start with the normal uninstall and work down the list if it keeps failing.
Uninstall it from Settings and finish every screen
First, close the Malwarebytes window and quit it from the system tray (the icon near the clock, if it’s there). Then run the normal uninstall and make sure you get through all of the uninstaller’s screens. Here’s how to do it:
- Open Settings and go to Apps > Installed apps.
- Find “Malwarebytes version x.x.x.xxx“, click the three dots (…) next to it and select “Uninstall“. Click “Uninstall” again to confirm.
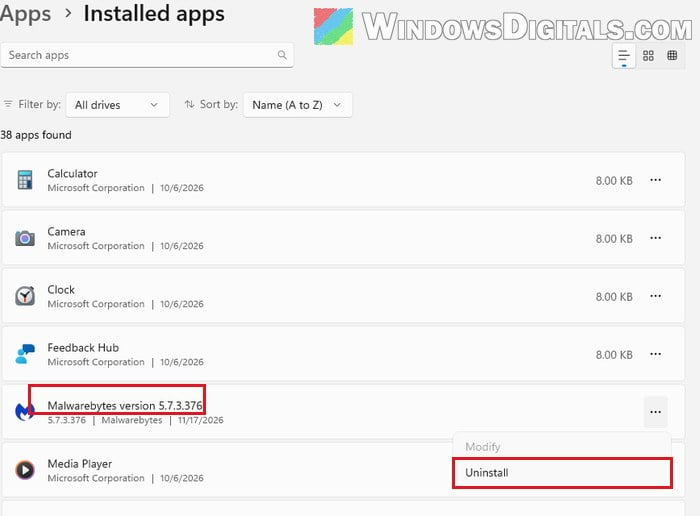
- When User Account Control asks whether to allow “Malwarebytes Setup” to make changes, click “Yes“.
- A “Malwarebytes Uninstaller” window opens (if you don’t see it, check the taskbar). Click “Skip this step” (or pick a reason and continue).
- If you’re on a trial, click “Continue uninstalling“.
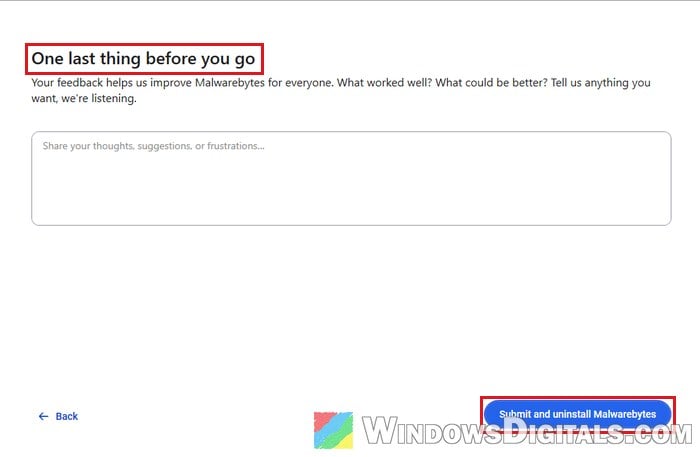
- On the “One last thing before you go” screen, you can leave the feedback box empty and click “Submit and uninstall Malwarebytes“.
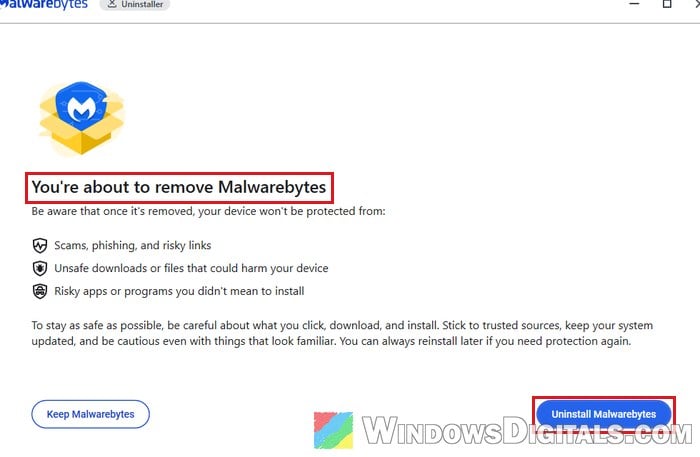
- On “You’re about to remove Malwarebytes“, click “Uninstall Malwarebytes“.
- Wait for “Uninstall complete“, then click “Done“. A “Sorry to see you go” page may open in your browser; just close it.
Once it’s done, Malwarebytes should be gone from Installed apps, and the “Malwarebytes” folder in C:\Program Files should be gone too.
What if Malwarebytes asks for a password?
Malwarebytes has a Tamper Protection feature that locks its settings behind a password you set yourself. You’ll find it in Malwarebytes under Settings (the gear icon) > Protection > Tamper Protection, as the “Limit who can change your Malwarebytes security settings” switch. When we tested it with Malwarebytes 5.7, uninstalling from Settings didn’t ask for that password, but older versions could require one to uninstall. If it does ask, enter that password. Malwarebytes says a forgotten Tamper Protection password can’t be reset from inside the app, so if you’ve forgotten it, contact Malwarebytes Support.
Related concern: McAfee Asks for a Password to Uninstall, Why?
Reinstall the latest version, then uninstall it
If the uninstall does nothing, stalls or throws an error, the existing install is probably broken or was made with an old setup file. Installing the current version over it and then uninstalling again is what Malwarebytes recommends for an install made with an old setup file, and it can help with other stuck uninstalls too. A fresh install should put a working uninstaller back in place. Here’s what to do:
- Download the free version from Malwarebytes’ official website,
https://www.malwarebytes.com/. Don’t use a download site. - Run the setup file and let it install over your current copy.
- Restart your PC if the setup asks you to.
- Uninstall it again from Settings > Apps > Installed apps, as in the section above.
Once it finishes, check that Malwarebytes is gone from Installed apps and that its folder in C:\Program Files is gone too.
Remove it with the Malwarebytes Support Tool
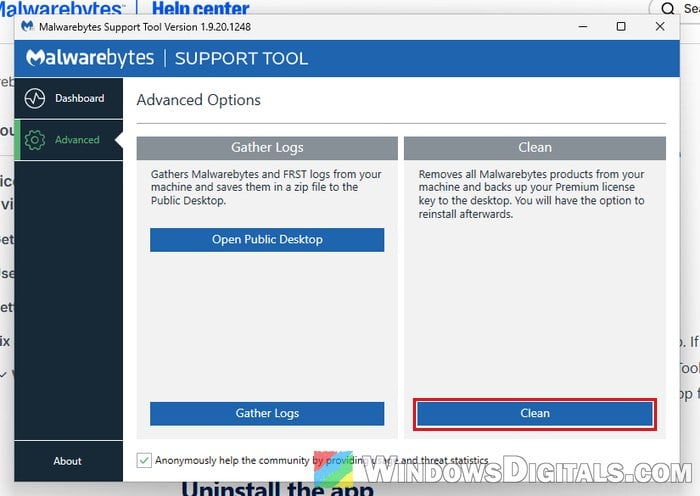
When the normal uninstaller keeps failing, or you want to be sure nothing is left behind, use the Malwarebytes Support Tool. It’s Malwarebytes’ own free cleanup tool, and its “Clean” option removes every Malwarebytes product from the PC. It needs Microsoft .NET Framework 4.8; if that’s missing, the tool tells you and offers to open Microsoft’s download page. Here’s how to use it:
- Go to Malwarebytes’ help article on uninstalling with the Support Tool,
https://help.malwarebytes.com/hc/en-us/articles/31589460358811-Uninstall-and-reinstall-Malwarebytes-for-Windows-with-the-Support-Tool, and click the “Support Tool” link to download it. - Open the mb-support-x.x.x.xxx.exe file from your Downloads folder and click “Yes” on the User Account Control prompt.
- Tick “Accept License Agreement” and click “Next“.
- In the Support Tool, click “Advanced” in the left menu, then click “Clean“.
- Click “Yes” when it asks whether you want to remove all Malwarebytes products.
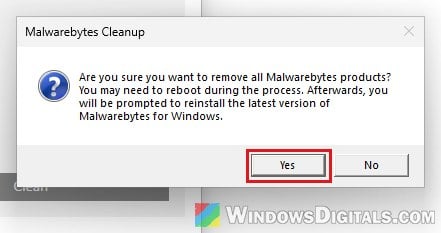
- If it asks you to restart, click “OK“. After the restart, the Support Tool opens by itself to finish the cleanup; click “Yes” when it asks.
- At the end, it asks whether you want to reinstall the latest version of Malwarebytes. Click “No” if you only want it gone.
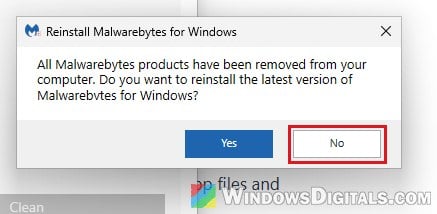
The Support Tool also saves a small results file on your desktop, plus a backup of your Premium license key if you had one, so you can activate it again later. Don’t choose “Repair” in the Support Tool instead of Clean: Repair removes Malwarebytes and then installs it again with your settings kept.
Once it’s done, Malwarebytes should be gone from Installed apps, along with its folder in C:\Program Files.
Might be useful: Can’t Completely Uninstall a Driver in Windows 11 (Fix)
Run the uninstaller from its folder
If the Support Tool won’t run and Settings still does nothing, you can start Malwarebytes’ uninstaller directly. This can help when Windows won’t launch it the normal way. Here’s how to do it:
- Open File Explorer and go to:
C:\Program Files\Malwarebytes\Anti-Malware
- Right-click mb5uns.exe and select “Run as administrator“. If that one won’t start, try mbuns.exe in the same folder.
- Go through the uninstaller’s screens as described in the first section, then check Installed apps again.
Uninstall it in Safe Mode
In Safe Mode, Windows starts only the basic drivers and services, so Malwarebytes’ service and self-protection usually don’t load, which can let the uninstaller run. Use Safe Mode with Networking if you still need to download the Support Tool. For the steps, see how to enter Safe Mode in Windows 11 or 10.
Once you’re in Safe Mode, uninstall Malwarebytes from Settings > Apps > Installed apps or run the Support Tool’s Clean option, then restart normally.
Linked issue: Windows 11 Keeps Booting in Safe Mode (Fix)
Use a third-party uninstaller as a last resort
Several people on Reddit recommend Revo Uninstaller for a Malwarebytes install that won’t go away. Try it only after the Support Tool, which Malwarebytes makes for its own products. Restart your PC when it’s done.
Make sure Microsoft Defender is back on
If Malwarebytes was acting as your antivirus, Microsoft Defender Antivirus should turn itself back on once it’s removed. To check, open Windows Security > Virus & threat protection and make sure real-time protection is on with no warnings.
If you also added the Browser Guard extension, it lives in your browser, so remove it from the browser’s extensions page as well.