Say you’re in the middle of a VALORANT or League of Legends match, or just browsing with no game open at all, when your PC suddenly crashes to a blue screen that says “What failed: vgk.sys“. The stop code can be SYSTEM_SERVICE_EXCEPTION, KMODE_EXCEPTION_NOT_HANDLED or a few others, and for some people it keeps coming back even after a clean reinstall of Windows. This guide will explain what vgk.sys is, why it crashes, and what you can do to stop it.
Also see: Windows 11/10 Computer Blue Screen When Idle (Fix)

What is vgk.sys and why does it crash your PC?
vgk.sys is the kernel driver of Riot Vanguard, the anti-cheat used by VALORANT, League of Legends, Teamfight Tactics and 2XKO. Vanguard is an “on-boot” application, so its driver starts with Windows, not with the game. That’s why the blue screen can happen while you’re idle, even with the Riot Client closed.
The stop code varies (0x3B, 0x1E, 0x7E, 0x50 and 0x1A have all been reported), but the file named on the blue screen isn’t always the real cause. A kernel anti-cheat driver is very sensitive to anything unstable, so a PC that’s fine in every other game can still crash inside vgk.sys. Common reasons are:
- A broken Vanguard install or a problem with Vanguard’s own driver.
- An old motherboard BIOS, sometimes years out of date.
- An unstable Intel 13th or 14th Gen CPU (Core i7 and i9 especially). Most of the reports on Reddit come from these processors, though Ryzen PCs get it too.
- Unstable RAM or an overclock, including XMP or EXPO memory profiles.
- Other software that loads its own drivers, like RGB tools, virtual audio apps, VPNs or another anti-cheat.
Try the fixes below in order, from Vanguard itself to the hardware.
Related problem: Kmode_Exception_Not_Handled on Windows 11 or 10 (Fix)
Reinstall Riot Vanguard (and test without it)
Reinstalling Vanguard fixes a broken install, and it’s also a useful test. If the crashes stop while Vanguard is gone, Vanguard is part of the problem. If they keep happening without it, look at the BIOS, CPU and RAM sections below.
Here’s how to uninstall it, using Riot’s own steps:
- Close any Riot game, then right-click the Riot Client icon in the system tray and select “Exit“.
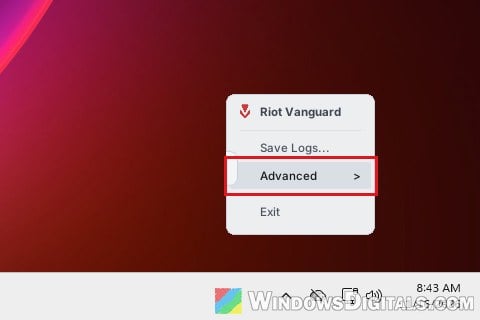
- Right-click the red Riot Vanguard icon in the system tray, select “Advanced“, then “Uninstall Vanguard“, and follow the prompts.
- Or, from Settings: press Win, search for “Add or remove programs” and open it. Find Riot Vanguard in the list, click the “…” button next to it and select “Uninstall“.
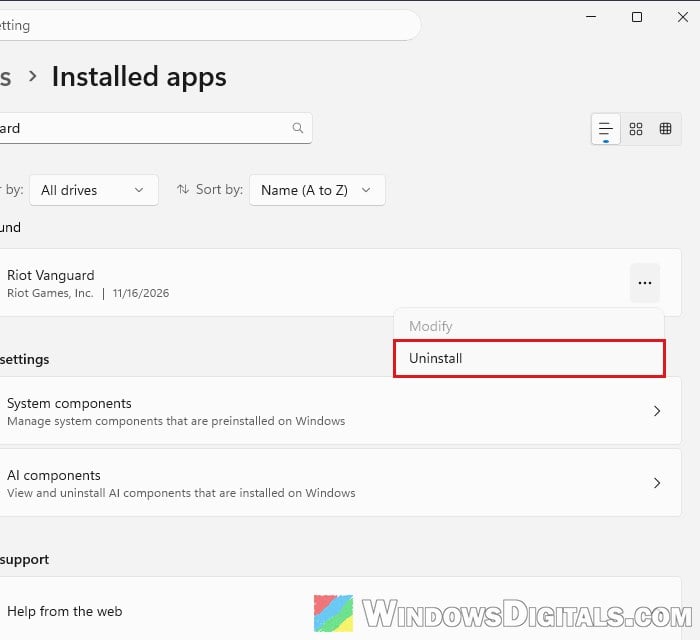
- Or, from Settings: press Win, search for “Add or remove programs” and open it. Find Riot Vanguard in the list, click the “…” button next to it and select “Uninstall“.
- Restart your PC. Vanguard is fully removed if its icon doesn’t come back in the system tray after the restart.
- Use the PC normally for a few days, without opening the Riot Client or any Riot game.
Then open the Riot Client again. Vanguard reinstalls itself and asks you to restart.
If Vanguard won’t uninstall (or crashes while uninstalling)
Riot has a manual way that deletes Vanguard’s two services directly:
- Close all Riot software. If something won’t close, press Ctrl + Shift + Esc to open Task Manager, select it and click “End task“.
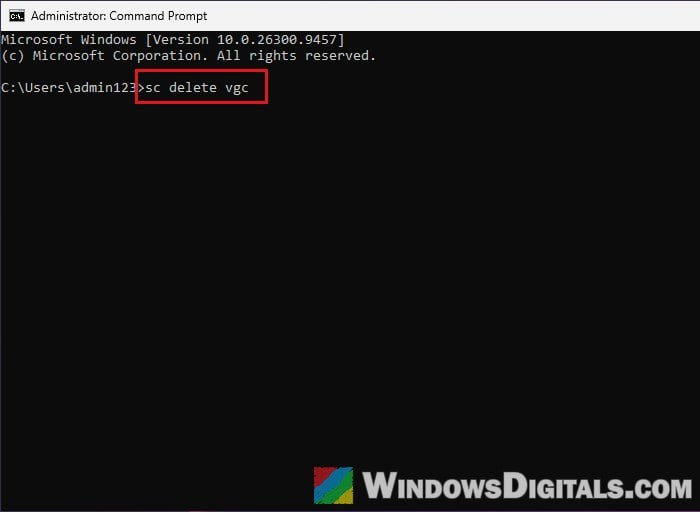
- Search for “cmd” in Start, right-click Command Prompt and select “Run as administrator“.
- Type the following commands one by one, and press Enter after each:
sc delete vgc
sc delete vgk
- Restart your computer.
- Open File Explorer, go to
C:\Program Filesand delete what’s left in the Riot Vanguard folder.
Update your motherboard BIOS
A BIOS update is one of the fixes that worked most often for vgk.sys crashes. Riot’s own guide for this error on Intel 13th and 14th Gen PCs says to update the BIOS before any other step. On older AMD boards too, a BIOS update is what fixed it for many people, often when nothing else did.
First, check which BIOS version you have:
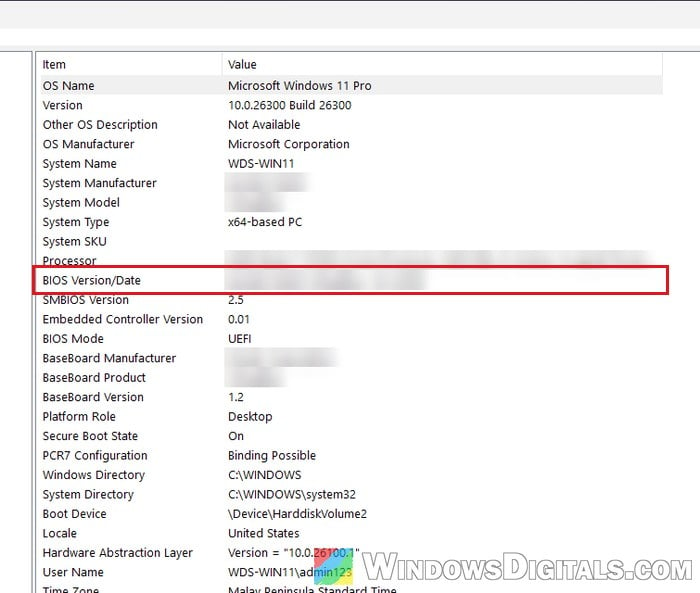
- Press Win + R, type “msinfo32” and press Enter.
- Look at the “BIOS Version/Date” row.
Then compare it with the latest one on your motherboard (or laptop) maker’s support page for your exact model, and if there’s a newer one, follow the maker’s instructions to install it. After that, use the PC as usual and see if the blue screens come back.
Be warned: If the power goes out or something goes wrong during a BIOS update, it can brick your motherboard. Keep a laptop plugged in, and if you’re not sure what you’re doing, get someone to help you instead. Also have your BitLocker recovery key ready, as Windows may ask for it after the update.
Related concern: Windows 11 Not Activated After BIOS Update
On an Intel 13th or 14th Gen CPU, use Intel’s default settings
Intel’s 13th and 14th Gen desktop processors have a known instability problem. Intel’s fix is the 0x12F microcode (from a BIOS update) plus Intel’s default settings instead of the board’s boosted ones.
After updating the BIOS, here’s what to do, based on Riot’s guide:
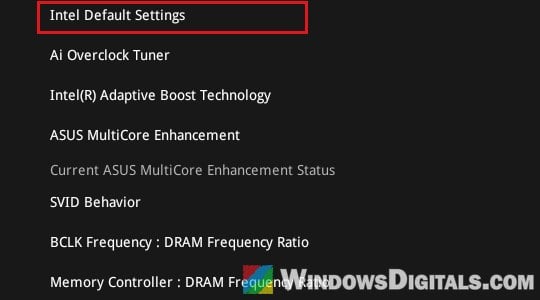
- Enter the BIOS and load your board maker’s Intel default profile. The name depends on the brand: “Intel Default Settings” on MSI, “Intel Baseline Profile” on ASUS, and “Intel BaseLine” on Gigabyte. On newer ASUS BIOS versions, it’s under Ai Tweaker > Performance Preferences > Intel Default Settings.
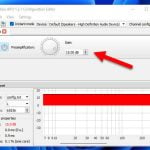
- If it still crashes, install Intel Extreme Tuning Utility (XTU) and lower the “Performance Core multiplier” by one or two steps (Riot’s example is x55 down to x54 or x53). Save the profile so the change stays.
- Then turn off any overclocking and enhanced modes like “ASUS MultiCore Enhancement” (set it to “Disabled“, not Auto).
You might still get one more crash after these changes. If the crashes keep coming at default settings, the CPU may be damaged, and Intel’s extended warranty still covers these desktop processors.
Linked issue: Apps and Games Keep Crashing (0xc0000005) on Intel 13th or 14th Gen CPU
Turn off XMP or EXPO and test your RAM
As mentioned above, vgk.sys has no patience for unstable hardware, and RAM is a common weak spot. A RAM profile like XMP (Intel) or EXPO (AMD) runs your memory faster than its default speed. Your other games may run fine with it, but vgk.sys might not.
Enter the BIOS, turn off XMP or EXPO, remove any CPU overclock or undervolt you set yourself, and see if the crashes stop. Then test the RAM with Windows’ own tool:
- Search for “Windows Memory Diagnostic” in Start and open it.
- Click “Restart now and check for problems (recommended)“. Your PC restarts and runs the test.
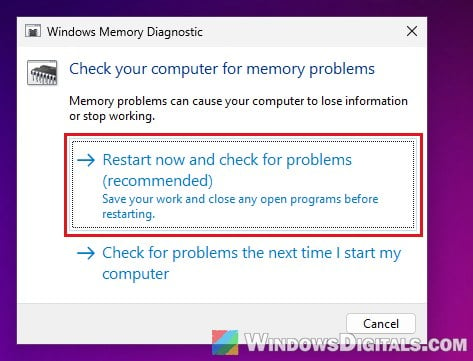
Even if it passes, try one stick at a time if you have two or more. If it crashes with one but not the other, that stick is likely faulty.
Might be useful: How to See Windows Memory Diagnostic Results in Windows 11
Remove apps that load their own drivers
It can also be a conflict with another program that runs its own driver. Apps that do this include RGB and peripheral software (like iCUE or Armoury Crate), virtual audio apps (like Voicemod or VB-Cable), VPNs, and other anti-cheats like FACEIT.
Uninstall the ones you can live without, restart, and see if the crashes stop. If they do, put them back one by one to find the culprit.
Still crashing? Contact Riot or check the hardware
If nothing above helped, open a ticket with Riot Support and include your stop codes, CPU, motherboard, BIOS version and everything you’ve already tried.
If crashes continue at default settings, even after a clean install of Windows, a faulty CPU or RAM stick is a real possibility. If your PC or laptop is still under warranty, contact the manufacturer and let them check it.