If you’ve turned on TPM 2.0 in your BIOS but Device Manager shows no Trusted Platform Module 2.0 under Security devices, and tpm.msc says “Compatible TPM cannot be found“, you’re not the only one. It’s a pretty common issue now that games like Battlefield 6, Call of Duty: Black Ops 7 and Valorant need TPM 2.0 for their anti-cheat. This guide will show you why Windows 11 or 10 can miss it and how to make it show up.
Also see: Can’t find TPM 2.0 and Secure Boot options in BIOS
Page Contents
First, check what Windows actually sees
Before changing anything, check whether Windows can’t see the TPM at all or sees it with an error. The fixes are different for each:
- Press Win + R, type
tpm.mscand press Enter. “Compatible TPM cannot be found” means Windows doesn’t see the TPM at all. A working TPM shows its Status and TPM Manufacturer Information instead.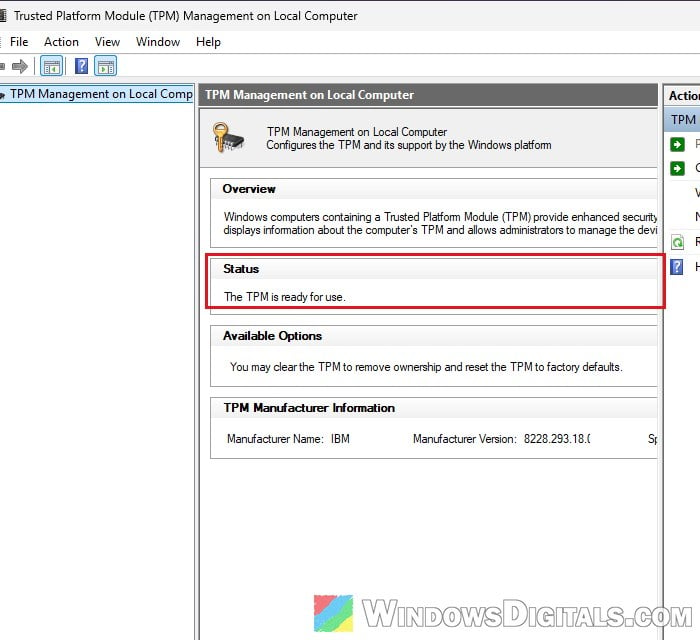
- Press Win + R, type
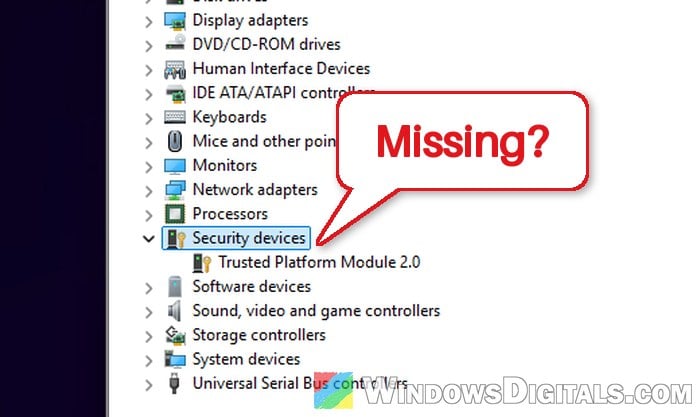
devmgmt.mscto open Device Manager, and expand Security devices. A working TPM is listed as Trusted Platform Module 2.0.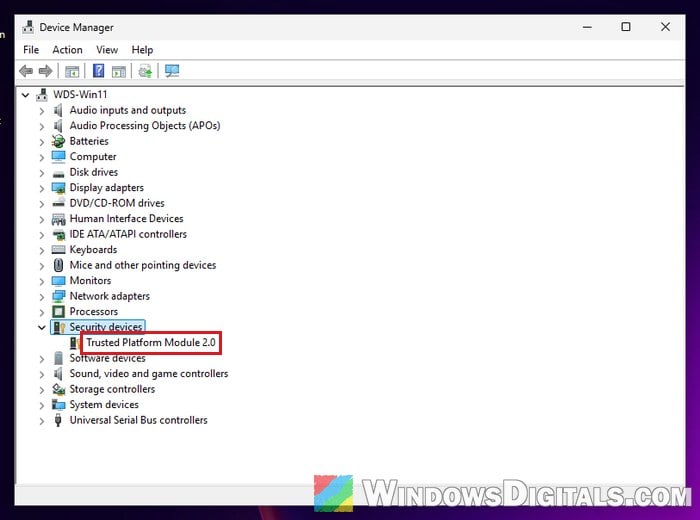
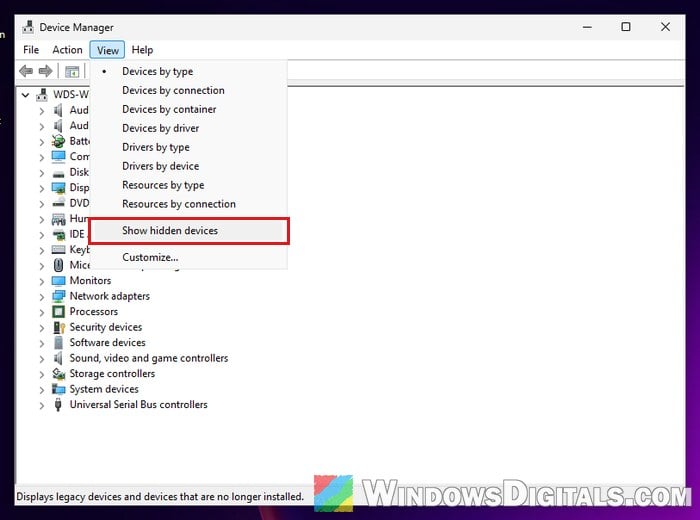
- If it isn’t there, click View > Show hidden devices and check again.
If the TPM isn’t listed at all, the cause is usually a BIOS setting (see the next sections). If it’s listed with a Code 10 error or only as a hidden device, skip to the Code 10 section below.
Make sure your PC boots in UEFI mode, not Legacy or CSM
This is the fix users confirm most often. According to Microsoft, TPM 2.0 isn’t supported in Legacy or CSM mode: the PC has to boot in native UEFI mode, with the Legacy and CSM (Compatibility Support Module) options turned off.
Users on Reddit and Microsoft Q&A reported that their TPM only showed up after turning off CSM Support. This could also be why the problem started after a fresh install. If CSM was on at the time, Windows may have installed in legacy mode.
First, check which mode Windows is running in:
- Press Win + R, type
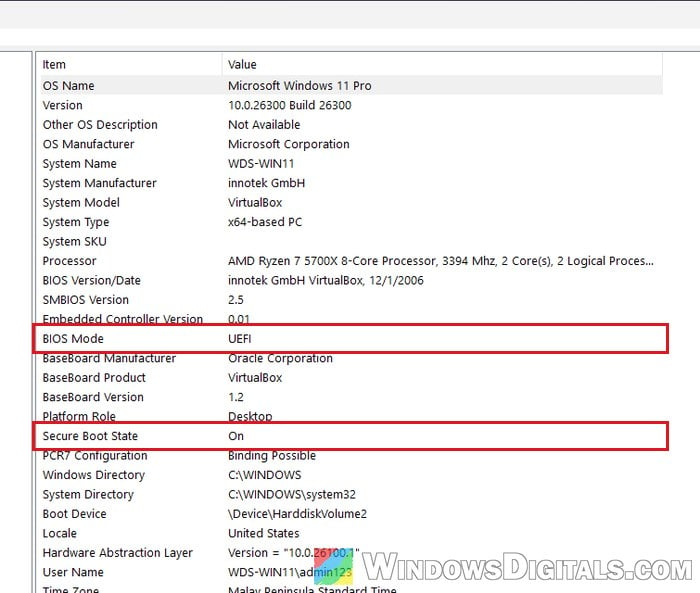
msinfo32and press Enter. - Look at BIOS Mode. It should say UEFI.
- Check Secure Boot State too. Games like Battlefield 6 and Black Ops 7 need Secure Boot on as well.
Be warned: If BIOS Mode says Legacy, Windows is on an MBR disk and won’t boot after you switch to UEFI unless you first convert the disk to GPT with Microsoft’s MBR2GPT tool. Back up your files first, and if you’re not sure what you’re doing, get someone to help you instead.
For detailed instructions on how to convert the disk, read: MBR2GPT “Cannot find OS partition(s) for disk 0” in Windows 11 or 10.
Once BIOS Mode says UEFI, turn off CSM in the BIOS:
- Restart the PC and enter the BIOS (UEFI) setup.
- Find CSM Support and set it to Disabled. On Gigabyte boards it’s under the BIOS tab; elsewhere, try the BIOS search.
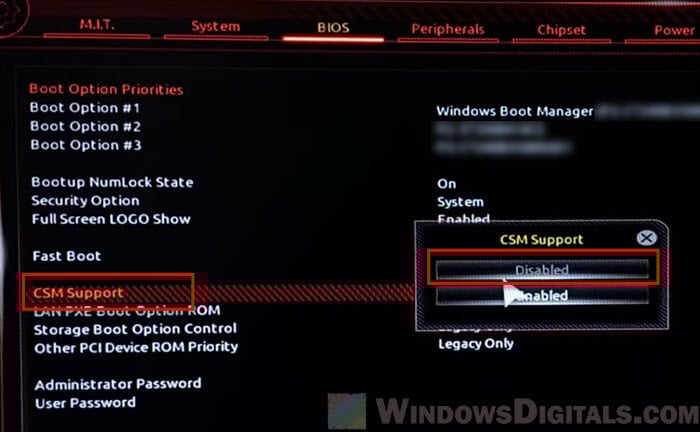
- Turn on Secure Boot while you’re there, then save your changes and exit.
Then open tpm.msc again and see if the TPM is found.
Related guide: Enabling TPM 2.0 and Secure Boot on Gigabyte Mobo
Check that the right TPM is selected in the BIOS
The TPM setting can be called Security Device Support, TPM State, AMD fTPM switch, AMD PSP fTPM or Intel PTT (Intel Platform Trust Technology), usually under Advanced, Security or Trusted Computing. Even when it’s set to enabled, the board might be using the wrong TPM.
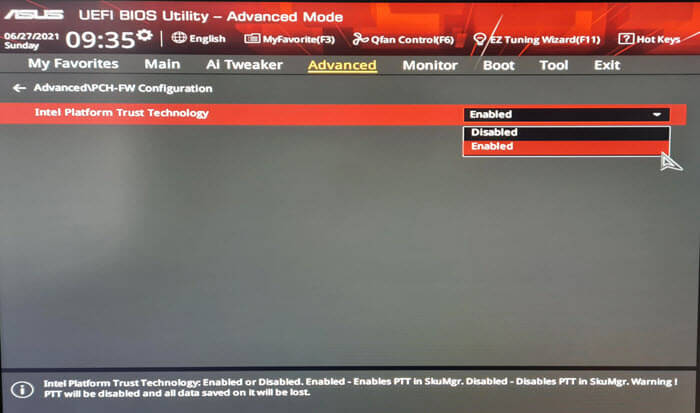
Some boards have a second setting that picks which TPM to use:
- Firmware TPM or discrete TPM: Boards with a header for a plug-in TPM module let you choose between the built-in firmware TPM and a separate plug-in module (a discrete TPM). On ASUS boards, it’s the TPM Device Selection option. Without a TPM module installed, it has to be on the firmware TPM.
- TPM 1.2, TPM 2.0 or Auto: One Reddit user with a Gigabyte Intel board found this on Auto, which left Windows with TPM 1.2. Setting it to TPM 2.0 fixed it.
Once you’ve picked one, leave it that way. Microsoft says Windows might not detect a TPM properly after you switch between them. Save, restart and check tpm.msc again.
Pro tip: How to Enable TPM 2.0 and Secure Boot on ASRock
Turn the TPM off and back on in the BIOS
Yes, it might sound a bit silly, but turning the TPM off and on again can get it working. On Ryzen PCs, after a CPU swap or a BIOS reset, a startup message may also say the fTPM/PSP NV is corrupted and offer to reset it. One answer on Microsoft Q&A says to go ahead and reset it.
Please be warned that resetting the fTPM wipes it like clearing it does, so turn off BitLocker or device encryption first (or have your recovery key).
Here’s how to do it:
- In the BIOS, set the TPM option (for example AMD fTPM switch or Security Device Support) to Disabled, then save and restart.
- Enter the BIOS again, set it back to Enabled, then save and restart. If asked whether to reset the fTPM, confirm with the key it shows.
Back in Windows, check Device Manager for Trusted Platform Module 2.0.
TPM shows a Code 10 error or is hidden in Device Manager
A Code 10 error means Windows sees the TPM but can’t start it. A TPM that only appears with hidden devices shown isn’t active either. In both cases, try removing the device so Windows sets it up again:
- In Device Manager, right-click Trusted Platform Module 2.0 under Security devices, select Uninstall device and confirm.
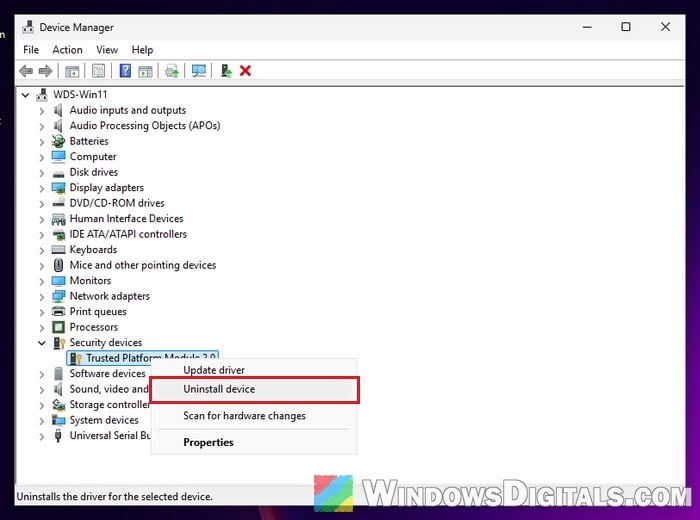
- Restart your PC. Windows reinstalls the TPM by itself. Then check whether the Code 10 error is gone.
Microsoft also notes that a TPM driver that isn’t from Microsoft can stop Windows’ own TPM driver from loading. If you installed a TPM driver that isn’t Microsoft’s, uninstall it and let Windows use its own.
Clear the TPM from Windows Security
If the TPM is found but still doesn’t work right, Microsoft’s own troubleshooting step is to clear it, which resets it to its default settings.
Warning: Clearing the TPM deletes every key stored in it and anything protected by them, such as your Windows Hello PIN. If you use BitLocker or device encryption, save your recovery key first. Don’t do this on a work or school PC unless your IT admin says so. If you’re not sure, get someone to help you.
To clear it, follow the steps below:
- Open Windows Security and select Device security.
- Click Security processor details, then Security processor troubleshooting.
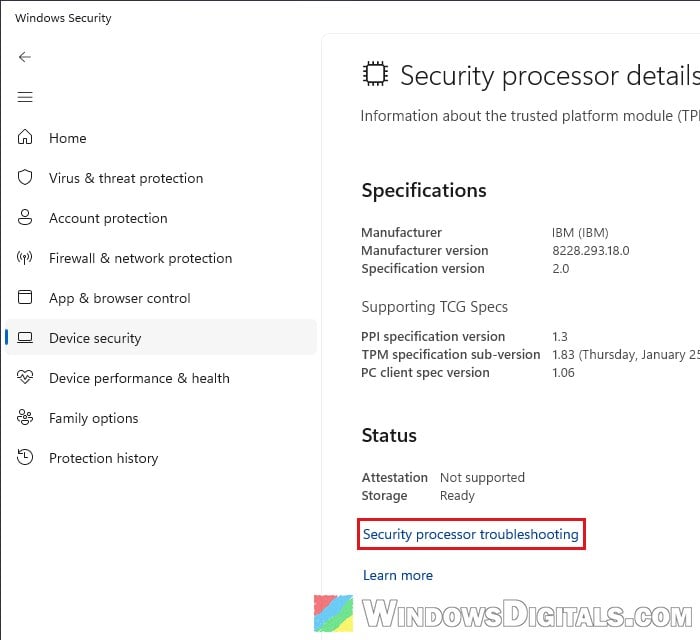
- Pick a reason from the Select menu, which turns on the Clear TPM button.
- Click Clear TPM and follow the prompt to restart. You might be asked to press a key to confirm.
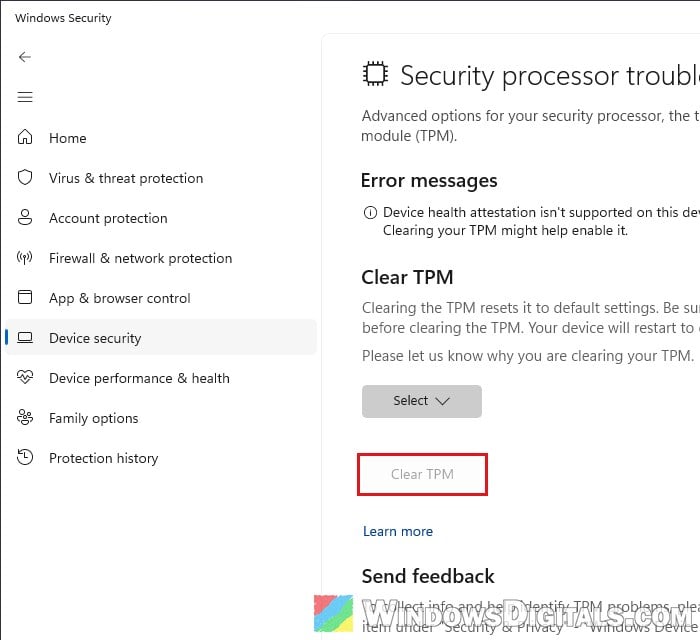
Once Windows starts, it sets up the TPM by itself. You’ll need to set up your Windows Hello PIN again too.
Related concern: “The dictionary attack mitigation is triggered” Windows Hello PIN Error
Update the BIOS (and check the settings again after)
If nothing else worked, check your motherboard or laptop maker’s website for a newer BIOS. In one Reddit thread, a commenter noted that the newest BIOS for the poster’s board included a TPM update. Just be careful when updating your BIOS: an interrupted update can brick your motherboard, so follow your manufacturer’s instructions exactly.
An update can also reset your settings to their defaults, so check the TPM, CSM and Secure Boot settings again afterward. If the TPM still doesn’t show up, contact your PC or motherboard maker, especially if it’s under warranty.