Turning on TPM 2.0 (Trusted Platform Module) and Secure Boot on an ASRock motherboard is very important for today’s computers, especially if you like gaming or care a lot about security. TPM 2.0 provides security features built into the hardware to protect your important data. Secure Boot stops unapproved software from starting up on your computer, which makes it even safer. These security steps are getting more important, like in games such as Riot’s Valorant, which won’t start unless TPM 2.0 and Secure Boot are active.
Also see: Enabling TPM 2.0 and Secure Boot on Gigabyte Mobo

Page Contents
Knowing BIOS and UEFI firmware
Before we explain how to turn on TPM 2.0 and Secure Boot, you need to know about BIOS (Basic Input/Output System) and UEFI (Unified Extensible Firmware Interface) firmware. Most modern ASRock motherboards use UEFI firmware. It’s a newer version of the old BIOS and it’s generally much easier to use.
UEFI lets you use bigger hard drives, starts up your computer faster, and has better security features, including TPM and Secure Boot. We’ll use the UEFI settings to turn these features on. Next, we’ll start by showing you how to get into the UEFI settings on your ASRock motherboard.
Related resource: Can’t find TPM 2.0 and Secure Boot options in BIOS?
Step 1: Go into the UEFI settings on ASRock motherboard
The first step to enable TPM 2.0 and Secure Boot on an ASRock motherboard is to get into the UEFI (Unified Extensible Firmware Interface). The UEFI is a type of firmware that lets you adjust settings for your computer’s hardware.
- Start by restarting your computer. As it boots up, you need to enter the UEFI settings. You usually do this by pressing a certain key while the computer is starting.
- Watch the screen closely when your computer starts. Most ASRock motherboards tell you to press the F2 or Del key to get into the UEFI settings. Do this before your operating system begins to load. If you miss it, just restart your computer and try again.
- Once in the UEFI settings, you’ll see a graphical interface, which is different from the old text-based BIOS screens. Use your keyboard (and sometimes your mouse) to go through the menus.
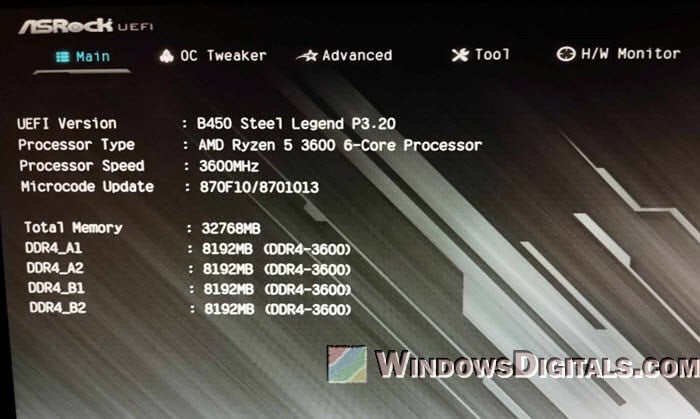
The UEFI interface might look a bit different depending on your ASRock motherboard model and firmware version. If you meet a problem or just don’t know how to get into the interface, check your motherboard’s manual for specific instructions for your model.
Pro tip: How to Allocate More RAM to a Game in Windows 11 or 10
Step 2: Enable TPM 2.0 on ASRock motherboard
After you get into the UEFI settings, the next step is to just turn on TPM 2.0. TPM (Trusted Platform Module) is a security feature that helps with secure booting, disk encryption, and more. The following are the steps to enable TPM 2.0 on your ASRock motherboard.
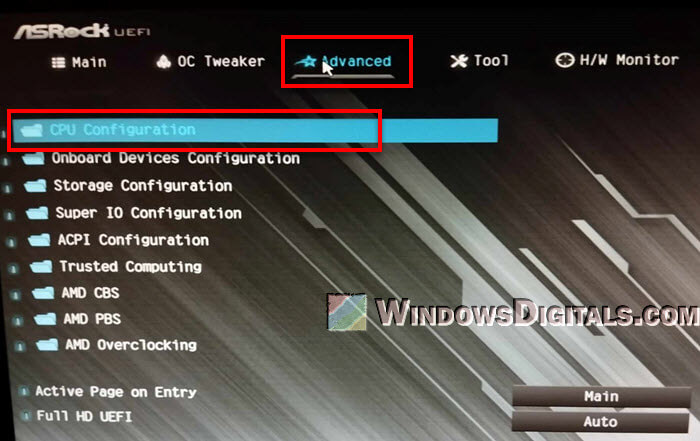
- Inside the UEFI interface, go to the Advanced tab or section. Here, you’ll find different settings to configure.
- Click on the CPU Configuration settings. The exact location and name might vary, so check your motherboard’s manual if you’re not sure.
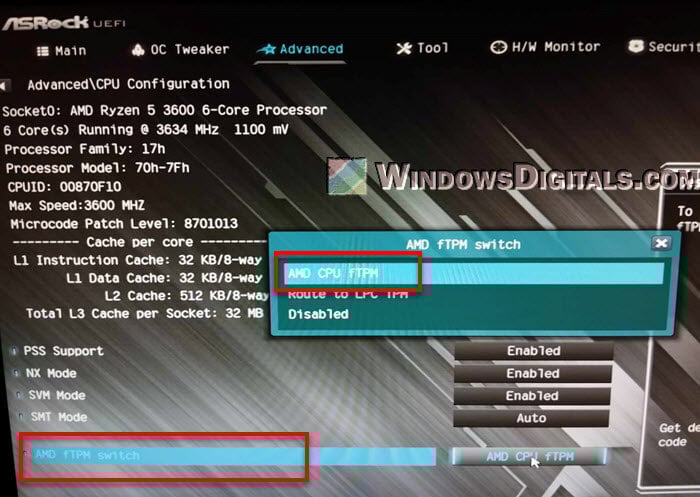
- Look for an option like AMD fTPM (Firmware TPM for AMD CPUs), TPM 2.0, TPM State, or Intel PTT (Platform Trust Technology for Intel CPUs). Choose this option and change it to “AMD CPU fTPM” or just “Enabled“.
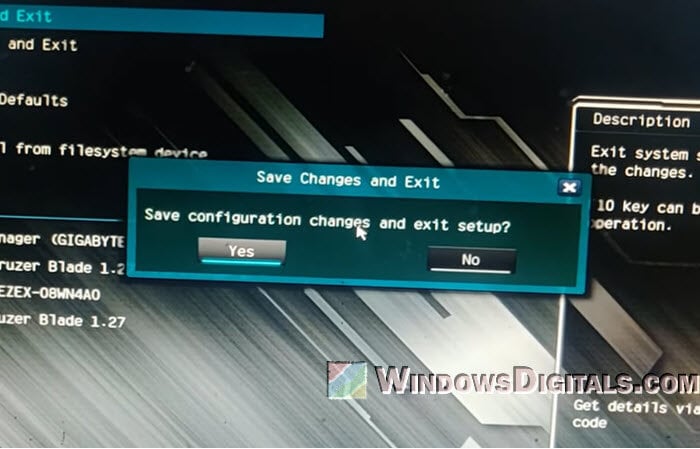
- After turning on TPM, don’t forget to save the changes. This is usually done by pressing F10 or going to the Exit tab and choosing Save Changes and Exit. Your computer will restart for the changes to take effect.
Know that enabling TPM might need a firmware update first, especially on older motherboards. If TPM 2.0 isn’t available or working on your ASRock motherboard, check the manufacturer’s website for a firmware update that could add or fix this feature.
Useful guide: Using Onboard Graphics And Graphics Card Simultaneously
Step 3: Enable Secure Boot on ASRock motherboard
After turning on TPM 2.0, the next step is to enable Secure Boot. Secure Boot is just a UEFI feature that makes sure your PC starts up only with firmware that the manufacturer trusts. This is quite important for stopping harmful software from messing with the boot process. Below is how you can turn on Secure Boot on your ASRock motherboard.
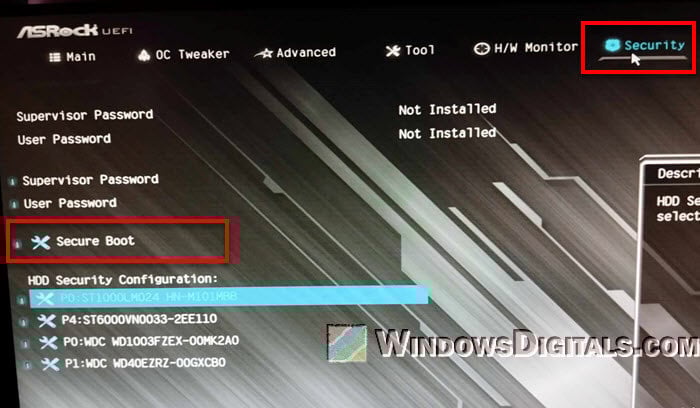
- In the UEFI settings, find the Security tab or section. This is where you’ll find Secure Boot settings.
- In the Security options, locate the Secure Boot setting and select it.
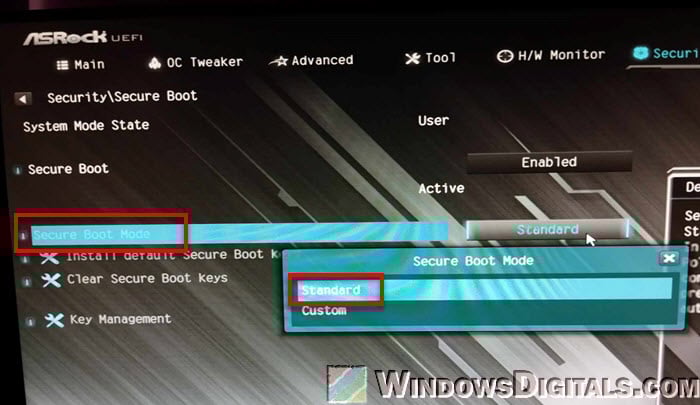
- There, before you can change the settings for “Secure Boot”, you need to set the “Secure Boot Mode” to “Standard“.
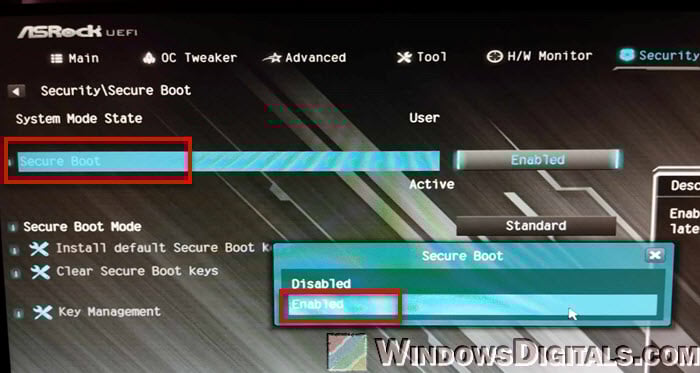
- Then, change the Secure Boot setting from “Disabled” to “Enabled“. In some rare cases, you might need to set the OS Type to Windows UEFI mode or something similar to fully turn on Secure Boot functionality.
- Like with the TPM setting, make sure to save your changes. Press F10 or go to the Exit tab and pick Save Changes and Exit. Your computer will restart with Secure Boot turned on.
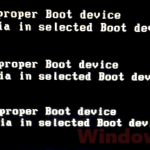
Please note, turning on Secure Boot might cause problems with starting operating systems that don’t follow UEFI rules or with bootloaders that aren’t seen as secure. If you have a dual-boot system or use an older operating system, make sure everything is compatible before turning on Secure Boot.
Linked issue: Windows 11 Not Activated After BIOS Update
Some common issues you might encounter
Update UEFI firmware
If you can’t see the TPM 2.0 or Secure Boot options in your UEFI settings, your motherboard’s firmware might need an update. Go to the ASRock website, find your motherboard model, and download the latest UEFI firmware. Updating can fix many compatibility issues.
Compatibility mode
Some systems might need you to switch from Legacy to UEFI boot mode to turn on Secure Boot. You usually find this option under the Boot tab in the UEFI settings.
Operating system issues
If your operating system doesn’t start after you change these settings, it might not work well with Secure Boot or UEFI mode. Windows 10 and newer versions usually work fine, but older versions or some Linux setups might have problems.
Reset UEFI settings when needed
If you can’t start your computer after making changes, most motherboards let you reset the UEFI settings to their original state by pressing a specific key combination. Check your motherboard’s manual to find out how to do this.
Might be useful: How to Clear CMOS without Removing Battery or Jumper Cap
Check the manual again
Each motherboard model has its own UEFI layout and options. Look at your motherboard’s manual for specific guidance.
Turning on TPM and Secure Boot is a big change to your system’s security settings. If you’re not sure or if you keep having problems, think about getting help from a pro or the ASRock support community.