It’s common to see things suddenly go wrong after your PC recently finished running Windows Update. It’s a known frustration for Windows users that Windows Update could sometimes break things than fixing them. Sometimes, the only thing you can do after trying to fix these problems is to go back to an older version of Windows. And, this is known as rolling back.
You can usually roll back your Windows to a previous version through the Settings. But, if something goes so wrong that you can’t even access Windows normally (blue screen, crashes, etc.), you might have to do this rollback via Safe Mode or by using something called Windows Recovery Environment (Windows RE). This guide will show you how to do that.
If your issue started only after a major Windows 11 or Windows 10 update, check out the following guides to see if any matches your situation:
Page Contents
Roll back Windows 11/10 update via Settings
The easiest way to roll back a Windows 10/11 update to an earlier build is via the recovery settings, provided you still have access to Windows. To be on the safe side, back up all important files before proceeding. To roll back Windows 11/10 to a previous version, follow the instructions below:
- Go to Start menu.
- Click on Settings (the gear icon at the left).

Windows 10
Windows 11
- Select Update & Security.
Windows 10
Windows 11
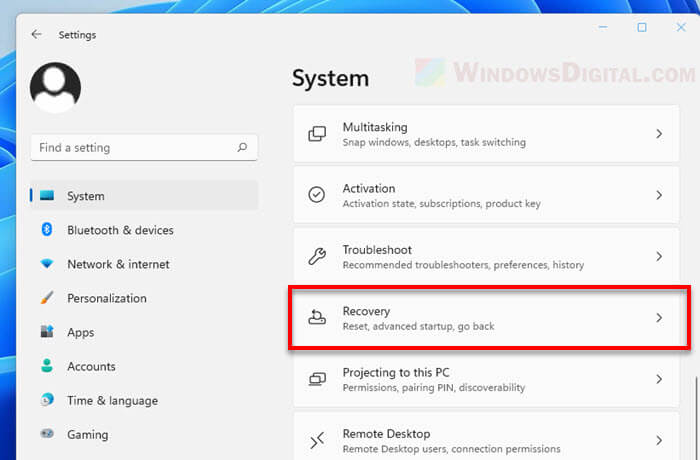
- From the left pane, select Recovery.
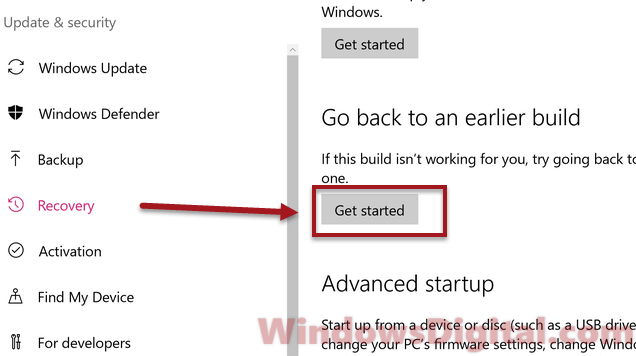
- Under “Go back to an earlier build“, click Get Started.
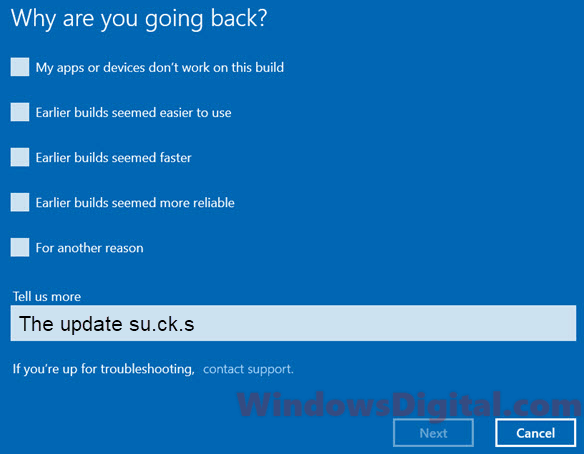
- You will be asked why you are going back; simply provide a reason.
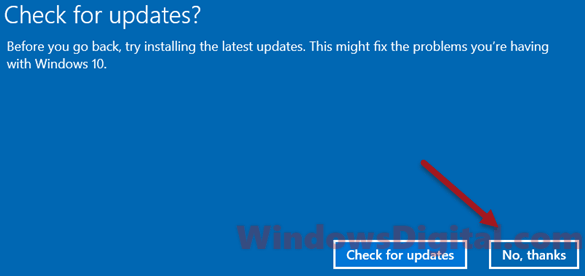
- When asked to check for updates, click “No thanks“.
- If you have a different account or password before the update, make sure you remember it, as the rollback will also revert your account information. Click Next to start the rollback process.
- The process may take some time, and your computer may restart automatically.
Once the process starts, it will uninstall the most recent major update you’ve installed. Windows will then reboot your PC to your previous build.
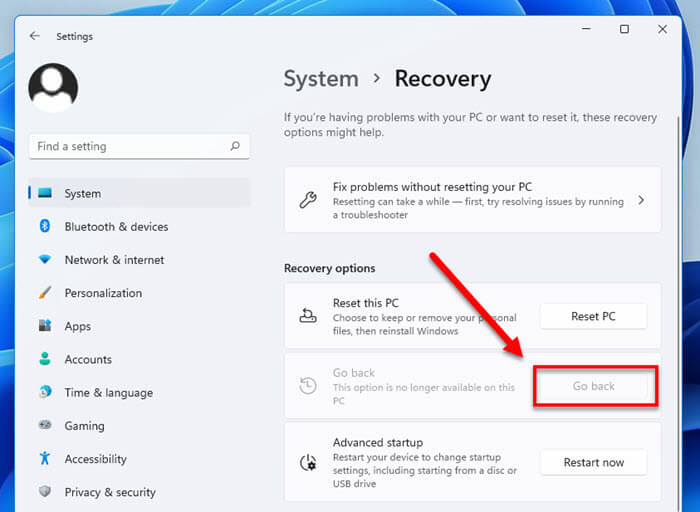
If you don’t see the Rollback option at all from the settings, or if you get a message during the rollback process that reads, “We ran into a problem and won’t be able to take you back to the previous build. Try resetting your current build instead,” try booting your PC into Safe Mode and repeating the instructions, or use the next method to enter the Windows Recovery Environment (Windows RE) and utilize the alternative option to roll back Windows 11 or Windows 10 to an earlier build.
Roll back Windows 11/10 in safe mode
When the situation is so dire that you can’t even boot into Normal Mode, you may want to try booting your PC into Safe Mode first before attempting to roll back Windows to an earlier version.
Follow this guide: How to Enter Safe Mode in Windows 11/10, to boot your Windows into Safe Mode. Then, repeat the instructions above to execute the rollback.
Roll back via Windows RE
If you can’t see the Rollback option in Settings, or if you encounter an error that prevents you from rolling back the Windows 11/10 update from Settings, try using the rollback option via Windows RE instead. Here’s how:
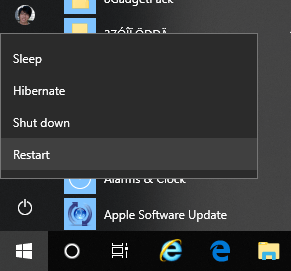
- Go to start menu.
- Click on the Power button.
- While holding the Shift key, click on Restart.

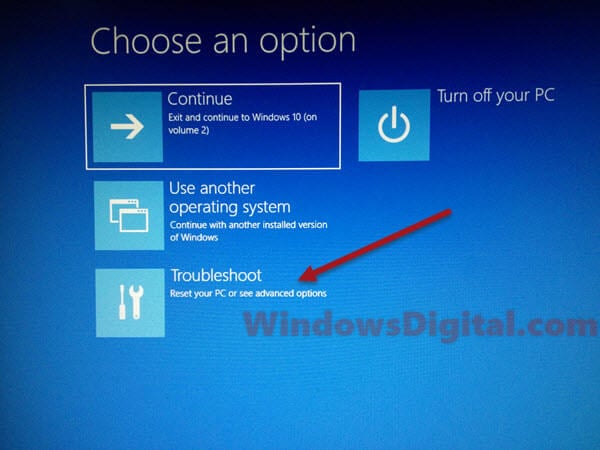
- Windows will then immediately boot into Windows RE.
- In Windows RE, under Choose an option, select Troubleshoot.
- Select Advanced options.
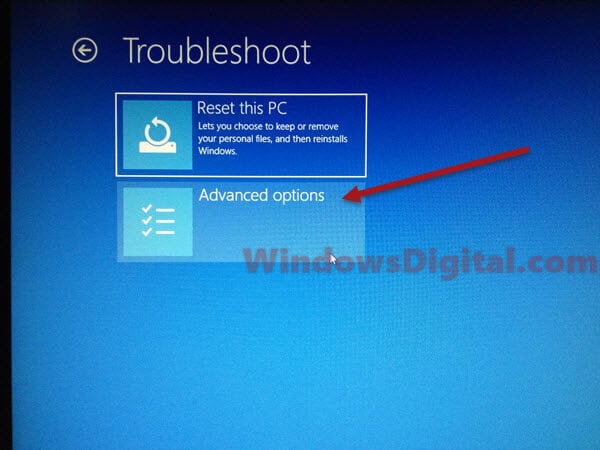
- Then, select Go back to the previous version.

- Windows will then begin to roll back itself to the previous version and may restart your PC several times during the process.
- When the process is completed, your computer will automatically boot to the previous version of Windows 11/10.
What to do if you can’t even access Windows at all
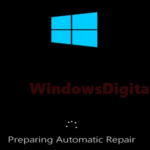
What if you can’t even access Windows in the first place to set your PC to boot into Safe Mode or Windows RE? Fortunately, there is still a way to force your Windows to boot into Windows RE. This method is surprisingly not known to many users.
To force boot your PC into Windows RE, follow the steps below:
- Hold and press the power button on your computer until your computer is completely switched off.
- Start your computer again.
- As soon as you see the Windows loading logo, hold and press the power button again to force another shutdown.
- Repeat this process three times.
- When Windows detects unusual startup activity, it will automatically boot into Windows RE.
If you don’t see the rollback option even in Windows RE, you have a serious problem. Your system files may be missing or corrupted to the point that the option is unavailable. You can try to reset Windows 11/10 or reinstall it if you have a serious issue with the latest update.