When using Windows, you might run into messages that talk about specific hard disk volumes like \Device\HarddiskVolume3. At first, these messages might seem a bit tricky to get, but actually, they’re pretty straightforward once you know what to do.
In this guide, we’ll break down what these hard disk volume references mean and show you how to figure out which drive they’re talking about in Windows 11 or Windows 10. We’ll go step by step so you can find the specific device or volume path you need to sort out any issues with file access events.
Page Contents
Understanding hard disk volume references
Before we get into finding hard disk volume references in Windows, let’s first get what they are and why we use them.
Also see: How to hide a drive in Windows 11
In Windows, hard disk volumes help organize data on physical hard drives. Each volume gets a unique reference, like:
- \Device\HarddiskVolume3
- \Device\HarddiskVolume4
- \Device\HarddiskVolume5
- \Device\HarddiskVolume1
- \Device\HarddiskVolume2
- \Device\HarddiskVolume6
This reference is how Windows identifies and accesses the volume’s contents.
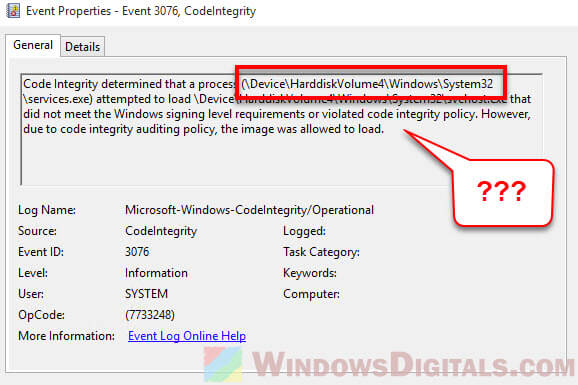
When fixing issues in Windows, you might see error messages pointing to a certain hard disk volume. Like, you could get a message saying:
\Device\HarddiskVolume3\Windows\System32\svchost.exe is missing or corrupted
This means Windows can’t find the svchost.exe file on the third hard disk volume, and you’ll need to find that volume and the file to fix the problem.
Related issue: Service Host Local System (svchost.exe) high CPU, disk, or memory usage
How to tell which drive is \Device\HarddiskVolume3 or other volumes?
Now that we know what hard disk volume references are, let’s see how to find the hard disk volume number and figure out which drive it’s pointing to in Windows 11/10.
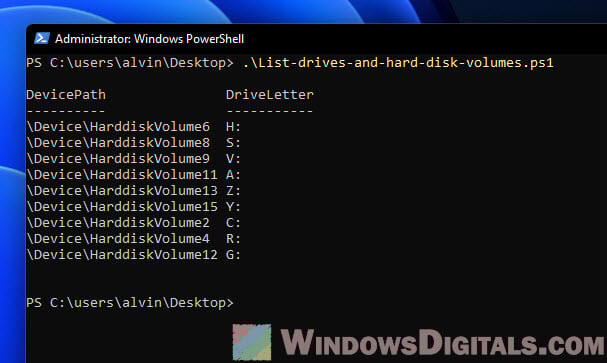
Method 1: Listing all drive letters and hard disk volume numbers using PowerShell
This method gives you a full list of all device names and their matching volume paths on your computer. It uses PowerShell to check the Windows Management Instrumentation (WMI) class Win32_Volume for the drive letter and then gets the device path through the QueryDosDevice function from the Kernel32 module.
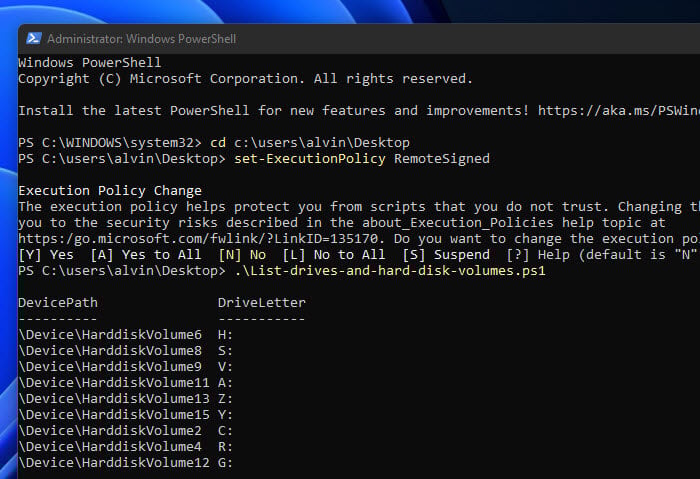
To list all the drive letters and their matching hard disk volume numbers on your Windows system, do this:
- Open Notepad and paste the following PowerShell script.
$DynAssembly = New-Object System.Reflection.AssemblyName('SysUtils')
$AssemblyBuilder = [AppDomain]::CurrentDomain.DefineDynamicAssembly($DynAssembly, [Reflection.Emit.AssemblyBuilderAccess]::Run)
$ModuleBuilder = $AssemblyBuilder.DefineDynamicModule('SysUtils', $False)

$TypeBuilder = $ModuleBuilder.DefineType('Kernel32', 'Public, Class')
$PInvokeMethod = $TypeBuilder.DefinePInvokeMethod('QueryDosDevice', 'kernel32.dll', ([Reflection.MethodAttributes]::Public -bor [Reflection.MethodAttributes]::Static), [Reflection.CallingConventions]::Standard, [UInt32], [Type[]]@([String], [Text.StringBuilder], [UInt32]), [Runtime.InteropServices.CallingConvention]::Winapi, [Runtime.InteropServices.CharSet]::Auto)
$DllImportConstructor = [Runtime.InteropServices.DllImportAttribute].GetConstructor(@([String]))
$SetLastError = [Runtime.InteropServices.DllImportAttribute].GetField('SetLastError')
$SetLastErrorCustomAttribute = New-Object Reflection.Emit.CustomAttributeBuilder($DllImportConstructor, @('kernel32.dll'), [Reflection.FieldInfo[]]@($SetLastError), @($true))
$PInvokeMethod.SetCustomAttribute($SetLastErrorCustomAttribute)
$Kernel32 = $TypeBuilder.CreateType()

$Max = 65536
$StringBuilder = New-Object System.Text.StringBuilder($Max)

Get-WmiObject Win32_Volume | ? { $_.DriveLetter } | % {
	$ReturnLength = $Kernel32::QueryDosDevice($_.DriveLetter, $StringBuilder, $Max)

	if ($ReturnLength)
	{
		$DriveMapping = @{
			DriveLetter = $_.DriveLetter
			DevicePath = $StringBuilder.ToString()
		}

		New-Object PSObject -Property $DriveMapping
	}
}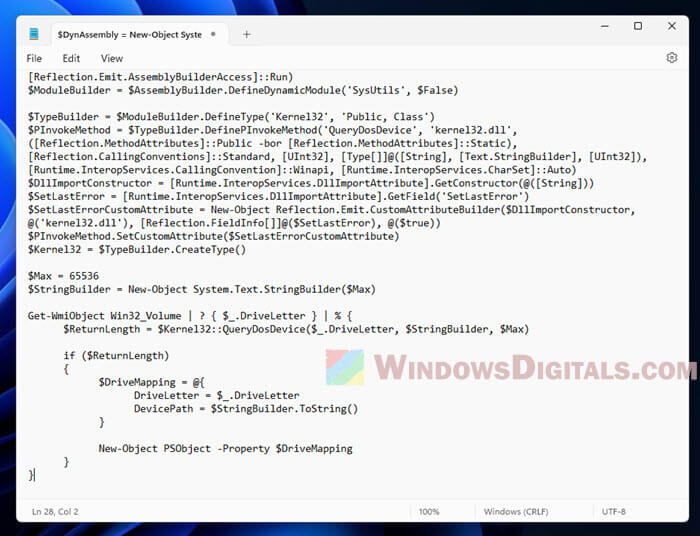
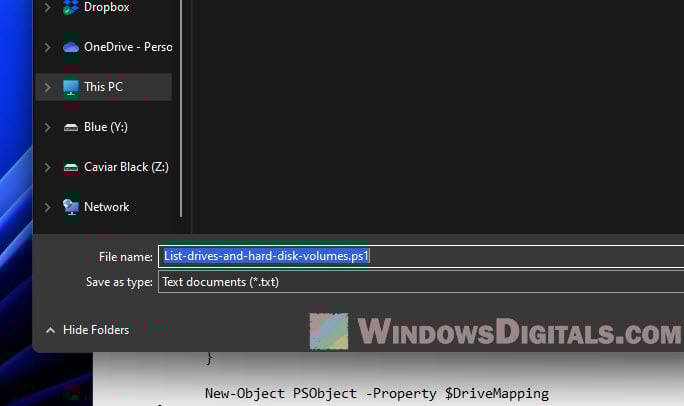
- Save the Notepad file as a .ps1 file, like List-drives-and-hard-disk-volumes.ps1.
- Run the
List-drives-and-hard-disk-volumes.ps1script in PowerShell to see all the drive letters and their hard disk volume paths on your Windows 11 or Windows 10 system.
Recommended resource: Run CMD, PowerShell, or Regedit as SYSTEM in Windows 11
To run the List-drives-and-hard-disk-volumes.ps1 script in PowerShell, just follow these steps:
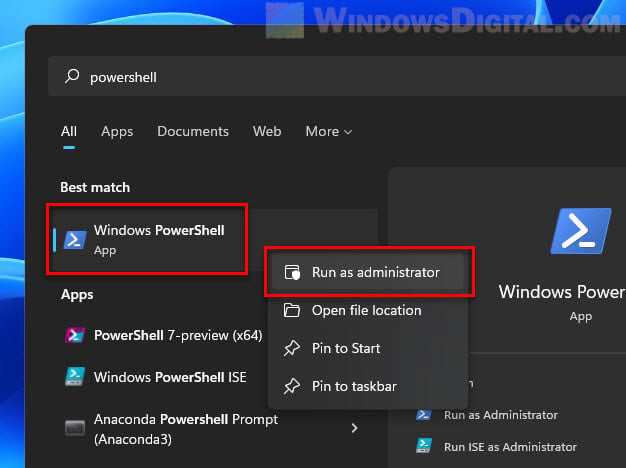
- Open PowerShell as an admin by right-clicking the Start button, picking “Windows PowerShell (Admin)” or “Windows Terminal (Admin)” if you’re using Windows Terminal, and saying “Yes” to the User Account Control (UAC) prompt.
- If needed, change the execution policy by typing
Set-ExecutionPolicy RemoteSigned
and hitting Enter. Say
Yto confirm. This lets you run scripts you’ve made or downloaded as long as they’re signed by someone trustworthy. - Go to where you saved the script using the
cdcommand. For example, if it’s on the Desktop, typecd C:\Users\username\Desktop
and press Enter. Swap in your actual Windows username.
- To run the script, type
.\List-drives-and-hard-disk-volumes.ps1
and hit Enter. You’ll see the device names and their paths for all drives on your computer.
- It’s a good idea to set the execution policy back to its default after running the script by typing
Set-ExecutionPolicy Restricted
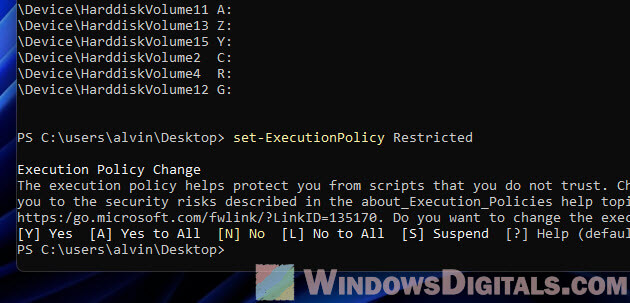
You need admin rights to run the script since it touches on system info.
Useful tip: How to merge two drives in Windows 11
Here’s a deeper look at what the script does:
- It makes a dynamic assembly named ‘SysUtils’ and sets up a method to call the
QueryDosDevicefunction from the Kernel32 module. - The
StringBuilderobject’s max length is set to 65536 to hold the device path info. - Then it uses
Get-WmiObjectto ask theWin32_Volumeclass for drive letter details, only keeping results that have a drive letter. - For each drive letter, it calls the
QueryDosDevicefunction with the drive letter as input. The function returns the device path string’s length, which is then put into an object that has both the drive letter and device path. - Last, it shows the device letter and path for each drive.
Similar problem: Hard drive doesn’t show up after clone in Windows 11
Method 2: Getting the hard disk volume number from a specific drive letter using PowerShell
This method lets you find the device path for a specific drive letter using a similar approach as Method 1. But instead of listing all device names and their paths, it asks you for a drive letter and gives back its device path.
To see the device path for a specific drive letter, use this PowerShell script:
- Open Notepad and paste in the PowerShell script below.
$driveLetter = Read-Host "Enter Drive Letter:"
Write-Host " "
$DynAssembly = New-Object System.Reflection.AssemblyName('SysUtils')
$AssemblyBuilder = [AppDomain]::CurrentDomain.DefineDynamicAssembly($DynAssembly, [Reflection.Emit.AssemblyBuilderAccess]::Run)
$ModuleBuilder = $AssemblyBuilder.DefineDynamicModule('SysUtils', $False)

$TypeBuilder = $ModuleBuilder.DefineType('Kernel32', 'Public, Class')
$PInvokeMethod = $TypeBuilder.DefinePInvokeMethod('QueryDosDevice', 'kernel32.dll', ([Reflection.MethodAttributes]::Public -bor [Reflection.MethodAttributes]::Static), [Reflection.CallingConventions]::Standard, [UInt32], [Type[]]@([String], [Text.StringBuilder], [UInt32]), [Runtime.InteropServices.CallingConvention]::Winapi, [Runtime.InteropServices.CharSet]::Auto)
$DllImportConstructor = [Runtime.InteropServices.DllImportAttribute].GetConstructor(@([String]))
$SetLastError = [Runtime.InteropServices.DllImportAttribute].GetField('SetLastError')
$SetLastErrorCustomAttribute = New-Object Reflection.Emit.CustomAttributeBuilder($DllImportConstructor, @('kernel32.dll'), [Reflection.FieldInfo[]]@($SetLastError), @($true))
$PInvokeMethod.SetCustomAttribute($SetLastErrorCustomAttribute)
$Kernel32 = $TypeBuilder.CreateType()

$Max = 65536
$StringBuilder = New-Object System.Text.StringBuilder($Max)
$ReturnLength = $Kernel32::QueryDosDevice($driveLetter, $StringBuilder, $Max)

 if ($ReturnLength)
 {
     Write-Host "Device Path: "$StringBuilder.ToString()
  }
  else
  {
      Write-Host "Device Path: not found"
  }
Write-Host " "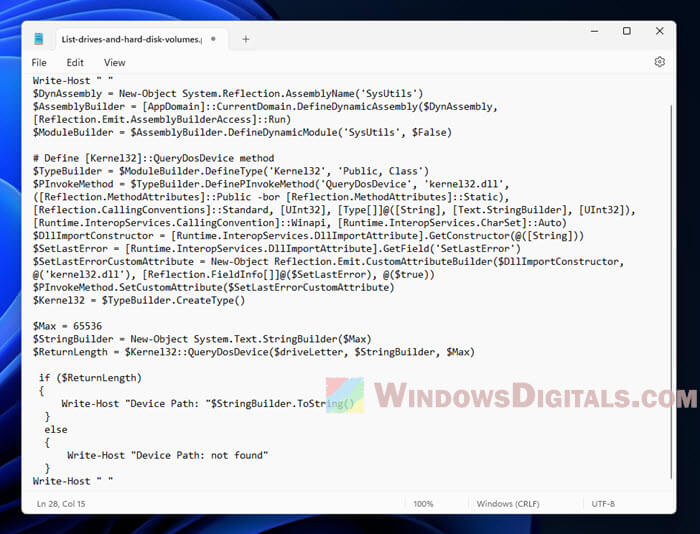
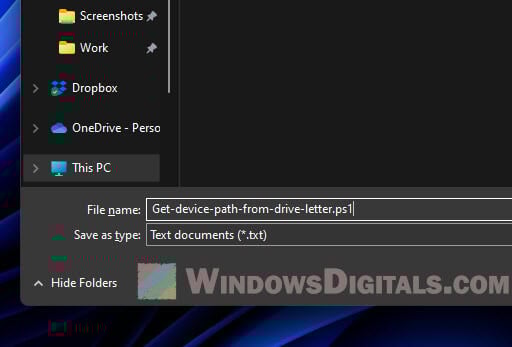
- Save it as a .ps1 file, like Get-device-path-from-drive-letter.ps1.
- Run the
Get-device-path-from-drive-letter.ps1script in PowerShell. When asked, type the drive letter you want the device path for.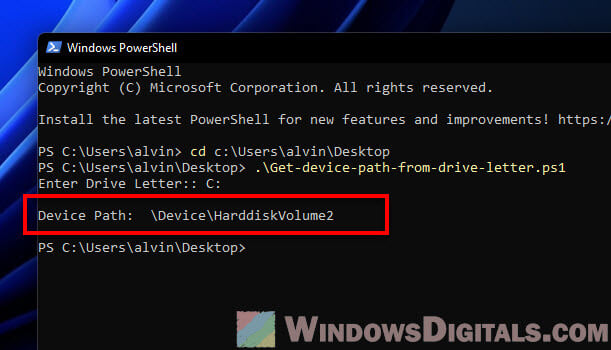
For how to run the .ps1 PowerShell script you’ve made, just follow the steps in the method above.
Here’s what the script does:
- Like Method 1, it creates ‘SysUtils’ and sets up a way to use the
QueryDosDevicefunction from the Kernel32 module. - It asks for a drive letter with the
Read-Hostcommand. Remember to enter it without the backslash (like “C:”, not “C:\”). - The
StringBuilderobject’s max length is set to 65536, so it can hold the device path info. - Then it calls
QueryDosDevicewith the input drive letter. If it works, it returns the length of the device path string. - If
QueryDosDeviceworks out, the script shows the device path for the drive letter. If not, it says the device path wasn’t found.
One final note
One more thing to remind you is that although these methods do help you track down disk volume paths and drive letters, you have to know that the volume numbers can sometimes change. For instance, plugging in a new hard disk drive or SSD, creating a new partition, etc. can sometimes shuffle the numbers. When things don’t go as planned, double-check the volume paths and drive letters again to make sure you are working with the correct volume.