Opera Browser Assistant (browser_assistant.exe) is supposed to stay off once you disable it in Startup apps, but on Opera and Opera GX it often comes back after the next Opera update or a day or two later, Opera icon in the system tray and all. This guide will explain why it keeps returning and how to stop it for good without breaking Opera’s own updates.
Also see: How to Disable Startup Programs in Windows 11
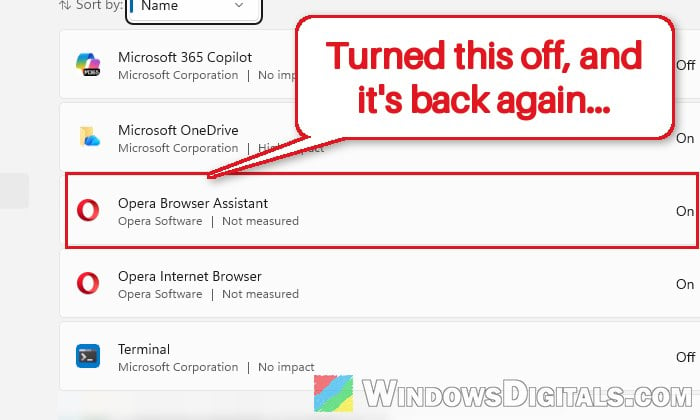
What is Opera Browser Assistant and why does it keep coming back?
Opera Browser Assistant is a real part of Opera, not malware. According to Opera’s privacy statement, it shows notifications that promote the browser’s features and may report certain system events. An unrelated adware program is also called “Browser Assistant”, though, so if you’re not sure, check that the publisher is Opera Software.
It keeps coming back because it doesn’t live inside the browser. It has its own pieces on your PC:
- Its own folder, usually
C:\Users\<your name>\AppData\Local\Programs\Opera\assistant, orC:\Program Files\Opera\assistantwhen Opera is installed for all users. - Its own startup entry, called “Opera Browser Assistant”.
- Its own scheduled task, called “Opera scheduled assistant Autoupdate” followed by a number. This task runs Opera’s updater just for the Assistant, which is likely one way it gets put back.
Opera’s updates can put it back too, and Opera can even create a brand new assistant task while the old disabled one is still there. So disabling it in one place rarely holds, and you’ll want to deal with all three.
If you never installed Opera yourself, it most likely came bundled with another program you installed. In that case, uninstalling Opera is the cleanest fix (last section below).
Pro tip: Unknown Program in Task Manager Startup Tab Windows 11/10
Disable Opera Browser Assistant in Startup apps
Opera itself says the Assistant can be taken off the startup list. This stops it from starting with Windows. On its own it often doesn’t last through an update, so treat it as the first step and carry on with the next sections.
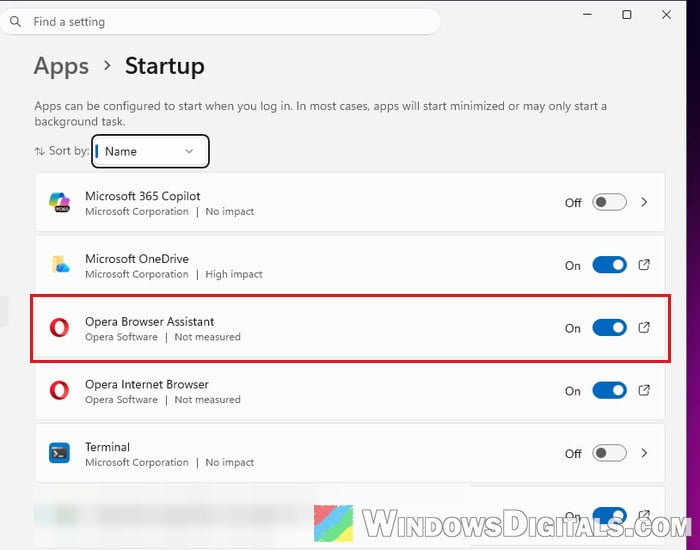
- Open Settings > Apps > Startup.
- Find “Opera Browser Assistant” in the list and turn it “Off“.
You can do the same in Task Manager:
- Press Ctrl + Shift + Esc to open Task Manager.
- Go to “Startup apps” on the left.
- Right-click the Assistant’s entry and select “Disable“. Task Manager may list it as “Opera Browser Assistant” or just “browser_assistant“, with the red Opera icon.
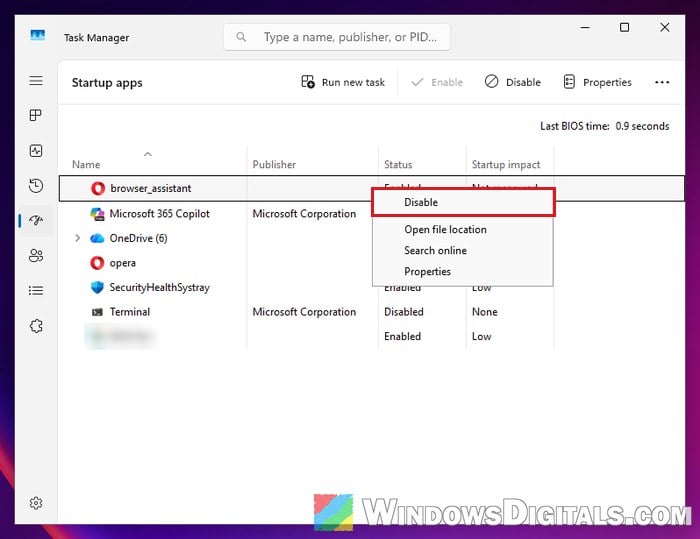
You’ll probably also see “Opera Internet Browser” (or “opera” in Task Manager). That one starts the browser itself, not the Assistant, so leave it alone unless you also don’t want Opera opening when Windows starts.
Might be useful: How to Disable Startup Services on Windows 11 or 10
Disable the Assistant’s scheduled task
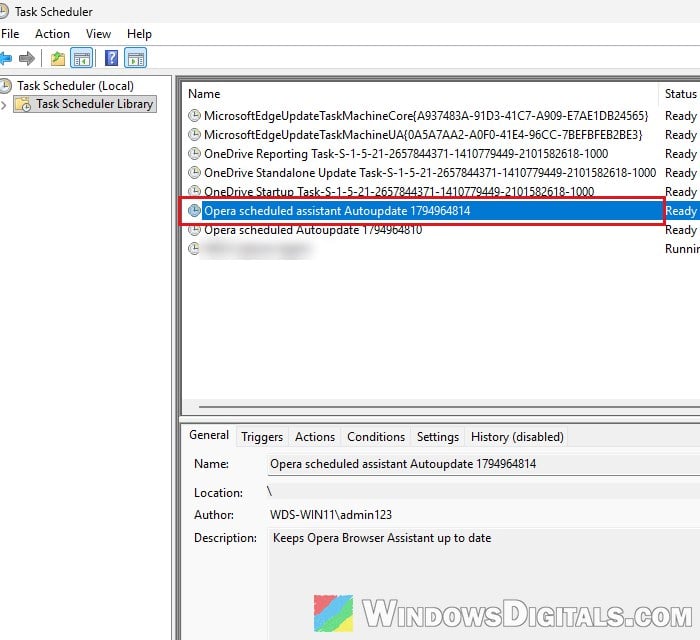
Opera adds two scheduled tasks when you install it: “Opera scheduled Autoupdate” (followed by a number) keeps the browser itself updated, and “Opera scheduled assistant Autoupdate” (also followed by a number), whose description reads “Keeps Opera Browser Assistant up to date”. Disable only the assistant one, so Opera still gets its security updates.
- Click Start, search for “Task Scheduler” and open it.
- Click “Task Scheduler Library” on the left.
- Find “Opera scheduled assistant Autoupdate” followed by a number. For Opera GX, it’s “Opera GX scheduled assistant Autoupdate“.
- Right-click it and select “Disable” (or “Delete” if you want it gone).
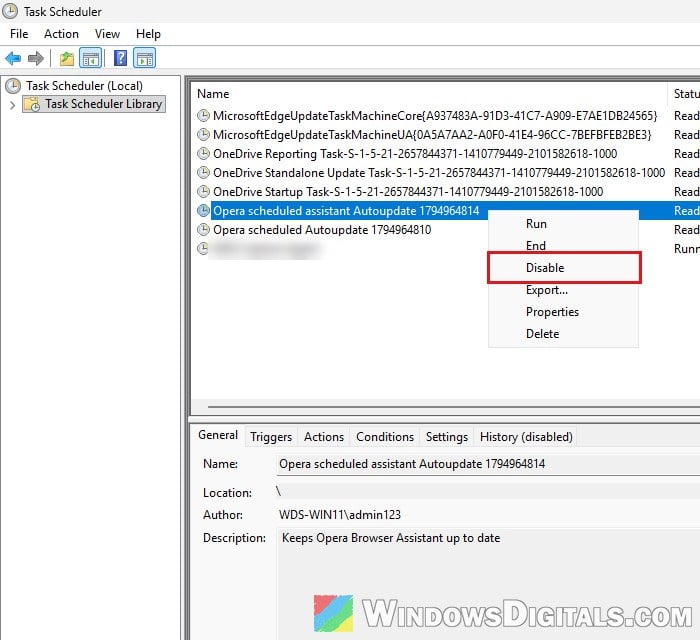
Make sure you leave “Opera scheduled Autoupdate” (without “assistant” in the name) as it is. After the next Opera update, open Task Scheduler again and check that no new assistant task has appeared next to the one you disabled. If one has, disable that one too.
Turn off “Display promotional notifications” in Opera
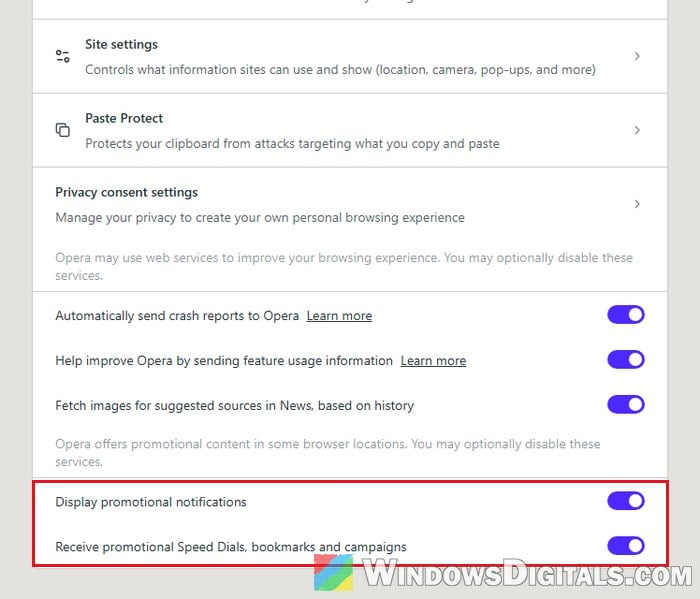
If you’re keeping Opera, it also has a setting for the Assistant’s pop-ups: “Display promotional notifications“. According to Opera, turning it off stops the promotional notifications and the data Opera collects about them. It doesn’t remove the program, but it’s quick.
- Open Opera, type
opera://settings/privacyin the address bar and press Enter. - Scroll down and turn off “Display promotional notifications“. You can also turn off “Receive promotional Speed Dials, bookmarks and campaigns” while you’re there.
Rename or delete browser_assistant.exe
If the Assistant still shows up, take away the file it runs from. Simply renaming browser_assistant.exe can keep the Assistant away for weeks. Do this together with the Startup apps and scheduled task steps above, since an update can put the file back.
- Open Task Manager (Ctrl + Shift + Esc), go to “Startup apps“, right-click the Assistant’s entry and select “Open file location“. This opens the Assistant’s folder.
- If the Assistant is running, end it first: in Task Manager’s “Details” tab, right-click
browser_assistant.exeand select “End task“. Otherwise Windows won’t let you delete the file or folder. - In the folder, right-click
browser_assistant.exeand rename it, for example tobrowser_assistant.exe.old. You can also delete the wholeassistantfolder instead.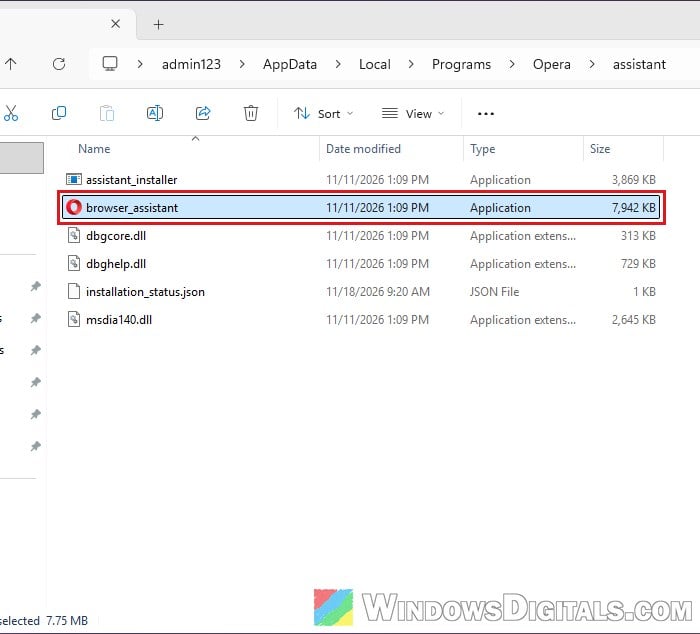
Delete the leftover startup entry in the registry
If you’d rather remove the Assistant’s startup entry completely instead of just switching it off, you can delete it in the registry.
Incorrectly changing the registry can cause problems with Windows, so only delete the value named below. If you’d like a safety net, create a system restore point first. If you’re not sure what you’re doing, it’s better to skip this section.
- Press Win + R, type “regedit” and press Enter.
- Copy and paste the following path into the address bar of Registry Editor and press Enter:
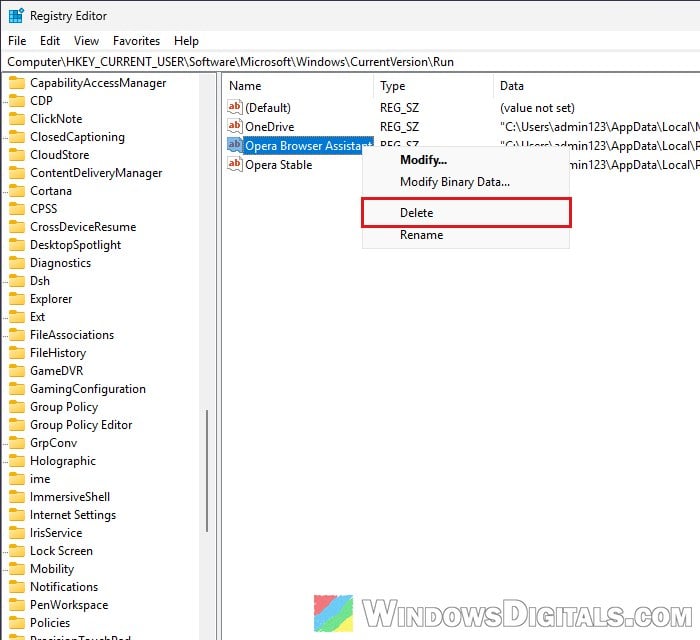
HKEY_CURRENT_USER\Software\Microsoft\Windows\CurrentVersion\Run
- Right-click the value named “Opera Browser Assistant” and select “Delete“, then confirm. Leave the “Opera Stable” value next to it alone unless you don’t want Opera starting with Windows, since that’s the browser’s own startup entry.
- Check these two keys as well and delete an “Opera Browser Assistant” value if there’s one:
HKEY_LOCAL_MACHINE\SOFTWARE\Microsoft\Windows\CurrentVersion\Run
HKEY_LOCAL_MACHINE\SOFTWARE\WOW6432Node\Microsoft\Windows\CurrentVersion\Run
Reinstall Opera, or uninstall it if you don’t use it
If the Assistant keeps finding its way back, a clean reinstall of Opera can get rid of it. A fresh install from opera.com may even come without the Assistant at all, though this can depend on which installer you use.
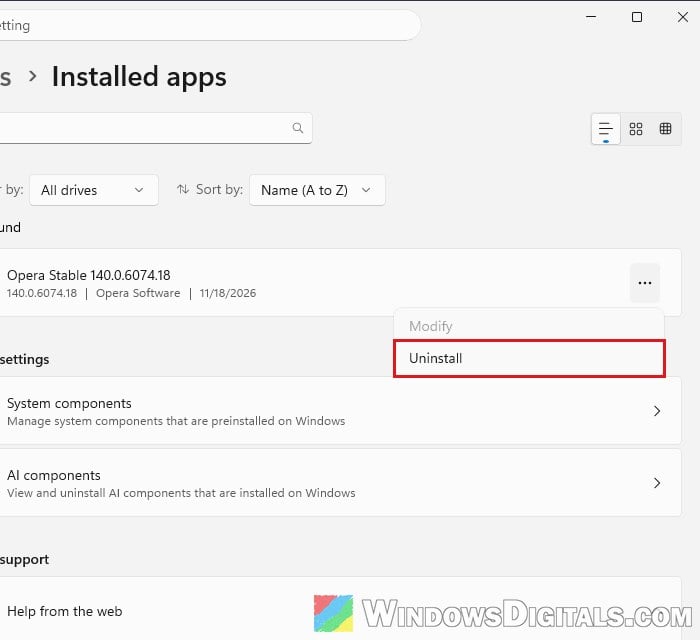
- Open Settings > Apps > Installed apps.
- Click the three dots next to “Opera Stable” (or your Opera GX entry) and select “Uninstall“, then “Uninstall” again to confirm.
- In the Opera Installer window, leave “Delete my Opera user data” unticked if you plan to install Opera again, so your Opera data stays. If you won’t use Opera again, tick it. Then click “Uninstall“.
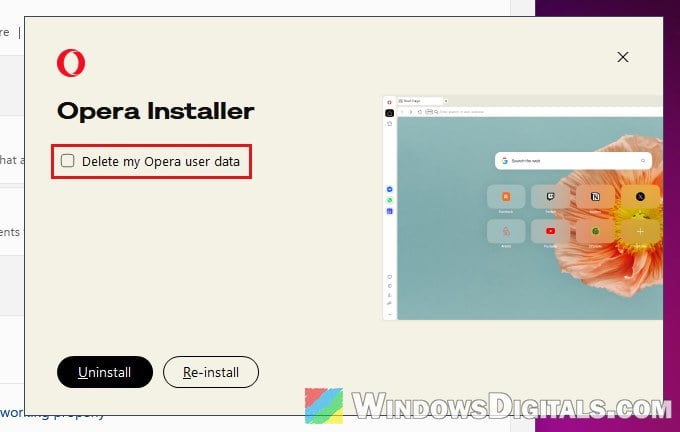
- Open Task Scheduler and delete any Opera tasks that are left. When I uninstalled Opera to test this, the uninstaller removed the Assistant’s folder and startup entry but left both Opera scheduled tasks behind. Also delete the
assistantfolder if it’s still there. - Download Opera again from
https://www.opera.com/and install it.
If you never use Opera (for example, it came bundled with something else), just stop after step 4. Once Opera is uninstalled and its folder and tasks are gone, there’s nothing of Opera’s left to bring the Assistant back.