In Windows 11, there is a weird phenomenon where two long lines suddenly cross your whole screen and follow your mouse pointer everywhere it goes. It’s most likely a built-in accessibility feature called Pointer indicator, often turned on by a keyboard shortcut pressed by accident. This guide will walk you through turning the crosshair off and checking what keeps turning it back on.
Also see: How to Take a Screenshot Showing Cursor on Windows 11
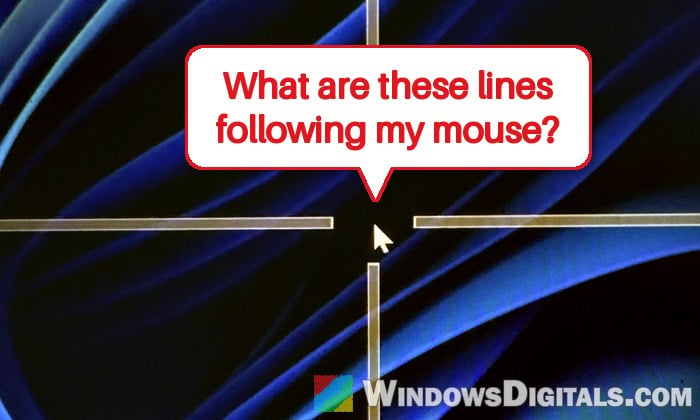
It usually looks like the picture above: a horizontal and a vertical line meet at the pointer, with a small gap around it. People often notice it right after pressing a few keys together, for example while taking a screenshot or while typing. Restarting the PC or resetting the graphics driver and the monitor usually won’t make it go away, because it’s a setting that stays on until you switch it off.
You might also notice that the lines don’t show up when you take a screenshot or record your screen, which can make it look like your monitor is dying. Screenshots and recordings can leave the crosshair out even though you can see it on screen, so that alone doesn’t mean anything is wrong with your monitor.
Press Win + Ctrl + Shift + X to turn it off
The Pointer indicator was made for people with low vision, so they can find and follow the mouse pointer more easily. Microsoft gave it a keyboard shortcut that switches it on and off, and that’s how many people end up with it without knowing.
Here’s what you should do:
- Press Win + Ctrl + Shift + X together once.
- Move your mouse and see if the lines are gone. If nothing changes, or a second set of lines appears, press the same keys again to undo it and move on.
- If they’re still there, try Win + Ctrl + X instead. Some earlier Insider (test) builds of Windows 11 used this shorter shortcut for the same feature.
If the crosshair disappears, that’s it. Just be aware that the same keys will bring it back, so if it shows up again one day, you’ll know what happened.
Turn off “Pointer indicator” in Settings
If the shortcut doesn’t do anything, you can switch the feature off directly in Settings. This is also the better way if you’re not sure whether the keys toggled it on or off.
Follow the steps below:
- Press Win + I to open Settings.
- Click on Accessibility on the left side, then click on Mouse pointer and touch on the right side.
- Find Pointer indicator and switch it Off. The line under it also tells you which keyboard shortcut toggles it on your version of Windows 11.
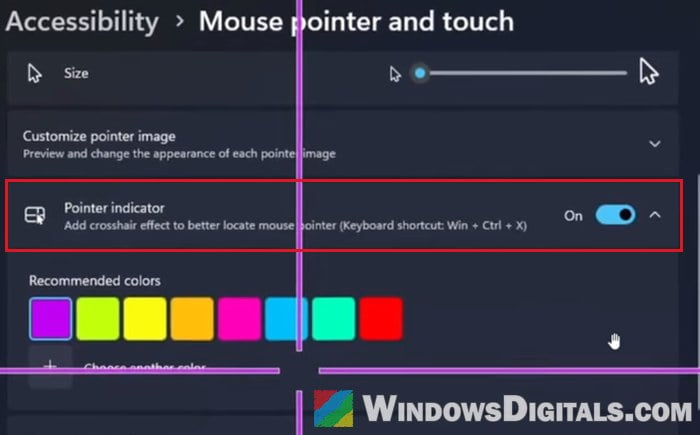
The lines should disappear as soon as you flip the switch. If you can’t find a Pointer indicator setting at all, Microsoft probably hasn’t rolled the setting out to your PC yet. In that case, check PowerToys next, and if you don’t have PowerToys, turn it off in the registry instead (see further below).
Might be useful: Windows 11 Keyboard Shortcuts Not Working (Fix)
Check PowerToys’ “Mouse Pointer Crosshairs”
If you have Microsoft PowerToys installed, it has its own crosshair tool called Mouse Pointer Crosshairs, which draws the same kind of lines centered on your pointer. By default it’s toggled with Win + Alt + P, so it’s just as easy to switch on by accident.
To turn it off, try pressing Win + Alt + P first. If that doesn’t work, or you want to make sure it stays off, do the following:
- Open PowerToys from the Start menu.
- In PowerToys Settings, go to Input & Output > Mouse Utilities on the left.
- Scroll down to the Mouse Pointer Crosshairs section and switch Mouse Pointer Crosshairs off.
- Click on Activation shortcut to expand it, and make sure “Automatically activate on utility startup” is unchecked, so the crosshair doesn’t come back every time PowerToys starts.
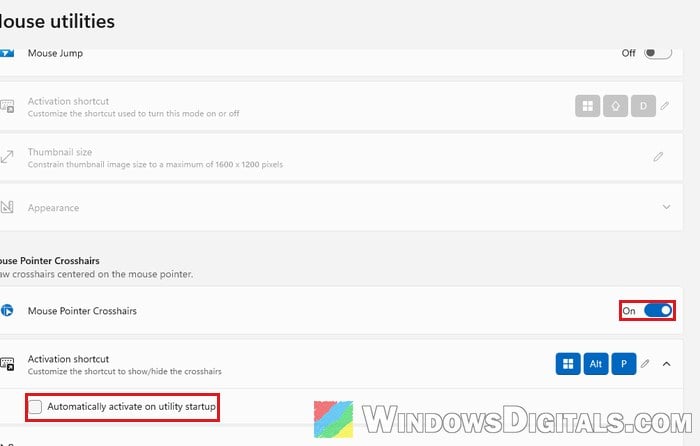
The PowerToys crosshair can also be switched on and off from the Quick Access menu in the system tray, so check its toggle there too. Then move your mouse and check that the lines are gone.
Turn it off in the registry
Windows saves the Pointer indicator as a value in the registry. Changing it directly should work even when the Pointer indicator row is missing from Settings on your PC, and it’s a good way to check whether something else keeps turning it back on.
Incorrectly changing the registry could mess up your Windows installation, so only change the one value below, and create a system restore point first if you’re not sure. Here’s how to do it:
- Press Win + R, type “regedit” and press Enter. Click Yes if a UAC prompt appears.
- Copy and paste the following path to the address bar of Registry Editor and press Enter:
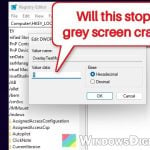
Computer\HKEY_CURRENT_USER\Control Panel\Cursors
- On the right side, double-click on CursorCrosshairEnabled, set its Value data to 0, and click OK. (1 means the crosshair is on.)
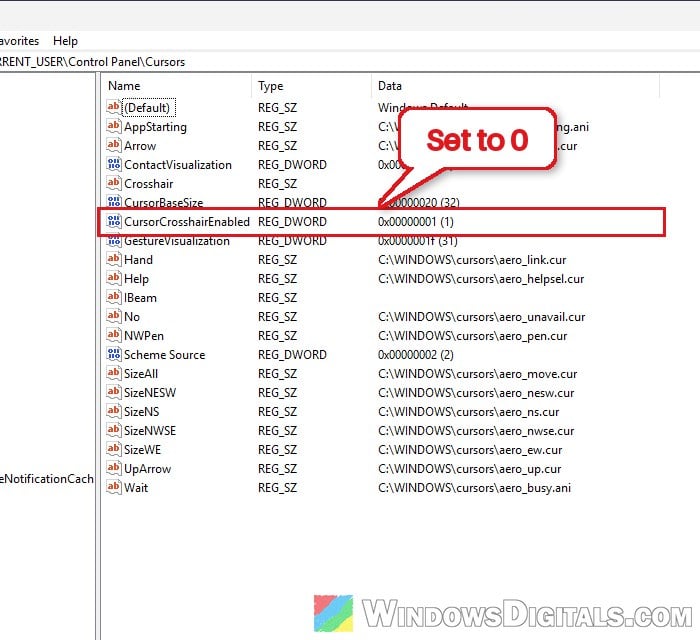
- Sign out and sign back in, or restart the PC, to apply the change.
Related guide: How to Remove Virus Using CMD in Windows 11 or 10
If the crosshair keeps coming back by itself
In rare cases, the crosshair turns itself back on even after you’ve switched it off, and nobody pressed any keys. Since it’s just a registry value, anything that runs on your PC can switch it on, malware or a shady script included. If that happens, and especially if you recently ran a “tool” or utility from a site you don’t fully trust, run a full scan with Microsoft Defender:
- Search for “Windows Security” in the Start menu and open it.
- Go to Virus & threat protection and click on Scan options.
- Select Full scan and click Scan now.
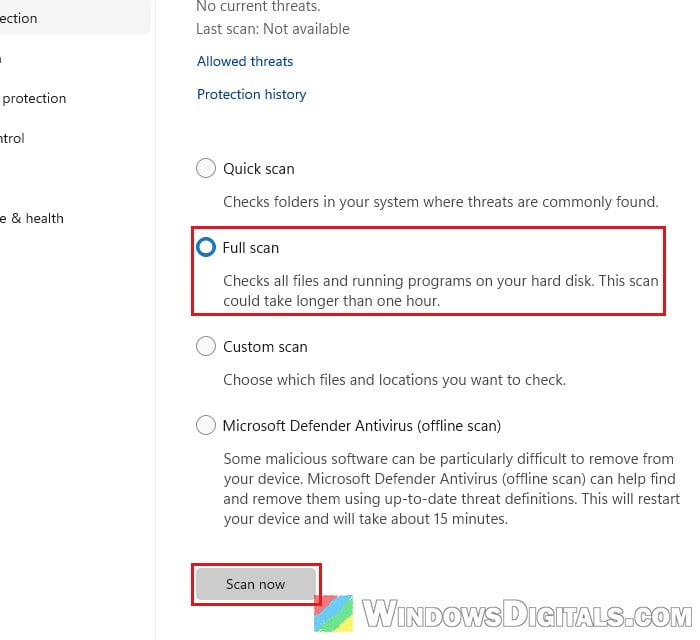
Once the scan is done and anything it found is removed, switch the Pointer indicator off again with any of the methods above. If it stays off this time, the problem is fixed.