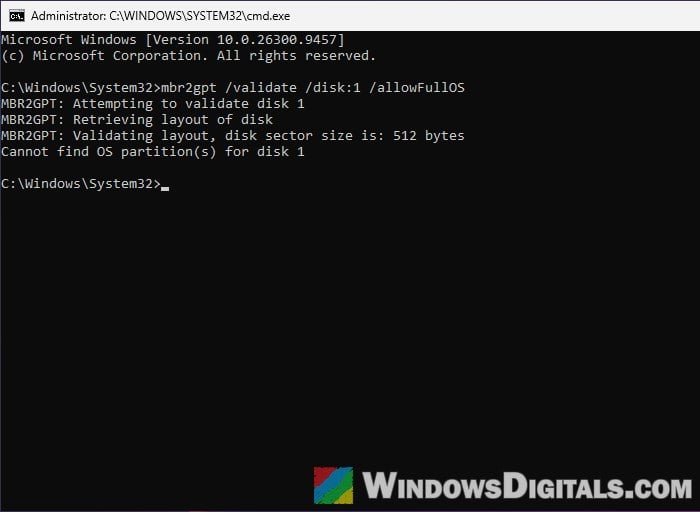
If you’re converting your system disk from MBR to GPT with MBR2GPT (usually to switch to UEFI and turn on Secure Boot for Windows 11) and it stops with “Cannot find OS partition(s) for disk 0” (or disk 1), it means the tool couldn’t find a Windows installation that the disk’s boot files point to. This guide will show you what the error means and how to get the conversion to go through on Windows 11 or 10.
Also see: Can’t find TPM 2.0 and Secure Boot options in BIOS
Page Contents
Why does MBR2GPT say it can’t find the OS partition?
Before MBR2GPT changes anything, it checks the disk to make sure the conversion can work. According to Microsoft, one of those checks is that the boot configuration (BCD) on the disk’s system partition has a default entry pointing to the Windows partition. If it can’t find that, it refuses to go on and shows this error.
Some common reasons for this are:
- The boot files are on a different disk than Windows. This can happen on PCs with two drives, where Windows sits on one drive while the boot files are on the other.
- The wrong disk is selected, for example disk 0 is your data drive and Windows is on disk 1.
- Leftover or broken boot entries in the BCD, for example on PCs that were upgraded from older Windows versions over the years.
The good news is that the error shows up during the check, so nothing on your disk has been touched yet.
Be warned: Converting the disk can’t be undone, so back up your important files first. If you use BitLocker, suspend it before converting; afterwards, Microsoft says you need to delete and recreate its protectors. And once the disk is GPT, your PC won’t start until you switch the firmware (BIOS) to UEFI mode, so make sure your PC supports UEFI before you begin. If you’re not sure about any of this, it’s better to get someone who knows PCs to help you instead.
Check the disk number and run MBR2GPT the right way
MBR2GPT has to run in an administrator Command Prompt. It’s made to run from Windows PE and is blocked inside normal Windows unless you add the /allowFullOS option. Without /disk:, it uses the system disk, so on a PC with more than one drive it’s worth checking which disk number Windows is on.
Here’s how to do it:
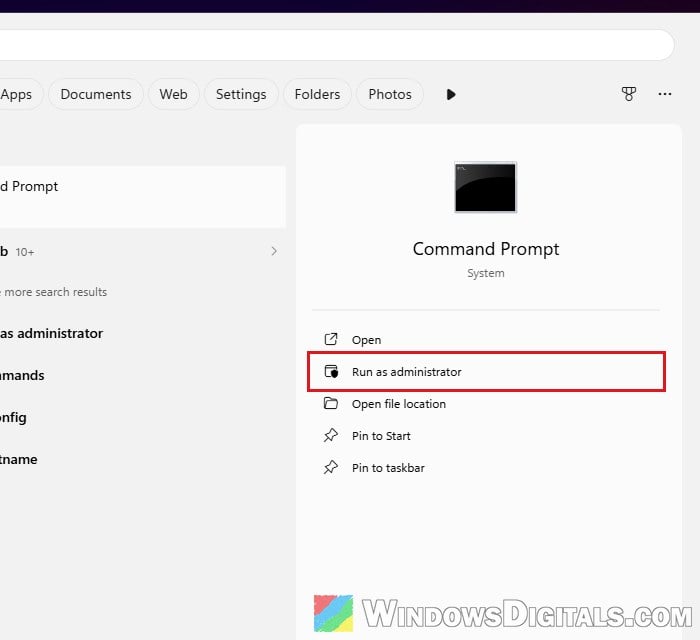
- Search for “cmd” in the Start menu, then select “Run as administrator” for Command Prompt.
- Type the following commands one by one, and press Enter after each:
diskpart
list disk
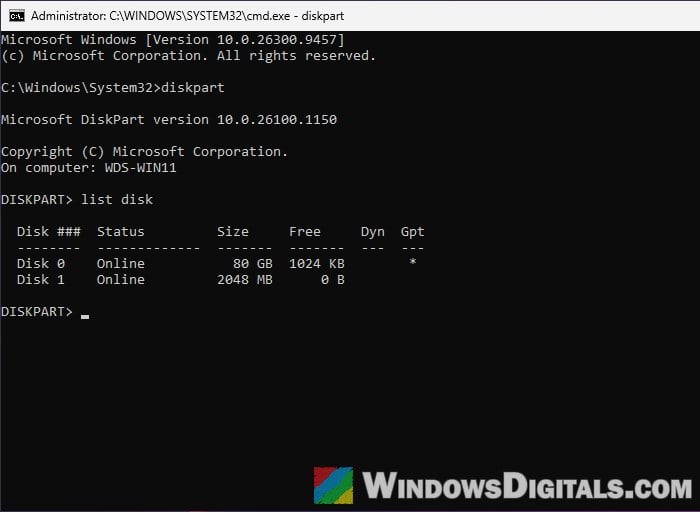
- In the list, an MBR disk has nothing in the “Gpt” column, while a GPT disk has an asterisk (*). Note the number of the MBR disk that has Windows on it (the size usually gives it away).
- Type
exitand press Enter to leave DiskPart. - Run the check again with that disk number (replace 0 if yours is different):
mbr2gpt /validate /disk:0 /allowFullOS
- If it now says “Validation completed successfully“, you can run the actual conversion with
/convertin place of/validate.
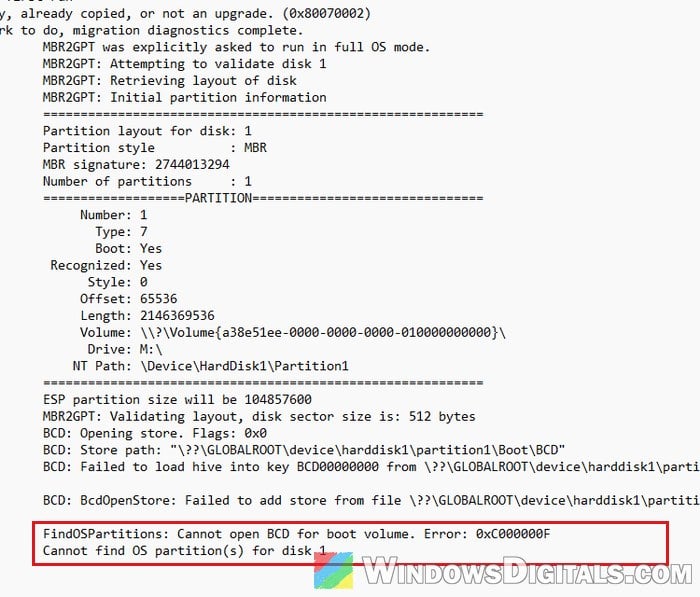
If the error still shows up, MBR2GPT writes log files to your C:\Windows folder, and the most useful details are in setupact.log and setuperr.log. Open setupact.log in Notepad and scroll to the end to see what MBR2GPT checked last.
Related problem: “The selected disk is of the GPT partition style” Windows 10/11 Install
Recreate the boot files on the Windows partition
If your PC has (or had) more than one drive, it’s possible that the boot files Windows starts from aren’t on the Windows disk at all. In one case on a German PC forum, a laptop owner got the same error (for disk 1 in their case) because Windows was on one drive while its boot files were on the other. Recreating the boot files on the Windows partition with bcdboot fixed it, and the conversion went through after that. The same bcdboot command was also suggested on Microsoft Q&A for this error.
BCDBoot is a built-in Windows tool that sets up the files your PC needs to start Windows. With the /s option, it copies them from your Windows folder to the partition you name and creates the boot configuration there. In the Command Prompt (admin), do the following:
- Type the following command and press Enter (if Windows isn’t on
C:, change both letters):bcdboot C:\Windows /s C:
- Check the disk again with the disk number you found earlier:
mbr2gpt /validate /disk:0 /allowFullOS
- If it passes, and you’ve backed up your files (and suspended BitLocker if you use it), run the conversion:
mbr2gpt /convert /disk:0 /allowFullOS
- When it finishes, it tells you to switch the firmware to boot in UEFI mode. Restart your PC and go into your BIOS.
- Change the boot mode to UEFI, then save and exit.
To confirm it worked, run diskpart and list disk again: the disk now has an asterisk in the “Gpt” column.
Might be useful: How to Delete Protected EFI System Partition in Windows 11
Check the boot entries with bcdedit
If the boot files are already on the Windows disk, look at the boot configuration itself. MBR2GPT needs the default entry to point to your Windows partition, and old entries left behind by earlier Windows versions or other systems can get in the way. Here’s how to check:
- In the Command Prompt (admin), type the following command and press Enter:
bcdedit
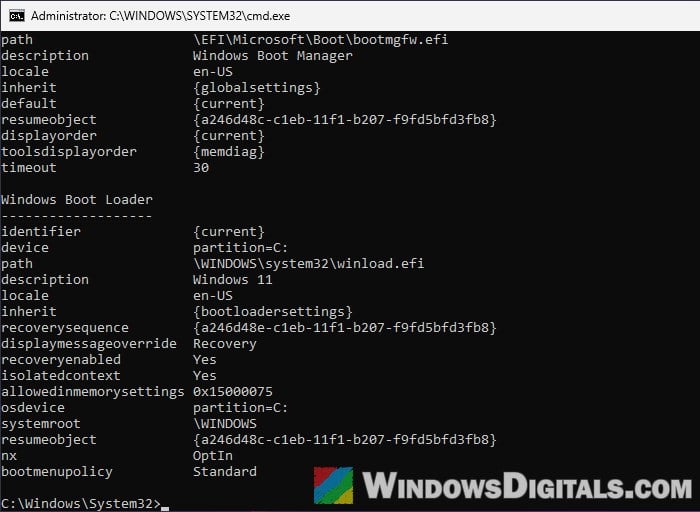
- Under “Windows Boot Manager“, look at the “default” line, then find the “Windows Boot Loader” entry with that same identifier. Its “device” and “osdevice” lines should point to your Windows drive (
partition=C:). The “path” lines on your PC may look different from the screenshot, which is fine. - Run the
mbr2gpt /validatecommand from earlier again after any change.
If you see entries for systems you no longer have, you can remove them with bcdedit /delete followed by the entry’s identifier. One user who wrote about fixing this error noted that the command works in Command Prompt but not in PowerShell, so use Command Prompt for it.
If you’re not sure what an entry is for, just leave it alone. Deleting the wrong one can stop Windows from starting.
If the check fails on the disk layout instead
Once the boot files are sorted out, MBR2GPT can still stop on one of its other checks, for example with “Disk layout validation failed” instead of this error. According to Microsoft, it refuses a disk with more than three primary partitions or with an extended partition on it, so a disk with extra recovery or tool partitions can fail. You can see your partitions in Disk Management, and setupact.log shows which check failed.
You’ll find suggestions online to disable the recovery environment with reagentc /disable and delete the recovery partition to get under the limit, but nobody on those threads confirmed it worked, and it removes your recovery partition, so it’s not something I’d do without a full backup.
If MBR2GPT still won’t convert the disk
If nothing above works, you still have two ways to get to GPT:
- A third-party partition tool. MiniTool Partition Wizard was suggested on Microsoft Q&A for this error. Back up your files first either way, since changing partitions always carries some risk.
- A clean install of Windows in UEFI mode. Back up your files, switch the firmware to UEFI, and install Windows from a USB drive. This wipes the disk, so it’s the last option.
Once you’re on GPT, switch the firmware to UEFI if you haven’t yet, then turn on Secure Boot. Our guides for Gigabyte and ASRock motherboards show where these settings are.