If you’re bumping into trouble with your Lenovo keyboard, like it’s not responding or seems turned off, and you really need to get your work done, this guide is for you. We will walk you through all the ways you can get your Lenovo keyboard working again.
Also see: How to Disable Laptop Keyboard Permanently in Windows 11
Page Contents
How to unlock the Lenovo keyboard
Often, the issue with a non-responsive Lenovo keyboard can be fixed with a simple key combo. Depending on your laptop model and where it was made, try pressing Fn + S + V or AltGr + S + V. Here’s how to go about it:
Step 1: Power off and unplug
First up, make sure your Lenovo laptop is off and disconnected from any power source. This helps in resetting your keyboard.
Step 2: Press the key combo
The combo you’ll need to press varies with your Lenovo model. Generally, press and hold Fn + S + V for a few seconds. On other models, it might be AltGr + S + V. After you release the keys, move on to the next step.

Step 3: Press the power button for a bit
Once you let go of the keys, hold down your laptop’s power button for a minute or two. This gives the keyboard a chance to reset.
Related issue: Windows 11 Keyboard Shortcuts Not Working (Fix)
Step 4: Power up and check
After resetting the keyboard, plug your laptop back in and power it up. Test the keyboard to see if it’s behaving now.
Other ways to fix Lenovo keyboard issues
If the key combo workaround didn’t do the job, there are other things you can try.
Update your keyboard driver
An old or corrupted keyboard driver could be the culprit of the problem. To sort this out, head to Lenovo’s site and grab the latest drivers for your model. Install them, reboot your laptop, and see if that fixes it.
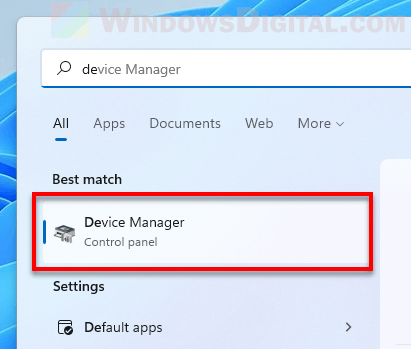
You can also update the driver via Device Manager in Windows 11 or 10. Here’s a quick way to do it:
- Hit the Start menu and look for “Device Manager”.
- Find the Keyboard section.
- Right-click your keyboard and pick “Update device”.
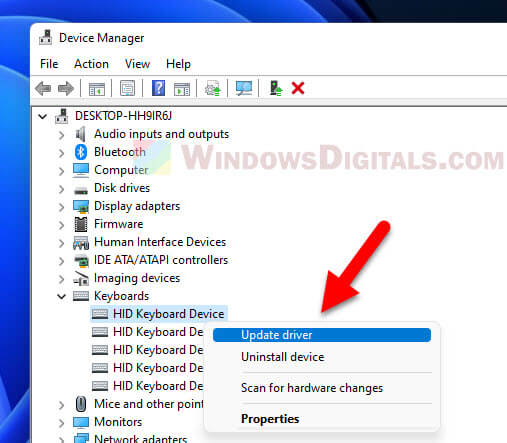
- Choose “Search automatically for drivers”.
- Follow the on-screen steps to finish the update.
- See if the keyboard works now.
Uninstall and reinstall the keyboard driver
If updating didn’t help, try removing and then reinstalling the keyboard driver:
- Search for “Device Manager” in Start and open it.
- Under the Keyboard section, right-click your keyboard and choose “Uninstall device”.
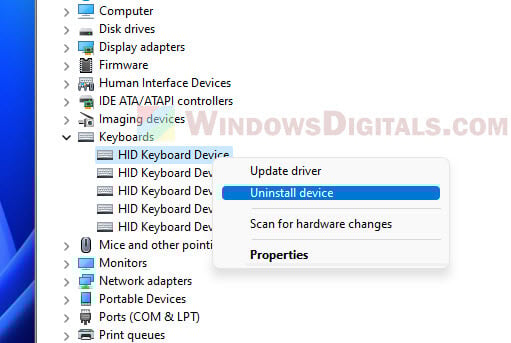
- Restart your Lenovo laptop.
- Windows should notice and reinstall the keyboard driver on its own.
- Check if the keyboard issue is resolved.
Suggested read: How to Lock Keyboard in Windows 11
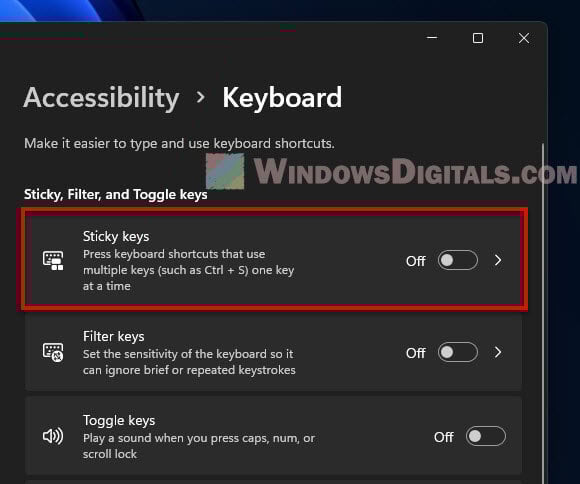
Turn off Filter keys
Filter Keys is meant to make typing easier but sometimes it gets in the way. Turning it off might help resolving your issues. Go to “Settings > Accessibility > Keyboard” in Windows 11 and switch off “Filter keys”.
Try restarting your laptop
Sometimes, a simple restart is all it needs. Turn your laptop off, wait a sec, and then power it back on. Check if the keyboard is back to normal.
Use an external keyboard
If none of the above worked, try to connect an external keyboard and see if that one works. If it does, you might need to look into replacing your laptop’s internal keyboard, or send it for warranty.
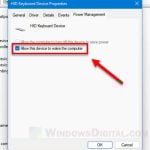
Make sure the keyboard is connected correctly
If you’re using an external keyboard and it’s not responding, make sure it’s plugged in properly.
- Unplug the keyboard from your laptop.
- Restart your laptop.
- Plug the keyboard back in.
- Check if it works now.
Clean the keyboard
At times, just giving your keyboard a good clean does the trick. Dust, crumbs, and other tiny bits can sneak under the keys and make them stick or ignore your taps. Power off your laptop, carefully flip it upside down, and give it a gentle tap to shake loose any dirt. For an even better clean, grab a can of compressed air and puff away the debris hiding between the keys.
Check for physical damage
Take a good look at your keyboard to spot any damage. Issues like keys that won’t budge, liquid spills, or general wear and tear can cause troubles. If you see any problems, tidying up that spot or having a pro check it out might be the way to go.
Reset your BIOS/UEFI settings
(Not recommended for people who do not know about BIOS) The BIOS or UEFI, which is the brain that gets your computer going, could be messing with your keyboard’s vibe. Restart your laptop and hit the key that gets you into BIOS or UEFI settings (it’s usually F2, Del, or Esc). Look for the option to reset everything to defaults, save your changes, and exit.