The exciting new Timeline feature that was introduced in the recent Windows April Update can be accessed via the Task View button on the taskbar or by pressing the “Windows Key + Tab.”
If the Task View button doesn’t show up on your taskbar or if you want to remove it, here’s a guide on how to add or remove the Task View button from the taskbar in Windows 10.
Page Contents
Add/Remove Task View or Timeline to Taskbar via context menu
It’s relatively easy to add the Task View button to the taskbar via the taskbar context menu. You may have just missed it. Here’s how:
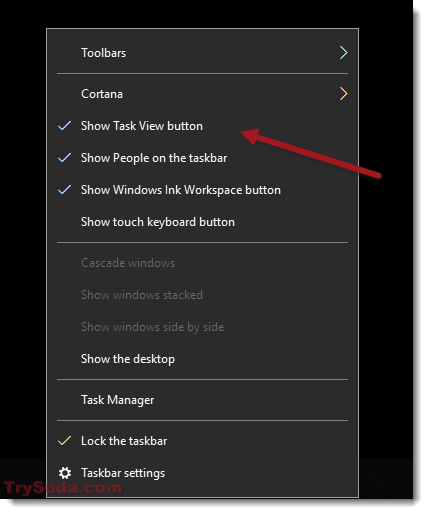
- Right click on your taskbar.
- From the context menu, click on Show Task View button.
- A tick icon beside Show Task View button means the Task View button is already added to your taskbar.
- To remove Task View/ Timeline from taskbar, simply uncheck the Show Task View button.
Even if you choose to hide the Task View from the taskbar, you can still access it via the keyboard shortcut – Windows Key + Tab.
If there is no option to show or hide Task View from the taskbar context menu, proceed to the next method.
Show or hide Task View/Timeline on Taskbar using registry
Use this method only if the first method above doesn’t work for you. Create a system restore point just in case; if things go wrong and you make a mistake when you edit the registry, you can restore your Windows.
- Go to Start Menu. Type regedit and open it.
- From the left pane, browse to the following registry path.
HKEY_CURRENT_USER\Software\Microsoft\Windows\CurrentVersion\Explorer\Advanced
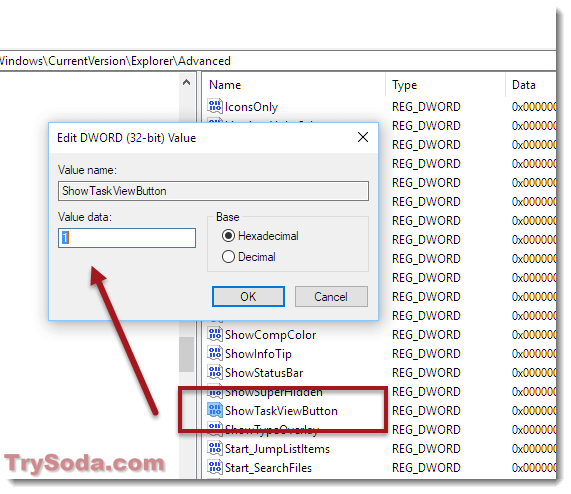
- In the right panel, look for the ShowTaskViewButton DWORD.
- Double click it and make sure the value is set to 1 if you want to show it on your Taskbar, or set the value to 0 if you want to hide it instead.
- Restart your computer.
Did you know that you can also add Task View or Timeline to your desktop context menu?
If you want to make accessing the Task View even easier, you can add it to your desktop context menu (right-click anywhere on your desktop). As usual, create a system restore point as a backup in case things go wrong. Here’s how to do it:
- Go to Start, then type regedit to open Registry Editor.
- Browse to the following registry path.
HKEY_CLASSES_ROOT\Directory\Background\shell
- Under the Shell key, you need to create a sub-key under it. Right click Shell. Select New, then Key. Name the new key TaskView.
- Under TaskView, create another sub-key under it. Right click the newly created TaskView key. Select New, then Key. Name the new key Command.
- Click on the Command key. In the right panel, double click on Default string value.
- Enter the following to the value data.
explorer shell:::{3080F90E-D7AD-11D9-BD98-0000947B0257}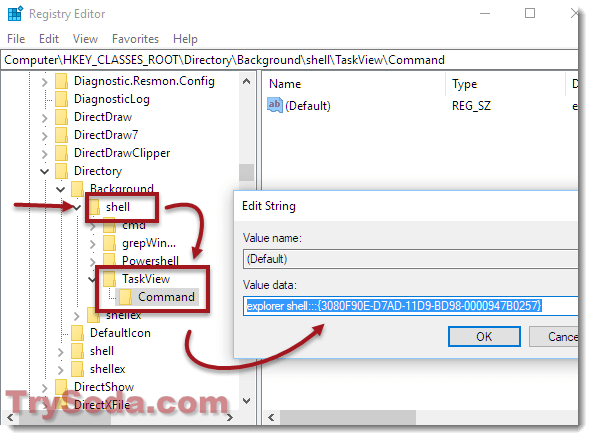
- Click OK.
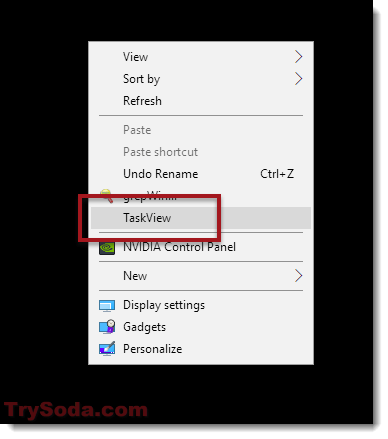
Now you should be able to see the Task View option on the context menu, which can be accessed when you right-click anywhere on your desktop.
5 tips on making the most of Timeline and Task View in Windows
Want to get better at using Timeline and Task View in Windows 11 or Windows 10? Here are five handy tips:
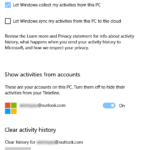
- If you use more than one device with the same Microsoft account, you can keep your Timeline the same on all of them. Just head to Settings > Accounts > Sync your settings and switch on the “Timeline” option.
- Need to clean up your Timeline history? No problem. Just go to Settings > Privacy > Activity history and hit “Clear” under “Clear activity history.” This gets rid of all the past activities on your Timeline.
- Task View isn’t just for checking your Timeline; it’s great for handling virtual desktops too. Virtual desktops let you separate your open apps and windows on different desktops. Create a new one by clicking the “New desktop” button in Task View and switch between them by clicking on the desktops in Task View.
- Got something important in your Timeline? Pin it, so it’s easy to find later. Just right-click on the activity you want to keep and choose “Pin to Taskbar.” If you change your mind, you can unpin it the same way.
- Make Task View work how you want by tweaking its settings. Jump into Settings > System > Multitasking to turn features on or off, like “Pressing Alt+Tab shows the most recently used” and “Virtual desktops.” You can also adjust other options like how many virtual desktops you have and the way Task View shows your windows.