If, after upgrading to the Windows 10 April v1803 update, you go to the Task View and find that there is nothing displayed in the Timeline feature, we will explain why it may not be working and how to turn the feature back on (if it’s off).
The Timeline is a new feature introduced back in the Windows 10 April update. It allows users to search and view past activities, such as opened apps, visited web pages, and accessed documents, all in the timeline. You can also return to any of these past activities.
If your Timeline is not working at all in Windows 11 or 10, it may be disabled. To enable it, go to the Activity history setting and turn on the Timeline feature. Otherwise, check out the solutions below.
Page Contents
How to fix Timeline feature not working
If the Timeline is not showing any past activities, or you simply can’t access the Timeline feature, go to the following settings and check if you’ve allowed Windows to collect the necessary info for the timeline to work:
- Go to Start, search for Settings, and click on it.
- Go to Privacy.
- On the left pane, select Activity history.
- Enable the settings that read “Let Windows collect my activities from this PC“.
- Optionally, if you want Windows to sync your activities across your devices, enable “Let Windows sync my activities from this PC to the cloud“.
- Under “Show activities from accounts,” make sure that the toggle beside your Microsoft account is toggled on.
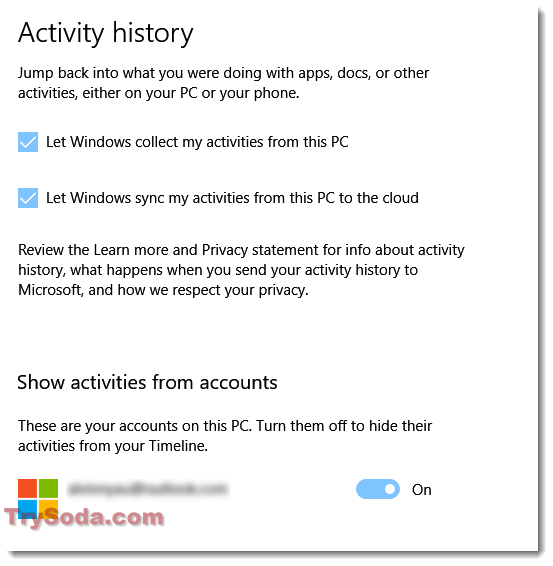
If you have multiple Microsoft accounts on the list, toggling them on means that their activities will be shared in the Timeline.
After enabling the necessary options and settings, restart your computer. As you use your computer, the Timeline will collect your activities. Check back tomorrow, and the Task View should display past activities in the Timeline.
If you cannot access the Task View from the taskbar, try pressing the Win + Tab keys. To re-enable the Task View button on the taskbar, right-click it and select “Show task view” button.
If you’re only seeing recent activities, you can set the Timeline to show activities from more days in the past. Make sure you’re signed into your Microsoft account. Go to the Timeline and scroll down until you see “See more days in Timeline.” Click the “Turn on” button.
Check the registry settings for Timeline
If nothing from the above helps, you may need to check your registry settings for the Timeline feature. Before making any changes to the registry, create a system restore point as a backup, in case things go wrong.
Here are the steps to check the registry settings:
- Go to the Start Menu.
- Search for regedit and open it.
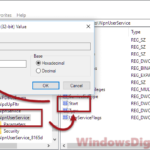
- Browse to the following path in the Registry editor:
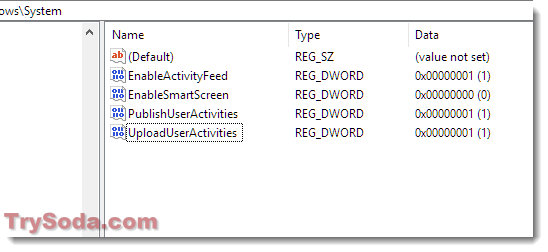
HKEY_LOCAL_MACHINE\SOFTWARE\Policies\Microsoft\Windows\System
- In this path, make sure the DWORD (32-bit value) of EnableActivityFeed, PublishUserActivities, and UploadUserActivities are set to 1.
- If these items are not in the list, create them by right-clicking anywhere in the right panel, selecting New, and selecting DWORD (32-bit). Enter the name as mentioned and set the value to 1.
Check for Windows Updates
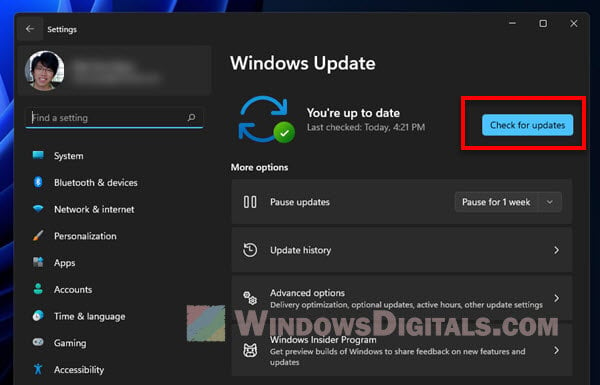
Sometimes, the reason why the Timeline feature isn’t working right could be because of some bugs or issues with the operating system that could have been already fixed by an update. Updating Windows might just fix that. To check for updates, head to the Start menu, hit Settings, then choose Update & Security. Tap on Windows Update and see if there are any updates waiting for you.
Use alternative timeline apps
If the Timeline feature in Windows 10 still isn’t working correctly and you still want to keep tracks of what you’ve done in the past, you may want to try out some other Timeline apps. There are a bunch of third-party apps like ActivityWatch, RescueTime, and Timely available for Windows. They might have some cooler features and ways to customize things that you don’t get with the built-in Windows Timeline feature.
Reset your Windows 10 PC
If nothing works and as a last resort, you might want to think about resetting your Windows PC back to factory settings. Note that this will wipe all your personal data and settings, so it’s extremely important that you back up all your stuff that you couldn’t lose before you go ahead with it.
To reset your PC, head over to the Start menu, click on Settings, then go to Update & Security. Click on Recovery and choose “Reset this PC“. Just follow what’s on the screen to complete the reset process. This should bring the Timeline feature back to its original state and might just solve the problem you’re facing. You should only do this if you think getting the Timeline feature back is worth your time and effort. Also, the reset might not guarantee to fix the Timeline issue.