Services are kind of like the backbone of the operating system and the apps that run on it. But, sometimes you might need to remove a service. Maybe you’re troubleshooting, trying to speed up your computer a little bit, or getting rid of a service that was left behind by a program you’ve already uninstalled.
In this guide, we’ll show you how to safely delete a service in Windows 11 or Windows 10 using Command Prompt (CMD). We’ll also talk about what to watch out for and how to make sure you don’t mess things up.
Page Contents
Why delete a service?
So, why would you want to delete a service sometimes?
- Getting rid of a program that left its service behind.
- Removing a service that’s causing problems or clashing with others.
- Trying to make your computer run slightly faster by getting rid of services you don’t need.
You should know what a service does before you decide to delete it. If you remove something important, it can cause serious issues.
Also see: 30+ Windows 11 Services to Disable for Gaming Performance
What happens if you delete a service in Windows 11 or 10?
After deleting a service, the programs or even the system itself that rely on the removed service will not be able to use the functions provided by the service. Most will stop working right away, while some will have issues with part of their features.
Some programs will automatically restore the service when it finds that it’s missing, while for the others that don’t, you will need to reinstall the app in order to bring back the service should you need to.
Therefore, please think twice before deleting a service because you might cause more harm than good if many things need that specific service to work. A smart way would be to create a system restore point first prior to removing any service in Windows. This way, if something goes south, you can still go back to how things were.
If you just want to turn the service off instead of deleting it, check out: How to disable startup services on Windows 11 or 10.
Opening Command Prompt as administrator
Before we start deleting anything, we need to open Command Prompt as an admin, because you need special permissions to delete services.
- Hit the Start button or press the Win key.
- Search for “cmd” or “Command Prompt”.
- Right-click Command Prompt in the results and choose Run as administrator. If it asks for permission, click Yes.
Useful tip: Run CMD, PowerShell or Regedit as SYSTEM in Windows 11

List services using “sc query” command
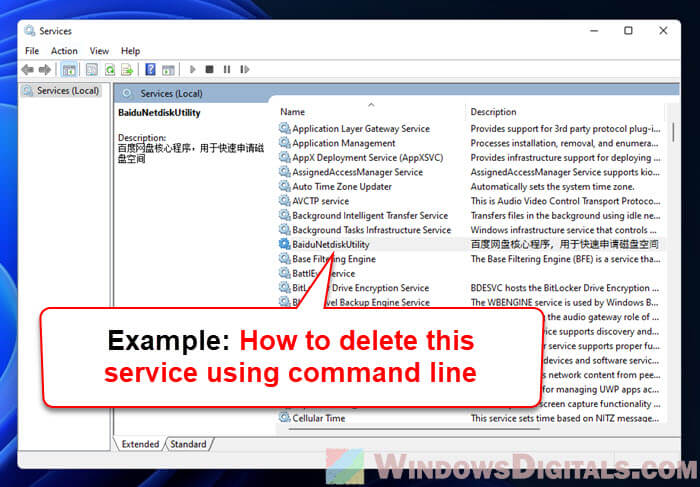
First off, we need to find the service you want to delete. We’ll use the sc query command to see all the services on your computer.
In Command Prompt, type this and hit Enter:
sc query type= service
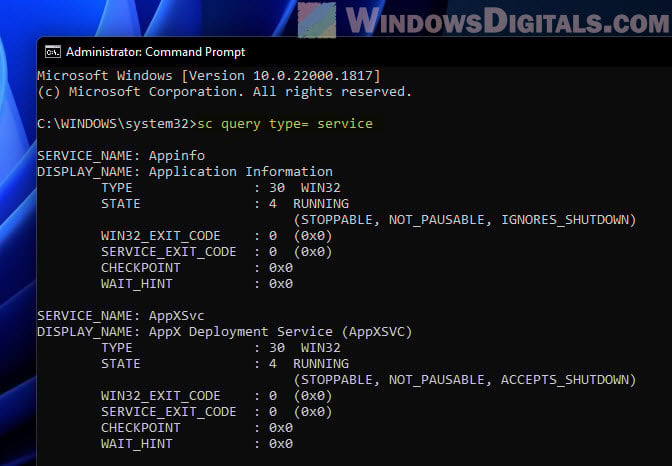
This will show you a list of all services, with their SERVICE_NAME and DISPLAY_NAME. Note down the SERVICE_NAME of the one you want to delete.
Checking service dependencies
Before getting rid of a service, you need to see if other services rely on it. Deleting a service that other services need can cause unwanted problems.
To check a service’s dependencies, type this in Command Prompt, swapping <SERVICE_NAME> with the service’s name:
sc qc <SERVICE_NAME>
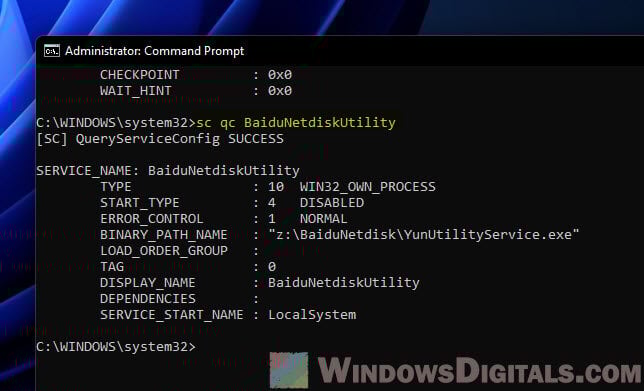
Look for the DEPENDENCIES section. If it’s empty, you’re good to go to the next step.
Stop a service using “sc stop” command
Before deleting a service, we need to stop it if it’s running. We’ll use the sc stop command for this. Just type the following, but use the name of the service you’re stopping instead of <SERVICE_NAME>:
sc stop <SERVICE_NAME>
For instance, to stop “SampleService”, you’d write:
sc stop SampleService
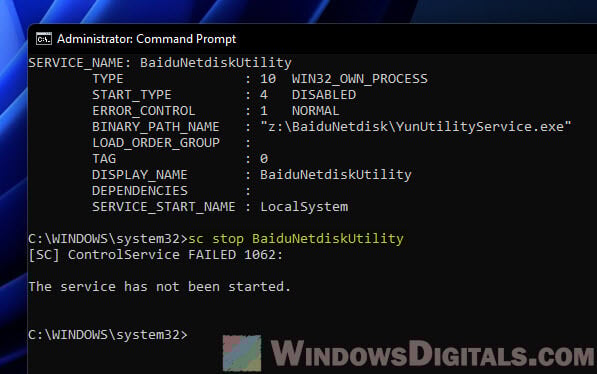
Hit Enter. If it stops successfully, you’ll get a message saying so. If it wasn’t running, it’ll tell you that too.
Note: Stopping a service could affect other things that depend on it. Make sure you know what you’re doing before you hit stop.
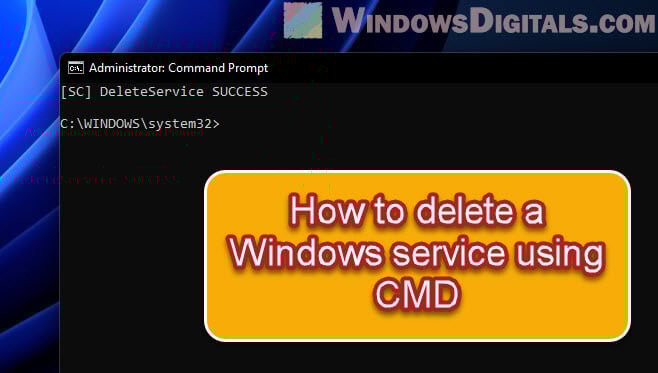
Delete a service using “sc delete” command
After stopping the service and checking it has no dependencies, you can delete it. Just type the following in Command Prompt. Replace <SERVICE_NAME> with the service’s name.
sc delete <SERVICE_NAME>
If you’re deleting “SampleService”, here’s what you’d type:
sc delete SampleService
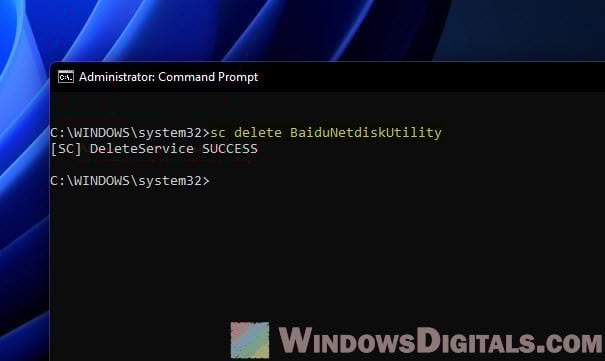
Press Enter. If everything goes right, you’ll see a message saying the service was deleted.
Related resource: How to Delete a Ghost File or Folder in Windows 11/10
Document changes made to services
When you delete or change a service, keep a record of what you did. Write down which service you stopped, modified, or deleted and why. This can be very useful if you need to troubleshoot in the future or if you need to reverse the changes. It also helps if someone else, like your system admin, needs to know what was changed on the system.
Check with a pro if you’re not sure
If you’re not completely confident about what a service does or whether it’s safe to delete it, you should definitely ask for opinion from an expert first. Whether it’s a tech-savvy friend or a professional, getting a second opinion can prevent catastrophic mistakes that might be very difficult to fix.