If you often share screenshots of order confirmations, account pages or error messages, you’ve probably had to blur or crop out an email address or phone number by hand before sending them. Snipping Tool on Windows 11 can actually redact (black out) that text for you, either automatically with one click or for any text you pick yourself. This guide will show you how to use both, how to undo them, and what to do if you can’t find the option.
Also see: How to Draw a Box Around Text in Snipping Tool
Page Contents
What does redacting in Snipping Tool actually do?
Snipping Tool can read the text inside a screenshot (this is called text recognition, or OCR). Once it knows where the text is, it can cover parts of it with solid black bars, so that text is hidden in the copy you share. Microsoft says the text recognition is done locally on your PC.
There are two ways to use it:
- Quick redact: Covers every email address and phone number it finds in the screenshot, all at once.
- Redact text: Covers any text you select yourself, like a name, an address or an order number.
The feature first showed up in 2023 under the name “Text actions”, and many guides (including Microsoft’s own support page) still call it that. In the current Snipping Tool, though, the button is now called Scan text. It does the same thing.
Pro tip: How to Crop Screenshot on Windows 11
Hide email addresses and phone numbers with “Quick redact”
This is the quickest way if all you need to hide are emails and phone numbers. Here’s how to do it:
- Open the Start menu, type “snipping tool” and open Snipping Tool.
- Choose the kind of snip you want in the mode dropdown (Rectangle, Window, Full screen or Freeform).
- Click New and take your screenshot. It opens in Snipping Tool’s editor.
- If the screenshot you want to edit is already saved on your PC, press Ctrl + O in Snipping Tool instead and open the image file.
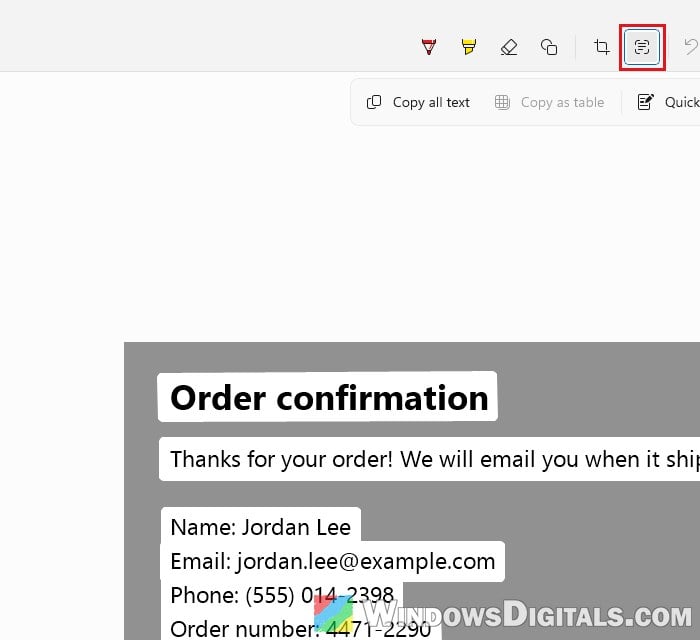
- Click the Scan text button (the icon next to the crop button in the toolbar). The image dims a little and the text it recognized gets highlighted, with a small bar showing Copy all text, Copy as table and Quick redact.
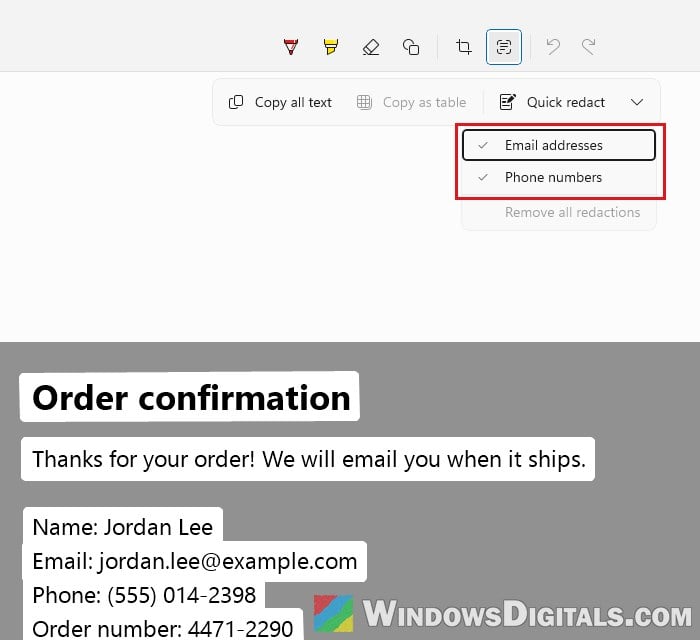
- If you only want to hide one kind of information, click the small arrow next to Quick redact and untick either Email addresses or Phone numbers. Both are ticked by default, so you can skip this step otherwise.
- Click Quick redact. The email addresses and phone numbers it found are now covered with a black bar.
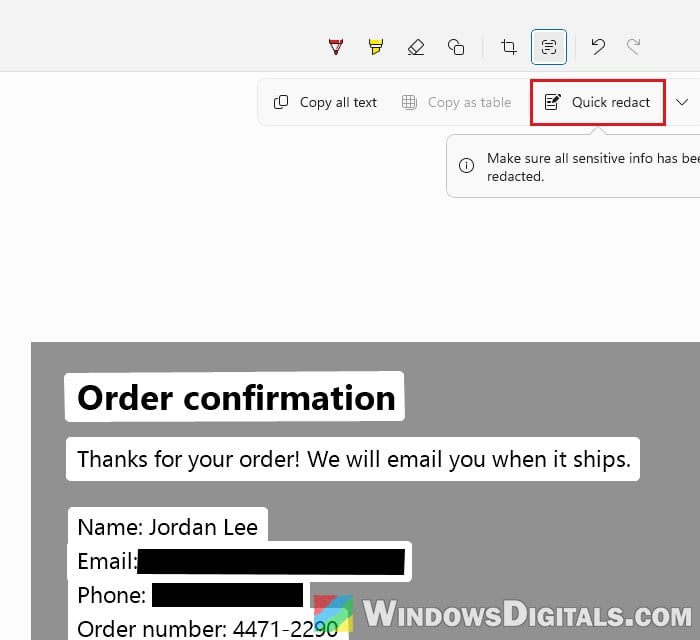
After redacting, Snipping Tool shows a short reminder to “Make sure all sensitive info has been redacted.” Quick redact only looks for email addresses and phone numbers, so names, home addresses, account numbers and anything else personal will still be visible. It also relies on text recognition, so it can miss text it doesn’t recognize. So before you send it, always look over the whole image yourself.
Redact any other text manually
For anything Quick redact doesn’t catch, you can black out the text yourself, as long as Snipping Tool recognized it. Here’s how:
- With your screenshot open in Snipping Tool, click Scan text in the toolbar.
- Select the text you want to hide by clicking and dragging over it with your mouse.
- Right-click the selected text and choose Redact text. You can also just press Ctrl + R after selecting it.
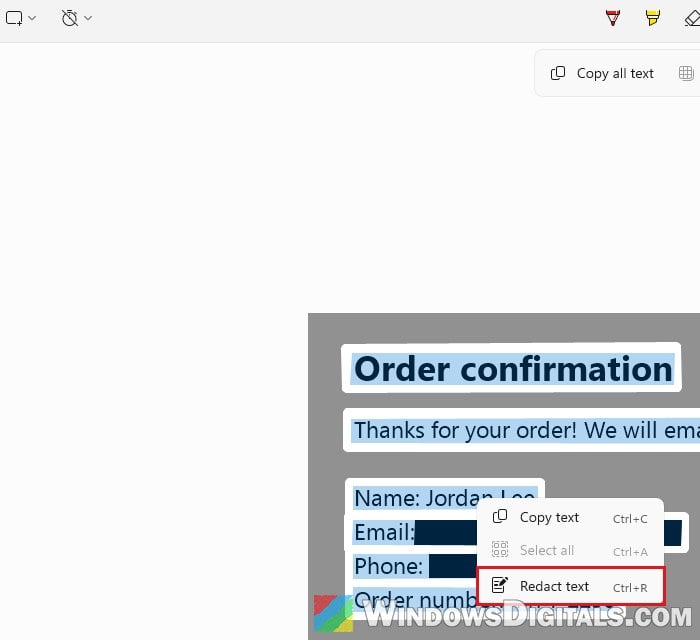
The selected text will now be covered by a black bar, the same way Quick redact does it. Repeat this for every part of the screenshot you want to hide. Note that the Redact text option stays grayed out until you’ve actually selected some text.
How to undo or remove redactions
If you redacted something by mistake, click Undo in the toolbar to take back the last change. To remove every redaction at once, click the small arrow next to Quick redact and select Remove all redactions. The original text will show up again, and you can start over.
Save the redacted screenshot
Once you’re happy with the result, click Save as to save the redacted copy where you want it, or use the Copy or Share buttons in the toolbar to send it right away.
Please note that if “Automatically save screenshots” is on in Snipping Tool’s settings (it is by default), every snip is saved to your Screenshots folder as soon as you take it. That means the copy in that folder may still show the text you redacted afterward, so delete it if you don’t want the unredacted version lying around on your PC.
Related guide: How to Find Snipping Tool History in Windows 11 or 10
What if there’s no “Scan text” button?
If you don’t see Scan text (or Text actions) anywhere in Snipping Tool’s toolbar, your copy of Snipping Tool is most likely too old. The text features were first added in version 11.2308.33.0 (in 2023), and the built-in copy on a new Windows 11 26H2 install we tested was still older than that until Microsoft Store updated it.
To update it, follow the steps below:
- Open Microsoft Store.
- Click Downloads near the bottom of the left sidebar.
- Click Check for updates and let it update your apps, including Snipping Tool.
- Close and reopen Snipping Tool, then open your screenshot again.
The Scan text button should now show up in the editor’s toolbar. If Snipping Tool is missing from your PC altogether, see: Install or Uninstall Windows 11 Snipping Tool via PowerShell.