When working with Azure Active Directory (Azure AD) and its synchronization services, admins often use the Start-ADSyncSyncCycle PowerShell cmdlet to manually start the synchronization cycles. This command is very important when you’re using Azure AD Connect which usually installed on a Windows Server. It makes sure that objects in your on-premises Active Directory match up with those in Azure AD.
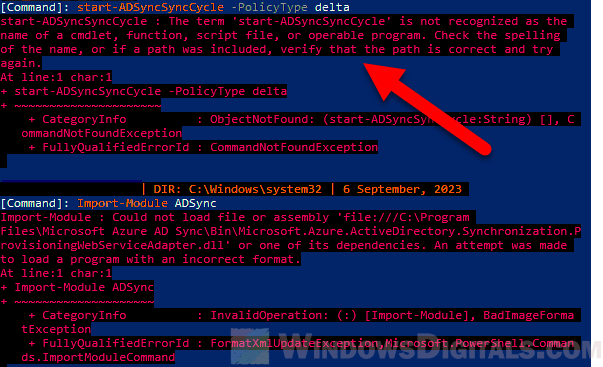
Sometimes, though, you might see an error that says “The term Start-ADSyncSyncCycle is not recognized as the name of a cmdlet, function, script file, or operable program“. In this guide, we’ll talk about why this happens and show you how to fix it.
Page Contents
Why Start-ADSyncSyncCycle is not recognized
The Start-ADSyncSyncCycle cmdlet is part of the ADSync module in PowerShell, which comes with Microsoft Azure AD Connect. This tool helps sync your local Active Directory with Azure Active Directory.
If PowerShell can’t find or recognize the “Start-ADSyncSyncCycle” cmdlet, it usually means one of the following things:
- The machine you’re working on might not have Azure AD Connect installed.
- Even if Azure AD Connect is installed, the ADSync PowerShell module might not be loaded into the current session.
- Sometimes, if you’re not running PowerShell as an admin or if your session is outdated, it can cause the cmdlet not to be recognized.
- It’s also good to check the command’s spelling to make sure a typo isn’t the issue.
Related resource: Install Active Directory Users and Computers via PowerShell
Verify whether the ADSync module exists
First off, let’s make sure the ADSync module is actually installed on your system.
Launch PowerShell as an Administrator and run the following command to see all the modules you have:
get-Module
This command will show you all the modules available to PowerShell. If you see ADSync in the list, you’re set. If not, the module might not be installed, or it might be in a directory that PowerShell doesn’t know about.
ModuleType Version  Name                                 ExportedCommands
---------- -------  ----                                 -----------------
Manifest   3.1.0.0  Microsoft.PowerShell.Management       {Add-Computer, Add-Content, Checkpoint-Computer, Clear-Content...}
Manifest   3.1.0.0  Microsoft.PowerShell.Utility          {Add-Member, Add-Type, Clear-Variable, Compare-Object...}
Script     2.0.0    PSReadline                            {Get-PSReadLineKeyHandler, Get-PSReadLineOption, Remove-PSReadLineKeyHandler, Set-PSReadLineKeyHandler...}
Binary     1.0.0.1  PackageManagement                     {Find-Package, Find-PackageProvider, Get-Package, Get-PackageSource...}
Script     1.0.0.1  PowerShellGet                         {Find-Command, Find-DSCResource, Find-Module, Find-RoleCapability...}
Check where the ADSync module should be by going to its usual install path:
C:\Program Files\Microsoft Azure AD Sync\Bin\ADSync
If it’s there but not showing up in PowerShell, there might be an issue with the path settings or it might not be imported correctly.
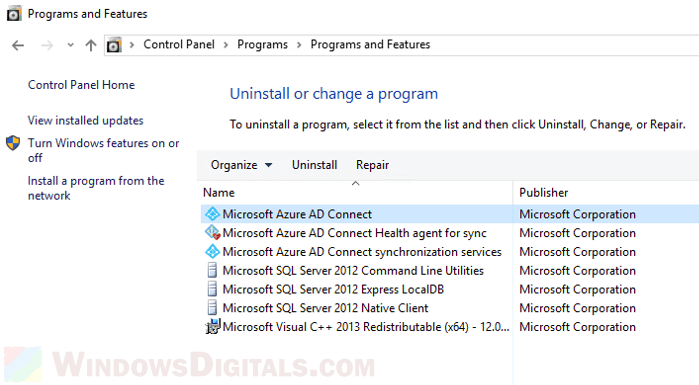
You can also check if ADSync is installed by going to Control Panel > Programs and Features and looking for Microsoft Azure AD Connect among the installed programs. If it’s not there, you’ll need to download and install it from Microsoft’s website.
Import the ADSync module into PowerShell
If ADSync is on your system but PowerShell doesn’t see it, you’ll need to import it manually. The following steps will show you how to do it.
Start by setting PowerShell’s execution policy to allow scripts to run:
Set-ExecutionPolicy RemoteSigned
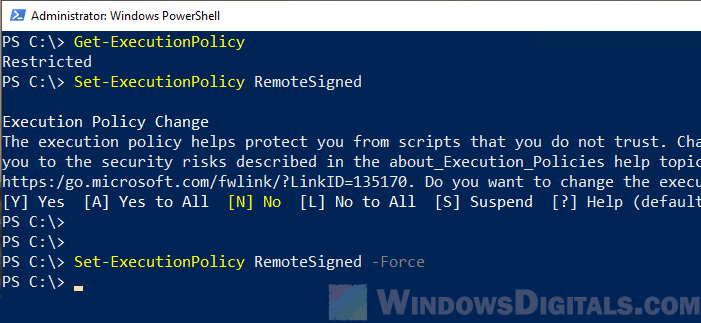
Note that changing the execution policy lets you run scripts you wrote yourself without a digital signature, but you’ll need a signature for scripts downloaded from the internet.
Next, add the ADSync module to your PowerShell session with this command (adjust the path if needed):
Import-Module -Name "C:\Program Files\Microsoft Azure AD Sync\Bin\ADSync" -Verbose
The -Verbose option tells you exactly what’s happening, which helps confirm the module is loading or shows you any problems.
Check again to see what modules are now available:
get-Module
You should see “ADSync” listed now, along with its commands.
ModuleType Version  Name                                 ExportedCommands
---------- -------  ----                                 -----------------
Manifest   3.1.0.0  Microsoft.PowerShell.Management       {Add-Computer, Add-Content, Checkpoint-Computer, Clear-Content...}
Manifest   3.1.0.0  Microsoft.PowerShell.Utility          {Add-Member, Add-Type, Clear-Variable, Compare-Object...}
Script     2.0.0    PSReadline                            {Get-PSReadLineKeyHandler, Get-PSReadLineOption, Remove-PSReadLineKeyHandler, Set-PSReadLineKeyHandler...}
Binary     1.0.0.1  PackageManagement                     {Find-Package, Find-PackageProvider, Get-Package, Get-PackageSource...}
Script     1.0.0.1  PowerShellGet                         {Find-Command, Find-DSCResource, Find-Module, Find-RoleCapability...}
Binary     1.0.0.0  ADSync                                {Start-ADSyncSyncCycle, Stop-ADSyncSyncCycle, Get-ADSyncScheduler...}
Now that the ADSync module is in place, you should be able to use the “Start-ADSyncSyncCycle” cmdlet in PowerShell.
Run the Start-ADSyncSyncCycle cmdlet
With the ADSync module imported into your PowerShell session, you’re all set to start the synchronization cycle.
Just run this command:
Start-ADSyncSyncCycle -PolicyType Initial
This kicks off the initial full sync of all objects.
To keep an eye on how it’s going, use this command:
Get-ADSyncScheduler
This shows you details like when the last sync happened and when the next one is due. The “SyncCycleEnabled” field will show “True,” meaning the sync is ongoing.
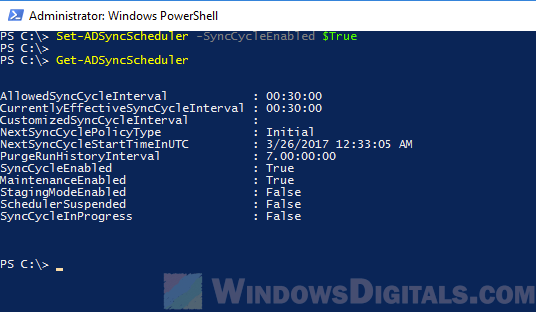
The Start-ADSyncSyncCycle cmdlet won’t tell you “Success” or “Failure” by itself in the session where you run the sync. To track success or issues, use the Get-ADSyncScheduler cmdlet or check the Azure AD Connect Synchronization Service Manager.