Rufus is a very popular small tool that allows you to create bootable USB drives from ISO files. People usually use this tool to create operating system installation bootable media or just to back up important stuff. But sometimes, when the tool tries to write files onto your USB drive, it might pop an error that says “Error: Access to the device is denied“, and fail the process.
In this guide, we’ll look into why this error shows up in Rufus and show you some fixes for it on Windows 11 and Windows 10.
Page Contents
What’s the problem?
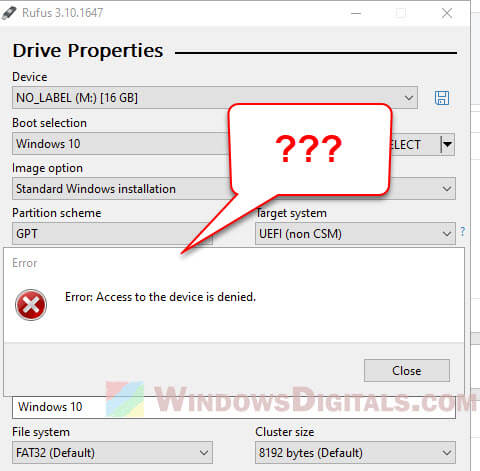
The “Access to the device is denied” error happens when Rufus can’t write to the USB drive. This problem can show up in any Rufus version, including Rufus 3.21 and newer. If you see this error, check the Rufus log to find a message like “Write error [0x00000005] Access is denied“.
Why does this error happen?
A few things might cause Rufus to end up with the “Access to the device is denied” error when you’re trying to create a bootable USB. Below are some usual suspects.
Related issue: Windows 11 bootable USB doesn’t boot
Microsoft Defender or antivirus software is blocking Rufus
The big reason is Microsoft Defender’s Controlled Folder Access or some antivirus software stopping Rufus from writing to the USB as a security step to stop harmful software from messing with your files.
Microsoft Defender’s Controlled Folder Access is all about keeping your files safe from unwanted changes. If Rufus tries to get to the USB, this feature might block it.
And if you have antivirus software from another company, it might block Rufus too, thinking it’s something bad.
You don’t have enough permission
If you’re using a computer as a guest or with a standard user account, you might not have the okay to access the USB. This means Rufus can’t write to it either.
The USB drive is not working right
Another reason could be the USB drive itself. If it’s broken or has some issues, Rufus won’t be able to do its job. Things like bad sectors on the drive can cause problems.
Something’s up with the USB port
Also, the problem might be the USB port you’re using. If it’s not connected properly or is damaged, Rufus can’t access the USB drive.
How to fix the issue
Here’s how you can solve the “Access to the device is denied” error in Rufus.
See also: How to Burn Windows 11 ISO to USB
Temporarily disable Microsoft Defender’s Controlled Folder Access feature
The quickest fix is to turn off the Controlled Folder Access in Microsoft Defender temporarily. Just do the following:
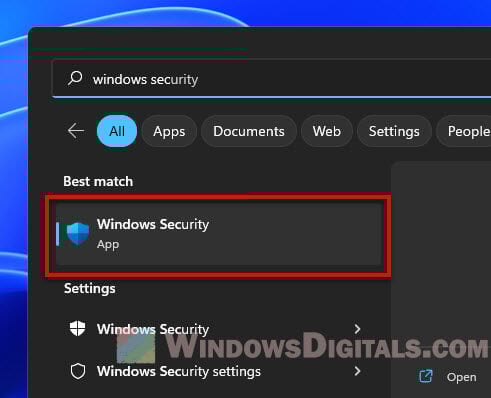
- Hit the Start menu and type “Windows Security” in the search box.
- Open “Windows Security” from the search results.
- Choose “Virus & threat protection” from the menu on the left.
- Under “Virus & threat protection settings“, go to “Manage settings“.
- Go down to “Controlled folder access” and switch it to “Off“.
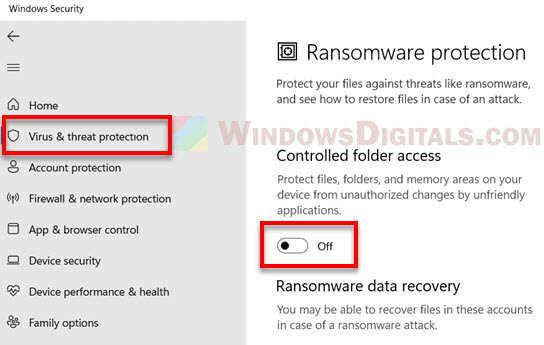
- If it asks, hit “Yes” to confirm you want to turn off this feature.
- Now, you should be able to use Rufus without the “Access to the device is denied” error.
Note: Once you’re done using Rufus, don’t forget to turn the Controlled Folder Access back on for extra safety.
Add Rufus as an allowed app in the Controlled Folder Access
If the error comes up because of the Controlled Folder Access feature, you can make Rufus an allowed app without turning the feature off.
Here’s how to make Rufus allowed:
- Search for the Windows Security app in the Start menu and open it.
- Click on “Virus & threat protection“.
- Under “Virus & threat protection settings“, pick “Manage settings“.
- Scroll to “Controlled folder access” and choose “Manage Controlled folder access” or “Allow an app through Controlled folder access“.
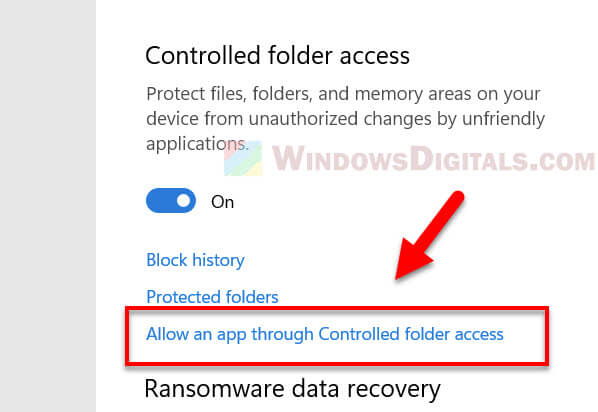
- In “Allowed apps“, select “Add an allowed app“.

- Hit “Browse all apps“.
- Find the Rufus program file, usually “Rufus.exe“, and open it.
- Click “Open” then “Add“.
- Now Rufus is allowed and should work without turning off the security feature.
Turn off antivirus software or put Rufus on its safe list
Just like Microsoft Defender’s special folder protection, other antivirus programs can also sometimes block Rufus and result in the “Access to the device is denied” error. They might think Rufus is a bad thing trying to mess with your USB stick.
If Rufus is getting stopped by your antivirus, turning it off for a while can allow Rufus to do its job on the USB drive. But don’t forget to turn it back on when you’ve finished creating your bootable USB drive.
Also see: How to let an app through the Firewall in Windows 11
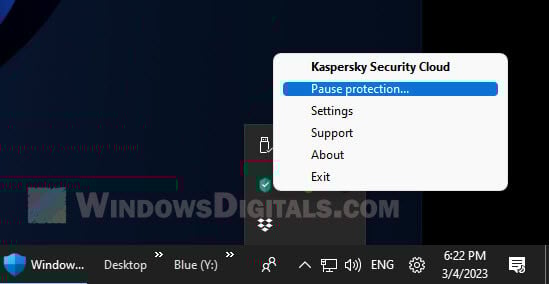
To temporarily turn off your antivirus, find its icon near your clock and right-click it. You should see an option to pause it for a bit.
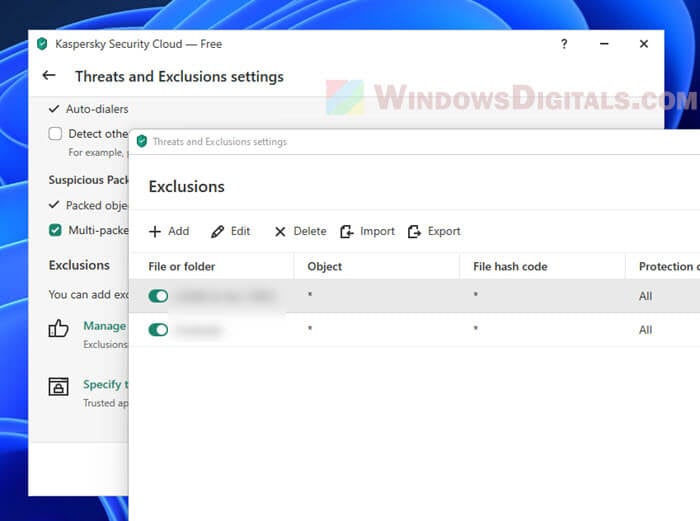
Or, you can tell your antivirus to ignore Rufus. This means Rufus can work with your USB without the antivirus stopping it. Check your antivirus guide on how to do this because each one is a bit different.
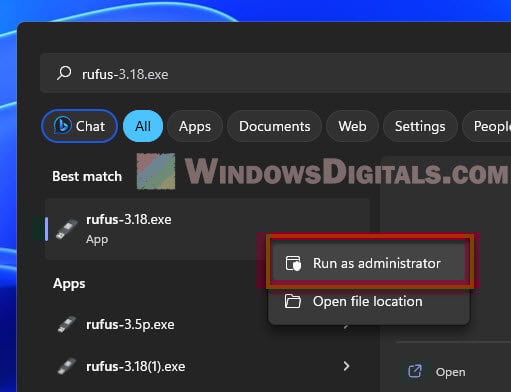
Make sure to run Rufus as administrator
Sometimes Rufus needs to be the boss to avoid the “Access to the device is denied” error. If your user account doesn’t have the right to touch the USB stick, or if the stick says “no writing allowed,” then Rufus needs to be run as the boss (administrator) to work properly.
Suggested read: How to take over a folder or drive in Windows 11
To run Rufus as the boss, right-click the Rufus program and choose “Run as administrator“. This gives Rufus the power it needs to work on the USB stick without problems.
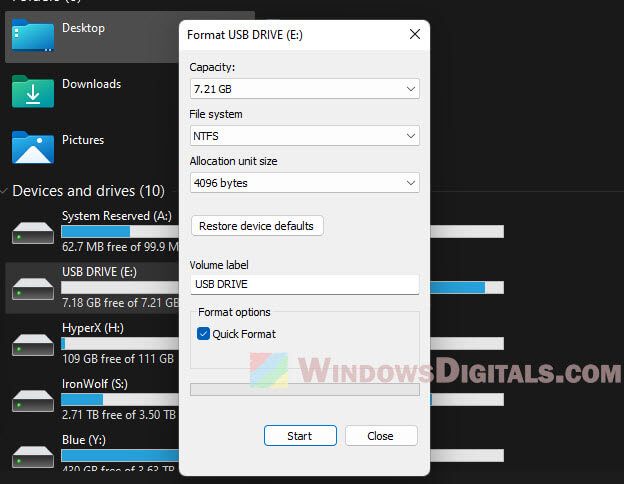
Manually format the USB drive first
If your USB stick isn’t working right, you might need to clean it up (format it) before Rufus can use it. Plug it into your computer, open File Explorer, right-click the USB stick, and choose “Format“. Then, just follow the steps on the screen to clean it. After that, Rufus should be able to turn your USB stick into a startable drive with no fuss.
Try plugging into a different USB slot
If Rufus still can’t talk to your USB stick, try a different USB slot on your computer. If that doesn’t help, check if the stick works on another computer. If it does, your computer’s USB slot might be the problem.
If you think your USB slot is broken, it might need fixing or replacing. Or, you can use a USB hub or adapter to connect your stick if the slot’s busted.
Looking at other ways
While Rufus is great for making USB sticks startable, getting the “Access to the device is denied” error is a pain. If none of these tips fix it, there’s another way to make a startable USB for Windows: the Media Creation Tool.
The Media Creation Tool is from Microsoft and free. It helps you make a USB stick that can install Windows 11 or Windows 10. It’s easy to use; just download it, follow the steps, and wait for it to make your USB stick ready to go.