Proxy settings are like the rules that tell your computer how to connect to the internet through a special server (proxy server). In Windows 11 and Windows 10, these settings can be configured to meet your needs. However, there are cases where these proxy settings can be unknowingly changed by a malicious program or a network-related software. When the proxy settings are incorrect or the server is unreachable, you will have problems connecting to the internet or opening any webpages at all.
In this guide, we will show you how to permanently disable any proxy settings you may have in Windows 11 or 10. We’ll show you various methods so if one doesn’t work or you have no access to it, you can try the other.
Also see: How to Disable VPN in Windows 11
Page Contents
Disable Proxy Settings in Windows 11 or 10 via Settings or IE
In previous versions of Windows, we had to go through Internet Explorer to configure proxy settings. While changing settings through IE still works in Windows 10, there is now a more straightforward way to do this through the Settings app, especially for Windows 11. Follow the steps below to disable the proxy settings.
- Go to the Start Menu or Cortana.
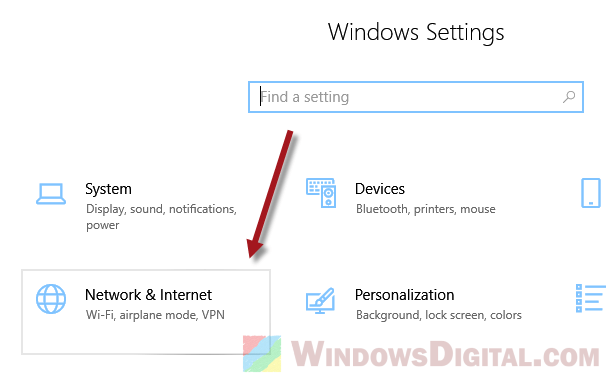
- Search for “Settings” and open it.
- Select “Network & Internet.”
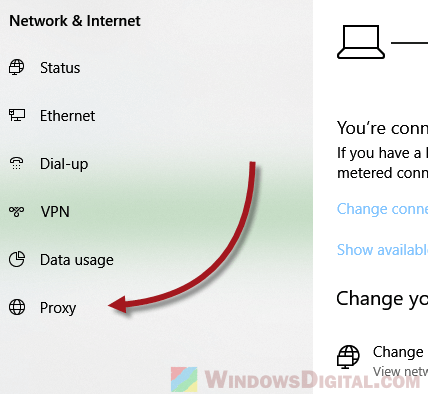
- From the left pane, click on “Proxy.”
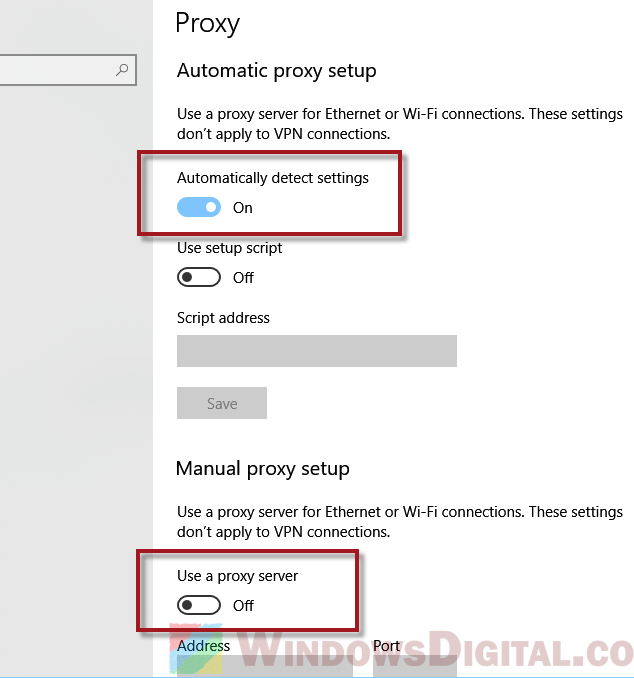
- Under “Automatic proxy setup,” switch on the “Automatically detect settings” option.
- Under “Manual proxy setup,” disable the “Use a proxy server” option.
- Close the settings window and restart your PC.
If for any reason you must use the Internet Options via IE to change the proxy settings, follow these steps:
- Open Internet Explorer.
- Click on the “Settings” icon and select Internet Options.
- Go to the Connections tab, then click on “LAN settings.”
- Enable “Automatically detect settings” and disable “Use a proxy server for your LAN.”
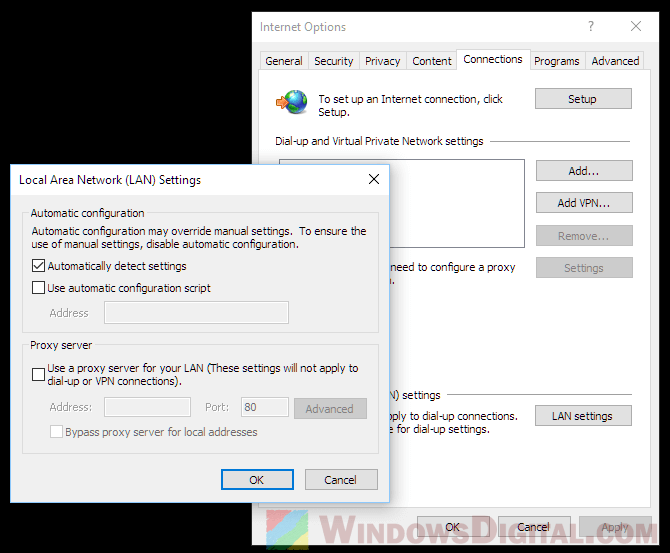
- Click “OK” and reboot your computer.
Some have reported that the automatic proxy settings checkbox will sometimes be grayed out when trying to set the proxy settings to automatic via LAN Settings in Internet Explorer, which makes it impossible to apply. If that’s the case, the method using the Settings app above should help to disable the proxy settings and set them to automatic in Windows 11 or 10.
Disable proxy settings via Registry
If the above options don’t work, you might need to try changing the proxy settings in the registry. But be careful, messing up the registry can cause very serious problems. Always back up your registry or create a system restore point first.
- Press the “Win+R” key to open the Run window.
- Type “regedit” and hit Enter to open Registry Editor.
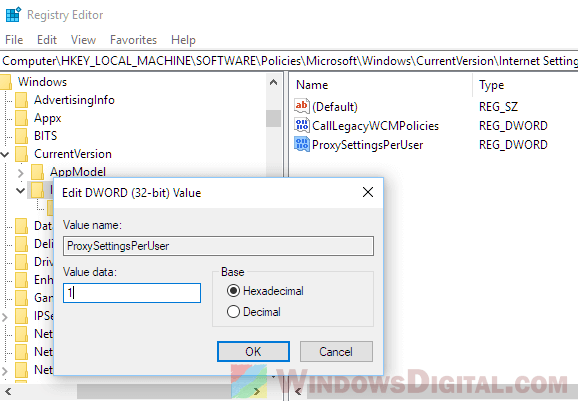
- In Registry Editor, navigate to the following registry path:
HKEY_LOCAL_MACHINE\Software\Policies\Microsoft\Windows\CurrentVersion\Internet Settings
- Double-click on the “ProxySettingsPerUser” registry.
- Change the value to “1“.
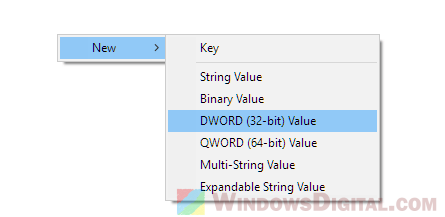
If the “ProxySettingsPerUser” registry key doesn’t exist, create it by right-clicking anywhere on the right pane in the Internet Settings registry path, and click on “New” > “DWord (32-bit) Value“. Name it “ProxySettingsPerUser” and set its value to 1. This should disable any proxy settings and set them to automatically detect settings.
Close Registry Editor and reboot your PC for it to take effect.
If your proxy problem persists
The proxy settings in the Settings app are correlated with the proxy settings in Internet Explorer. So, if the problem persists after trying to disable them, you may want to try resetting Internet Explorer settings. Note that doing so will also reset the security and privacy settings, such as sites you’ve whitelisted and blacklisted, and will wipe the parental control settings as well. Here’s a quick guide on how to reset IE settings:
- Open Internet Explorer in Windows and click on Internet Options.
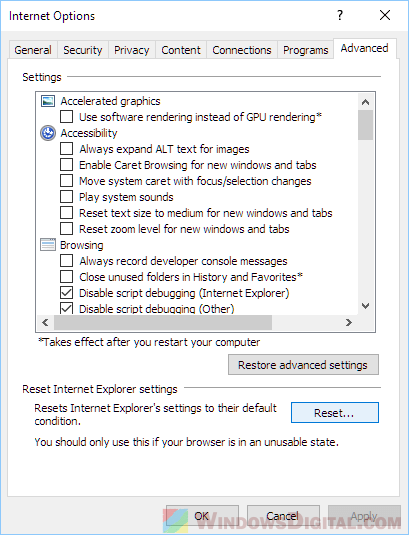
- Go to the Advanced tab.
- Under “Reset Internet Explorer settings,” click on the “Reset” button.
 If you’re still having connection problems after all these steps, you might want to double-check your internet connection or call your internet service provider to make sure there are no issues on their end.