CPU Throttling, less commonly known as dynamic frequency scaling, is a built-in feature in many operating systems, like Windows 11, that reduces the processor’s speed in real time to either save power or reduce the heat generated by the processor. It sounds like something you should always keep on, but for some people who are looking to squeeze out every bit of speed their PCs can provide, like for gaming purposes, it can be a problem. This guide will talk about CPU Throttling in Windows 11 and how to turn it off.
Also see: How to test CPU throttling in Windows 11
This guide will show you different ways to turn off CPU throttling in Windows 11. Each method has its own steps, giving you options based on what you’re comfortable with and what your computer allows.
Please note: Turning off CPU throttling can make your computer use more power and get hotter. Be careful and only do this if know what you’re doing.
Linked issue: Why is my CPU overheating and how to fix it
Page Contents
Method 1: Change power plan settings
Windows lets you tweak power settings with different plans. The “High Performance” plan reduces power-saving actions, including CPU throttling, for better speed. Making the processor run at full speed all the time is part of this plan.
Useful tip: How to limit CPU usage of a process in Windows 11
Step 1: Get to power options
Getting to the power options in Windows 11 is pretty straightforward:
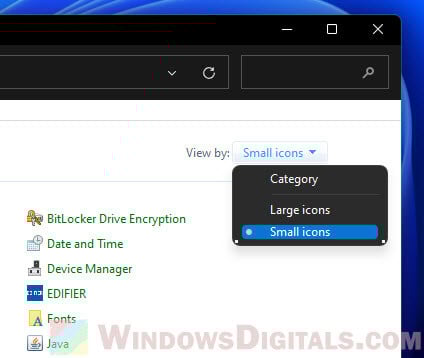
- Hit the Start menu, look up “Control Panel,” and open it.
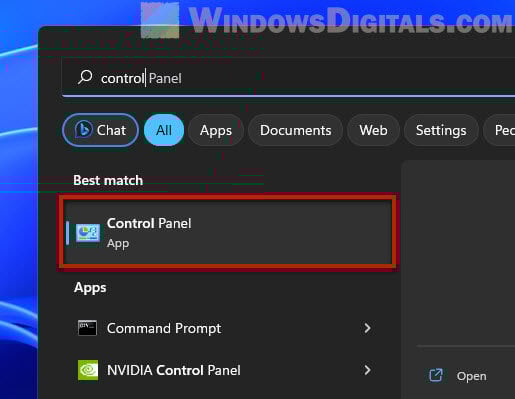
- Change “View by:” to “Small icons” or “Large icons” to show all items.
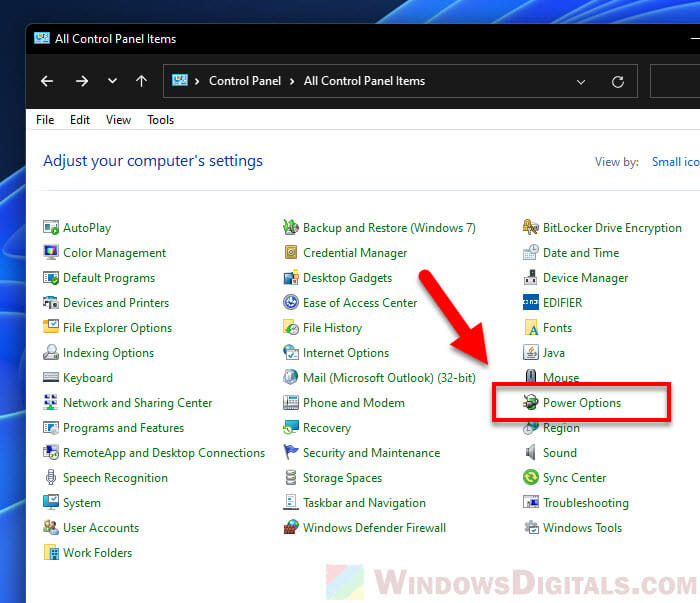
- Find and click on Power Options.
Step 2: Pick a power plan
Power plans help you balance performance and energy use:
- You’ll see a few plans like Balanced, Power Saver, and High Performance.
- Go for “High Performance” to get the best speed with fewer power-saving steps.

Step 3: Fine-tune power plan settings
Here’s how to make sure your plan fits your needs:
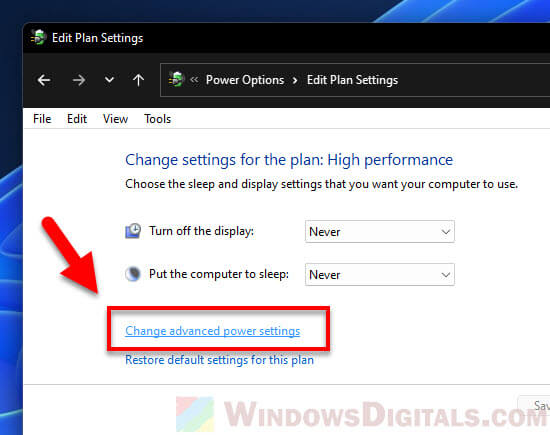
- Click “Change plan settings” next to the High Performance plan.
- Then, hit “Change advanced power settings“.
Step 4: Tweak processor power management
These settings let you control CPU throttling:
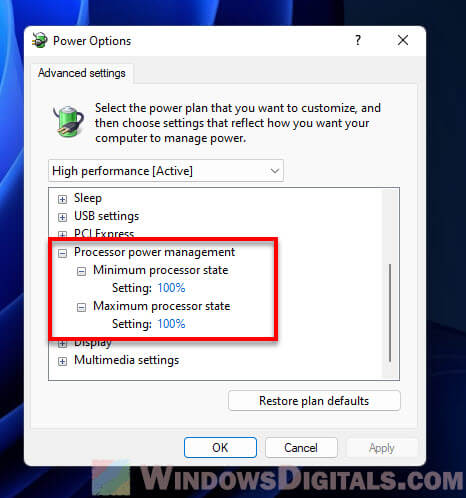
- Look for Processor power management and expand it.
- Adjust Minimum processor state and Maximum processor state to 100% to keep the CPU at full throttle.
Step 5: Lock in the changes
After tweaking, make sure to save your settings:
- Hit Apply and then OK.
Method 2: Turn off throttling for specific tasks in Task Manager
The Task Manager lets you see and adjust what’s running on your computer. You can find which tasks are being throttled and stop throttling for those you choose.
Handy guide: How to set process CPU affinity or priority permanently in Windows 11/10
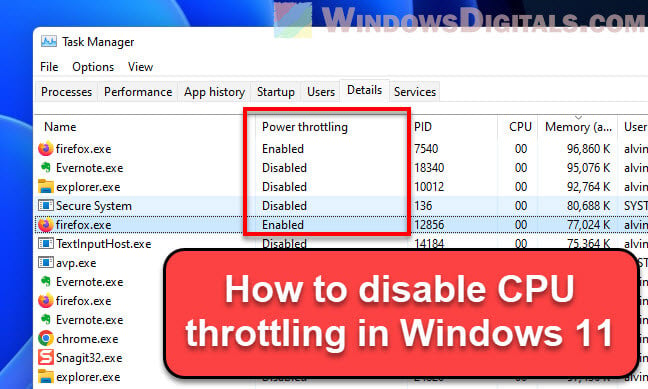
Step 1: Show the power throttling column in Task Manager
To check out which tasks are being throttled:
- Fire up Task Manager (right-click the taskbar, pick Task Manager, or press Ctrl + Shift + Esc).
- Head to the “Details” tab.
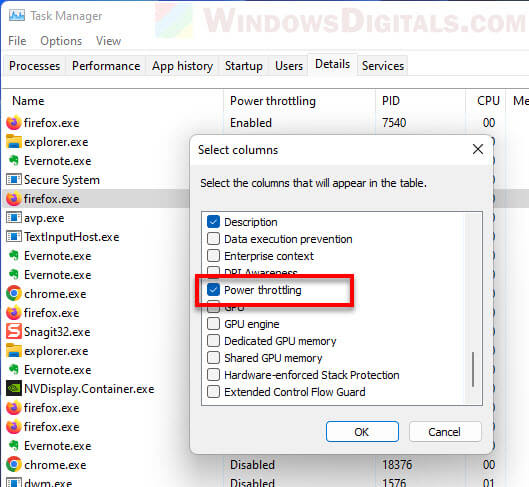
- Show the Power Throttling column by right-clicking a column header and picking “Select columns“.
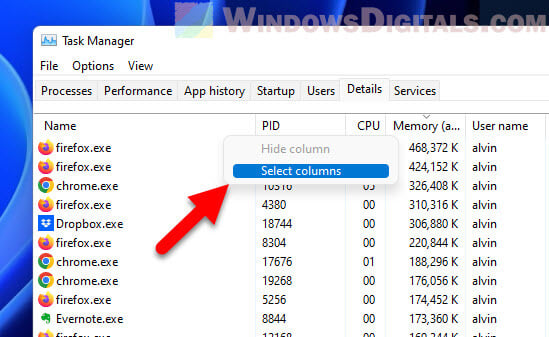
- Tick the “Power Throttling” box.
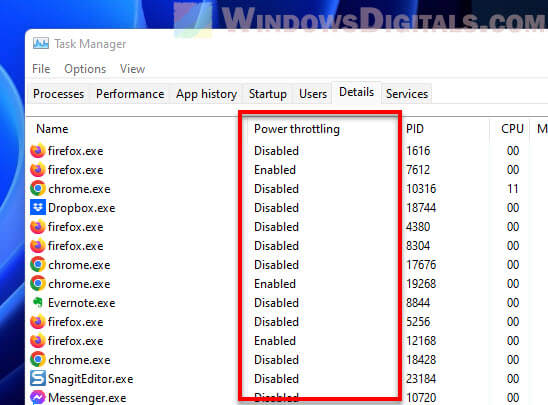
- Now you can see which tasks are getting throttled.
Step 2: Make a task more important
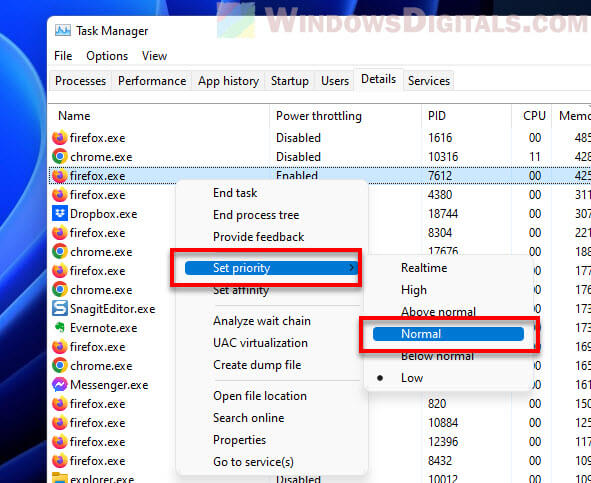
If you want a specific task to skip throttling:
- Find the task in the list, right-click it, and choose Set priority.
- Pick Normal or anything higher. This tells your computer that the task is important and should get more resources, which can help stop throttling for it.
Method 3: Use Group Policy Editor to stop power throttling
The Group Policy Editor is a tool for more advanced users, usually found in professional versions of Windows, that lets you change many system settings, including turning off CPU throttling.
Related resource: Game lag when watching YouTube or Twitch on Chrome
Step 1: Open Group Policy Editor
Here’s how to get into the Group Policy Editor:
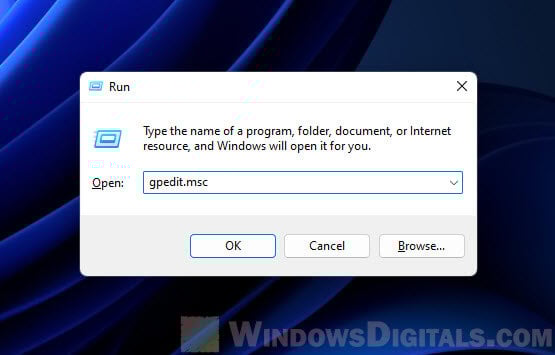
- Press Win + R to open the Run dialog box.
- Type gpedit.msc and hit Enter.
Step 2: Find the power throttling settings
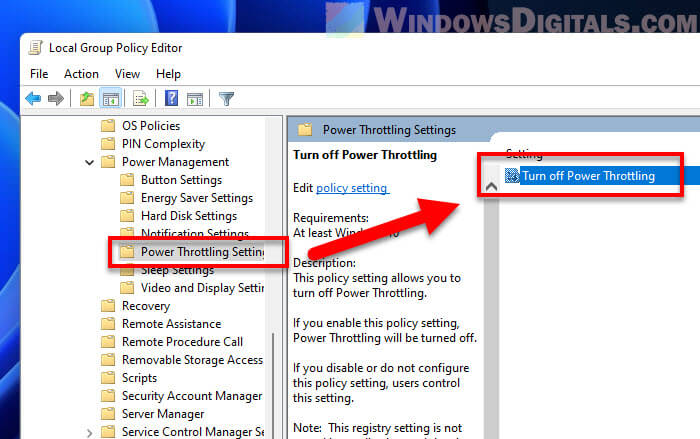
In the Group Policy Editor, follow these steps:
- Go to Computer Configuration -> Administrative Templates -> System -> Power Management -> Power Throttling Settings.
- Double-click Turn off Power Throttling.
Step 3: Stop power throttling
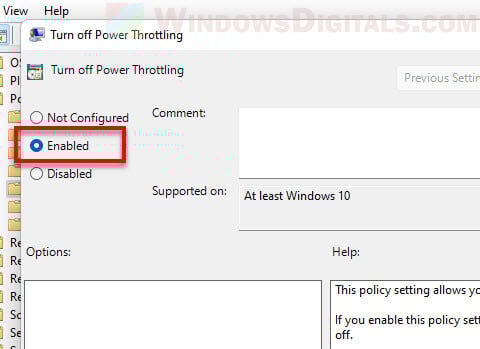
To turn it off:
- In the dialog box, select Enabled. This actually turns off power throttling.
- Click Apply and then OK.
Method 4: Turn off CPU Throttling using Registry Editor
The Registry Editor lets advanced users change system settings by tweaking the system registry. Be extra careful here, as mistakes can cause big problems. It’s smart to make a system restore point before you start.
Step 1: Open Registry Editor
Here’s how to open it:
- Press Win + R to bring up the Run box.
- Type regedit and press Enter.

Step 2: Go to the Power Throttling key
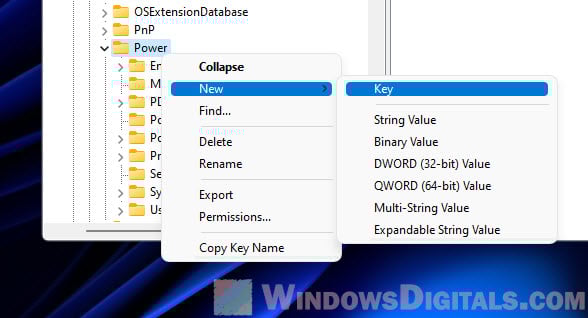
In the Registry Editor, follow these steps:
- Navigate to
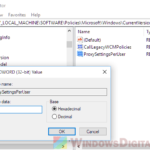
HKEY_LOCAL_MACHINE\SYSTEM\CurrentControlSet\Control\Power\PowerThrottling. - If you don’t see PowerThrottling, you’ll need to make it. Right-click Power, choose New > Key, and name it PowerThrottling.
Step 3: Change or add a new value
Then, do this:
- Look for PowerThrottlingOff. If it’s not there, create a new DWORD value with that name.
- Double-click PowerThrottlingOff, set the value to 1, and click OK. This tells your computer to stop throttling power.

Step 4: Close Registry Editor and restart
After that, you just need to:
- Close the Registry Editor.
- Restart your computer to apply the changes.
These ways show how to stop CPU throttling based on what you prefer or how comfortable you are with changing system settings. By managing CPU throttling, you can choose performance over saving power, which might be better for some users.
Some final advice
Keep an eye on your system after making these changes. If you run into any issues, you can always turn CPU throttling back on by undoing what you did here. CPU throttling exists to help avoid overheating and extend the life of your computer, especially laptop. If you decide to turn it off, make sure your cooling system can handle the extra heat to avoid damage.
Turning off CPU throttling means your CPU works harder, using more power and making more heat. Always check that your hardware can deal with the extra work and heat to keep things safe and running longer.