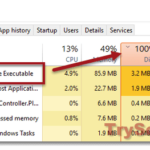
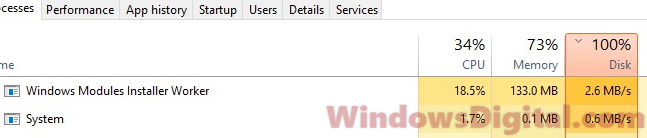
If you’ve checked your computer’s Task Manager, you might have seen a process called “Windows Modules Installer Worker” using a lot of CPU or disk space in Windows 10 or Windows 11. Usually, this process is fine and does nothing bad unless it keeps using a lot of resources for a long time. In this guide, we’ll talk about what this process is all about and how you can reduce its workload.
Also see: High CPU Usage After Windows 11/10 Update (Fix)
Page Contents
What is Windows Modules Installer Worker?
Windows Modules Installer Worker, also known as TiWorker.exe, is a service that helps Windows Update find and install new updates from Microsoft. This process runs automatically in the background when you check for updates on your PC or when Windows Update schedules it.
How to fix high CPU usage caused by Windows Modules Installer Worker
If this is your first time seeing this process, it’s best to just wait it out since it might be installing important updates for your Windows 10 or 11. But if it keeps using a lot of CPU or disk space after waiting, you can switch the Windows Modules Installer Worker service to manual. This change makes sure the process only runs when you want it to.
Just be aware that if you end this process using “End Task” in Task Manager, it will restart soon after. Setting the service to manual is the only full-proof way to stop it from running without your permission. However, doing this means Windows Update won’t run on its own anymore. You’ll have to check for updates yourself through the Windows Update interface. Before you decide to stop the service completely, you might want to try the Windows Update Troubleshooter to see if the problem comes from the Windows Update service itself.
Another big reason to manage this process is its impact on battery life, especially if your laptop uses power even when it’s plugged in. Setting Windows Update to manual might help with this issue.
Pro tip: How to Limit CPU Usage of a Process in Windows 11
How to set Windows Update to manual
To set the Windows Modules Installer Worker service to manual and only run on demand, follow the steps below.
- Go to the start menu in Windows.
- Search for “services.msc” and open it.
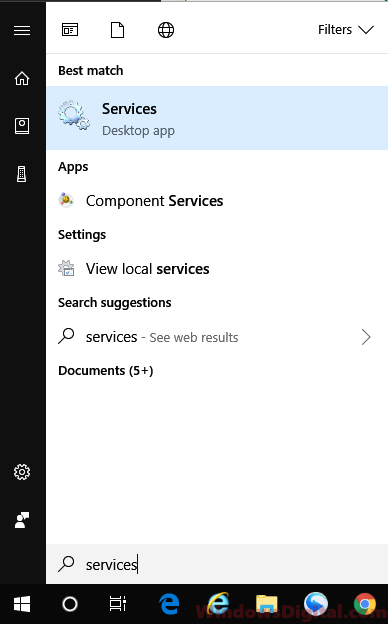
- Find “Windows Modules Installer” in the list of services and double-click on it.
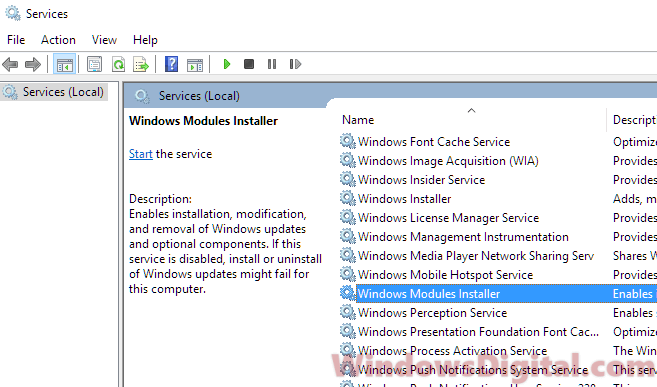
- Change the Startup type to Manual.
- Click Apply, then OK.
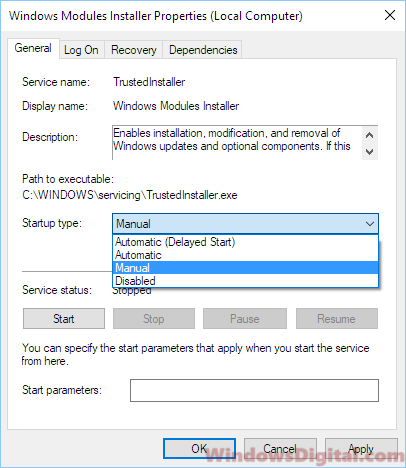
- If you want it to stop right now, you can click the Stop button.
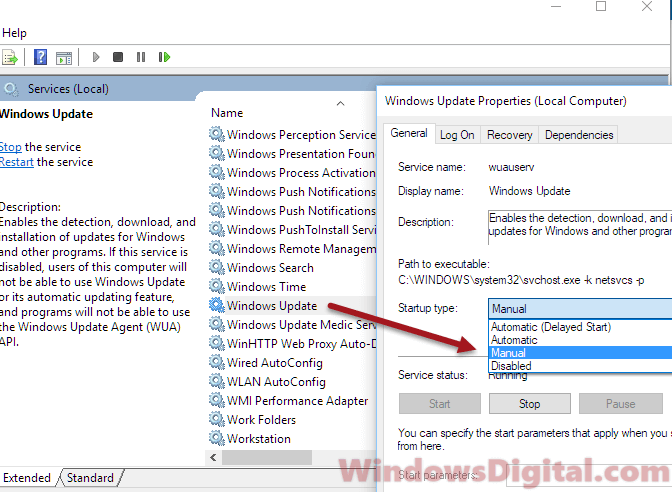
- Then, look for “Windows Update” and double-click on it.
- Change the Startup type to Manual.
- Click Apply, then OK.
- Close the Services window and restart your PC.
After you restart, open Task Manager to see if Windows Modules Installer Worker is still causing high CPU, disk, or memory usage in your Windows 10 or 11.
This method will stop automatic Windows Update, so also remember to check for updates on your own regularly, as your computer won’t do it for you anymore.
Delete corrupted update files
If Windows Modules Installer Worker is still using a lot of CPU or disk space because of corrupted update files, you can delete the Software Distribution folder in Windows. This folder holds temporary files that Windows Update uses and clearing it often fixes issues with corrupted files.
- Open Command Prompt as an administrator. Right-click on the Start menu and choose “Command Prompt (Admin)”.
- Type these commands one at a time, hitting Enter after each:
net stop wuauserv
net stop cryptSvc
net stop bits
net stop msiserver
These commands stop the services related to Windows Update.
- Rename the Software Distribution folder with this command:
ren C:\Windows\SoftwareDistribution SoftwareDistribution.old
This changes the folder’s name to SoftwareDistribution.old, which removes it so Windows can create a new one.
- Restart the services you stopped with these commands:
net start wuauserv
net start cryptSvc
net start bits
net start msiserver
This restarts the Windows Update services.
After doing these steps, check if the issue with high CPU or disk usage by Windows Modules Installer Worker is fixed.
Consider upgrading your hardware
When you frequently run into issues with high CPU or disk usage and software solutions haven’t always fixed the problem, you might want to consider hardware upgrades. Adding more RAM or getting a solid-state drive (SSD) can really help your computer run faster. If changing the CPU is possible, it would give you an even bigger boost. This is especially the case if you have a rather old computer with more than 7-8 years old hardware parts and you have to use some of the latest and big software.