Having trouble changing the “Startup type” of a service on your Windows 11 or 10 computer because it’s not clickable (the option is literally greyed out)? It’s a pretty common issue that leaves many confused when need to change the startup type of a certain service. This guide will walk you through why this happens and how to fix it.
Also see: How to Delete a Service in Windows 11 or 10 Using CMD
Page Contents
What’s the problem?
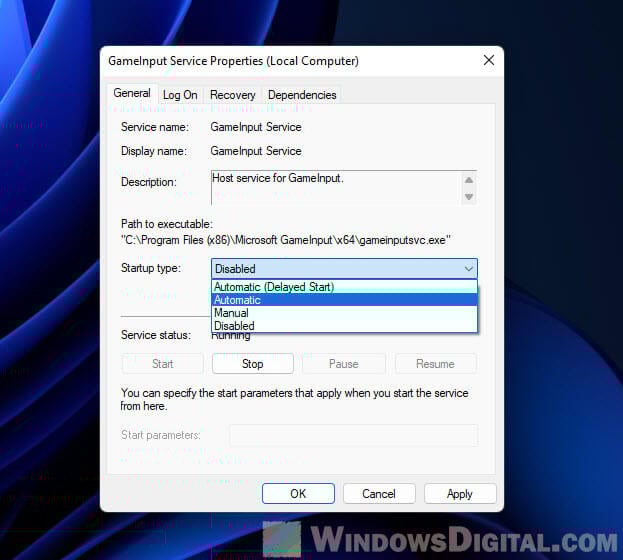
Windows runs a bunch of services in the background to make things work smoothly. Through the Services console (services.msc), you can manage these services and decide when they should start up:
- Automatic: These services get going by themselves when you turn on your computer, so everything’s ready without you having to do a thing.
- Manual: These only start up if you or something else on your system explicitly asks them to.
- Disabled: These services won’t start unless you decide to switch them on manually.
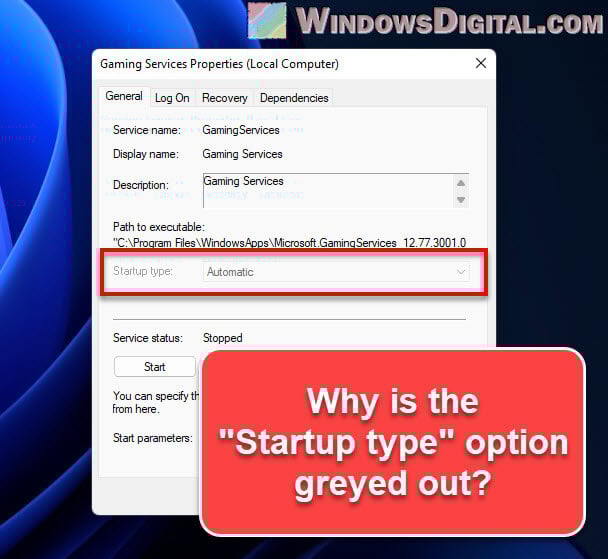
But sometimes, you’ll find you can’t change how a service starts because the option is just not available. This means something’s stopping you from making changes to that service’s settings.
Useful tip: 30+ Windows 11 Services to Disable for Gaming Performance
Why can’t I change the “Startup type”?
The main reasons you can’t tweak a service’s startup type usually boil down to:
- Not having enough permission. Changing service settings can affect how your system works, so you often need to be an admin to make changes.
- The service is currently running. You might need to stop the service before you can change its startup type.
- Other services depend on it. Some services rely on others to work properly. If the service you’re trying to change is needed by others, you might not be able to change its settings right away.
Understanding these reasons can help you figure out how to fix the issue.
How to sort it out
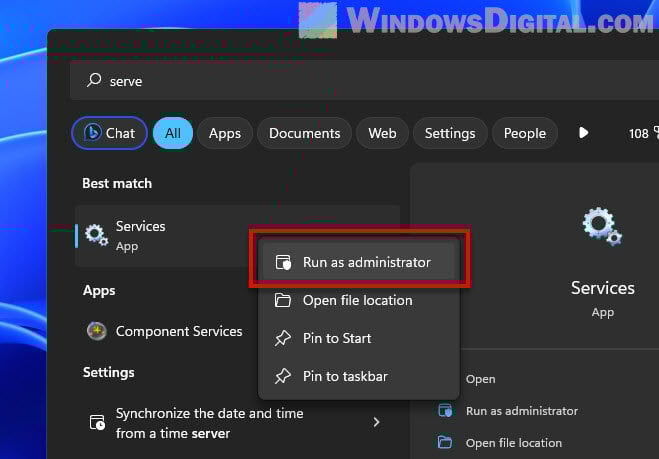
First step: Run services.msc as an administrator
To make sure you have the right permissions to change service settings, start by opening the Services console as an admin:
- Hit the Windows key, type “Services” in the search bar, then right-click on “Services” from the results and choose “Run as administrator”.
If you still can’t make changes, check out the next step.
Related resource: Run a Program as SYSTEM user in Windows 11
Next step: Stop the service
If the service is running, you might need to stop it to change its settings:
- Open the “Services” console as an admin (like we just did).
- Find the service you want to change, right-click on it, and hit “Stop”.
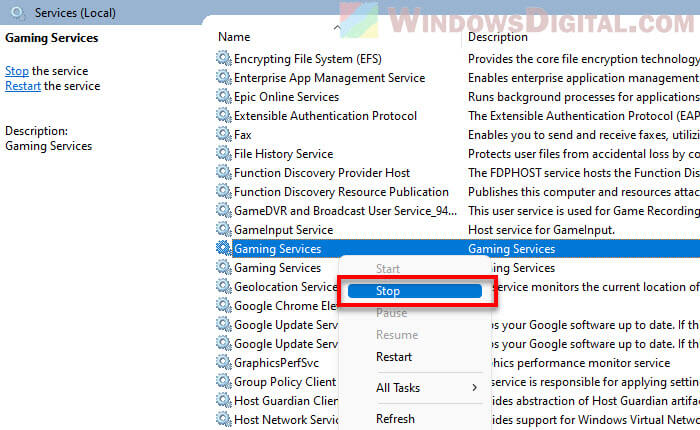
- Now try changing its startup type again.
If it’s still not working, there’s one more thing to try.
Relevant guide: How to Disable Startup Services on Windows 11 or 10
Last resort: Tweak the settings in the Registry Editor
If all else fails, you can go into the Registry Editor to change the startup type directly. This is a bit more advanced, so be careful:
Warning: Tweaking the registry can lead to big changes in your system. Make sure to back things up with a system restore point before you start. This way, you can undo any changes if things don’t go as planned.
- Press Windows + R, type “regedit”, and hit Enter.

- Go to
HKEY_LOCAL_MACHINE\SYSTEM\CurrentControlSet\Services\in the Registry Editor.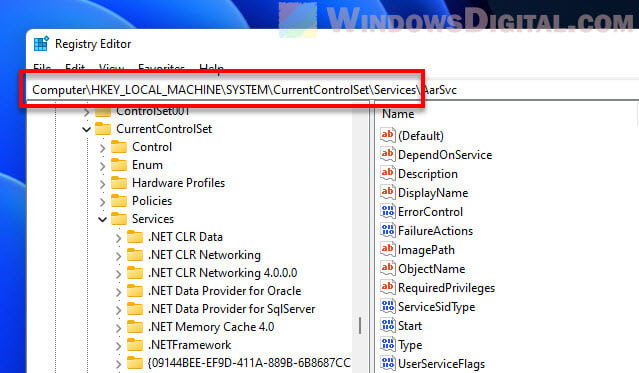
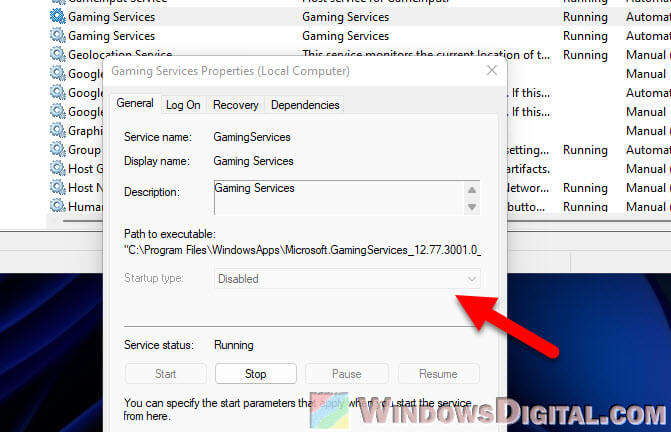
- Find the service you’re having trouble with and check its settings. For example, if the problematic service is the Gaming Services, the key would be
HKEY_LOCAL_MACHINE\SYSTEM\CurrentControlSet\Services\GamingServices. - Create a new DWORD called “DelayedAutostart”. If you get an “Access is denied” message, you might need to take ownership of the key.

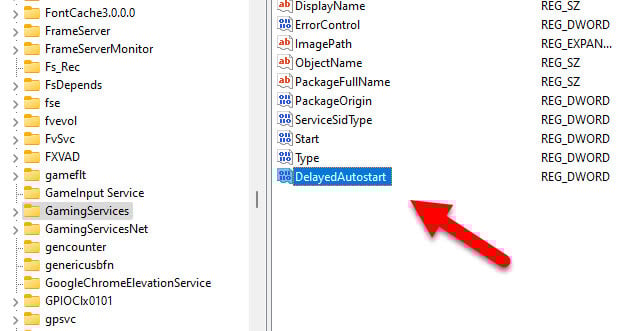
- Adjust the “Start” and “DelayedAutostart” values to match the startup type you want:
- Disabled: “Start” = 4, “DelayedAutostart” = 0.
- Manual: “Start” = 3, “DelayedAutostart” = 0.
- Automatic: “Start” = 2, “DelayedAutostart” = 0.
- Automatic (Delayed Start): “Start” = 2, “DelayedAutostart” = 1.
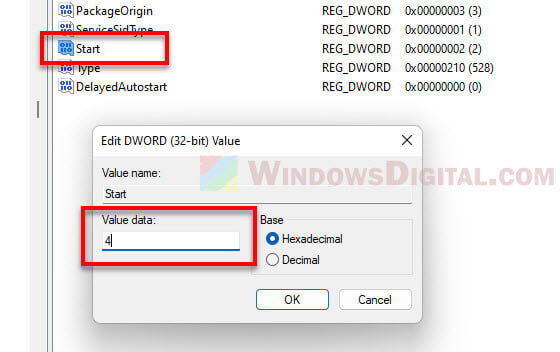
- Hit “OK” and reboot your PC to see the changes.
Even if you can’t tweak the startup type from the services console, the changes you made in the registry should now be reflected there.
A quick recap
Not being able to change a service’s startup type because it’s not clickable can be both frustrating and confusing, especially when you’re in a hurry to turn a service on or off. Thankfully, with the workaround mentioned in this guide, you can force change any service’s startup type and make the adjustments you need.
Just a heads-up though, be extra careful with those registry settings as one wrong step could result in unbootable Windows. And if things seem a bit too tricky, don’t hesitate to ask for help from someone with a bit more experience in registry editing.