Handling a ton of files can be very tiring and boring, especially if you need to change their names to follow a certain pattern. This could be organizing your photos, backup files, or any bunch of documents. For Windows 11 and Windows 10 users, you can actually use PowerShell to easily add beginnings (prefixes) or endings (suffixes) to the names of many files at once. This guide will show you the commands you can use to do all these renaming in bulk.
Also see: How to Batch Rename Files in Windows 11
Page Contents
Add a suffix to all files in a folder using PowerShell
With a few simple commands, you can rename multiple files in a folder, like adding a suffix to all of them in one or more directories.
How it actually works
The main steps to add a suffix to files with PowerShell involve the Get-ChildItem and Rename-Item cmdlets.
- This cmdlet gets all items (files and directories) in a specific place. It works like the
lscommand in Unix ordircommand in Windows Command Prompt. - This cmdlet is for renaming a file or directory.
By using these two, we can take all files in a directory and change their names by adding a chosen suffix.
Pro tip: How to Move All Files from Subfolders to Main Folder in Windows 10/11
Steps to add a suffix to multiple filenames
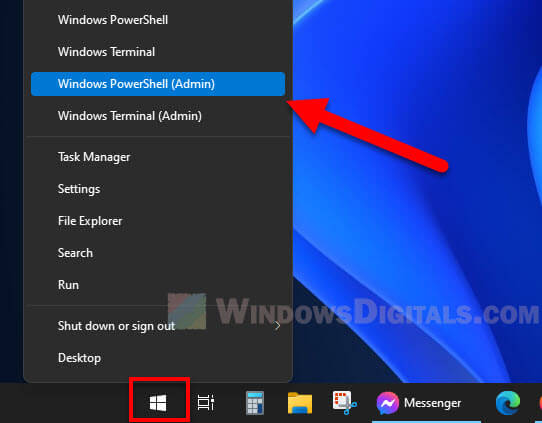
- Right-click on the Start menu.
- Select “Windows PowerShell (Admin)”. You might need admin rights for certain folders or system directories to make sure you can rename files.
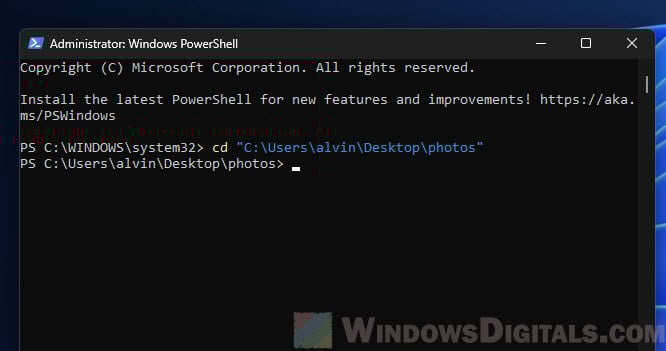
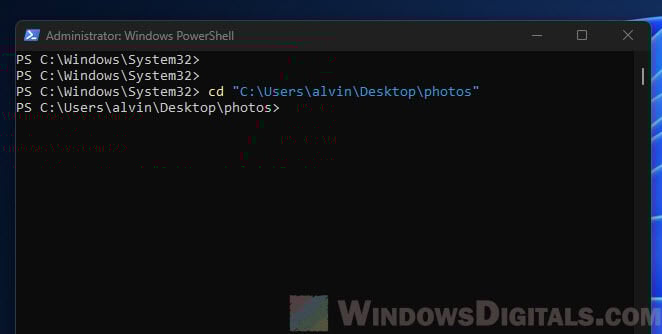
- Enter the
cdcommand and then your directory’s path. For instance:cd "C:\Users\YourUsername\Documents\YourFolder"
- Type this command, swapping ‘_MySuffix’ with the suffix you want:
Get-ChildItem | Rename-Item -NewName { $_.BaseName + '_MySuffix' + $_.Extension }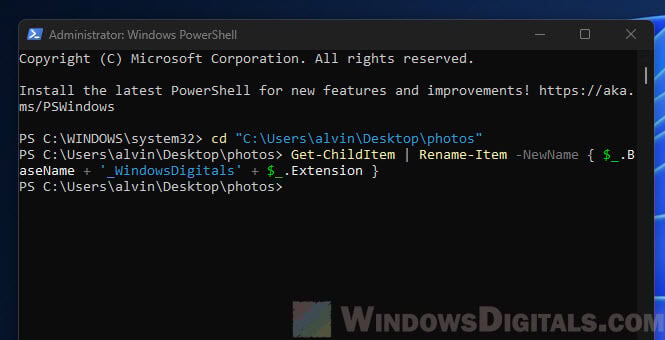 The following is what each part does:
Get-ChildItem: Gets all items in the folder you’re in.Rename-Item -NewName: Renames each item found.{ $_.BaseName + '_MySuffix' + $_.Extension }: Here,$_stands for the current item (each file)..BaseNamegrabs the file’s name without the extension. After adding the suffix, we tack the file extension back on with$_.Extension.
Some examples
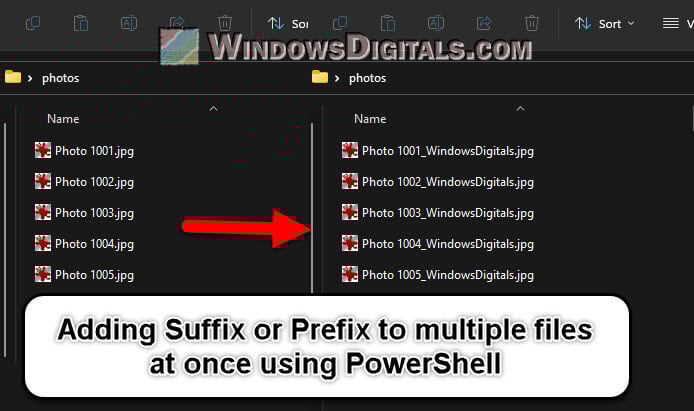
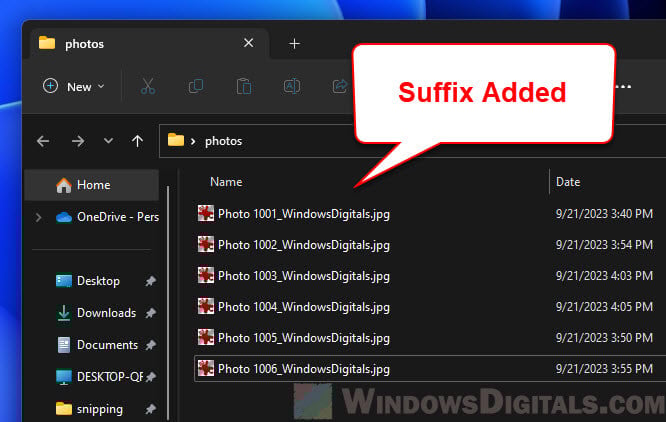
Imagine you have these files in your folder:
landscape.jpg
portrait.jpg
notes.txt
After running the PowerShell command with the suffix ‘_Edited’, the files would be renamed to:
landscape_Edited.jpg
portrait_Edited.jpg
notes_Edited.txt
It’s a pretty quick and efficient method to add suffixes to any number of files at once.
Related concern: Can I Manually Sort Files in a Folder in Windows 11?
Add a prefix to all files in a folder using PowerShell
Just like adding suffixes, you can also add prefixes to filenames using PowerShell. The steps are quite similar, using the same powerful cmdlets.
How it actually works
The process to add a prefix is just a small change from the suffix method. Instead of adding text to the end of the filename before the file extension, you put it at the start.
Steps to add a prefix to multiple filenames
- Right-click on the Start menu.
- Choose “Windows PowerShell (Admin)”. You might need admin rights for some folders or system directories, ensuring you have the right permissions to rename files.
- Enter the
cdcommand and then your directory’s path. For example:cd "C:\Users\YourUsername\Documents\YourFolder"
- Type this command, swapping ‘MyPrefix_’ with the prefix you want:
Get-ChildItem | Rename-Item -NewName { 'MyPrefix_' + $_.Name }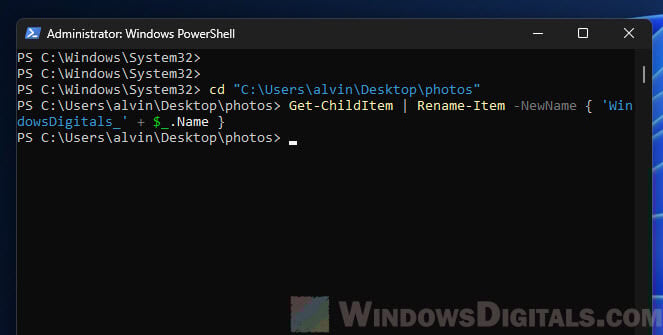
The following shows you what it does:Get-ChildItem: Fetches all items in the folder you’re in.Rename-Item -NewName: Renames each item.{ 'MyPrefix_' + $_.Name }: Adds ‘MyPrefix_’ to the start of each file’s name.
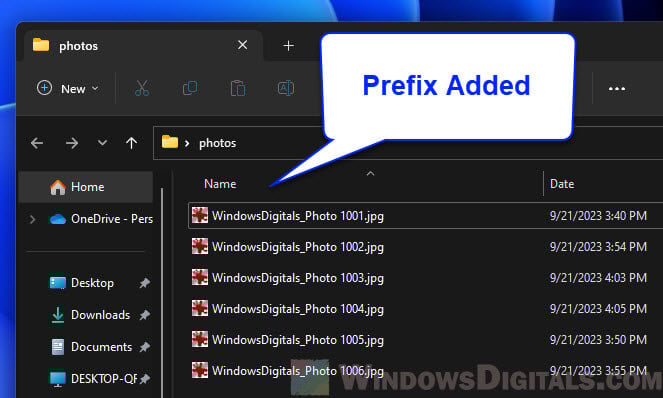
Some examples
Let’s say you have these files in a folder:
photo1.jpg
photo2.jpg
document.txt
After running the PowerShell command with the prefix ‘Vacation_’, the files would be renamed as:
Vacation_photo1.jpg
Vacation_photo2.jpg
Vacation_document.txt
This method is great for managing big lists or collections of files that needs a prefix.
Linked issue: Rename Folder: “Can’t find the specified file” in Windows 11
A few tips for using PowerShell for file renaming
Now that we’ve looked at how to add prefixes and suffixes to files using PowerShell, below are some other tips to help you do it even better.
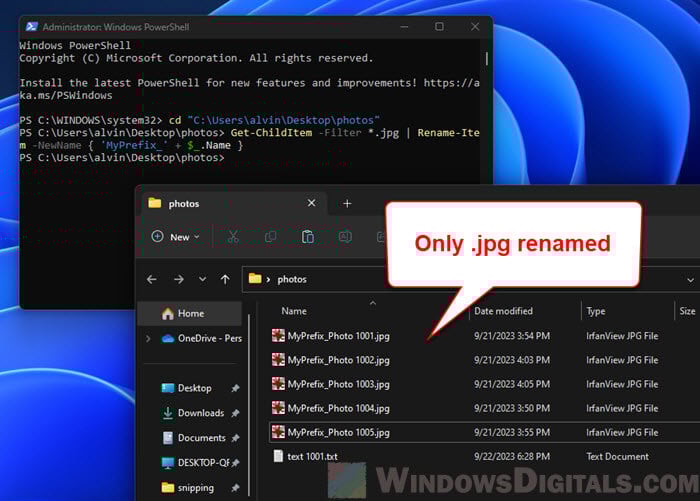
If you need to deal with specific file types
Sometimes, you might want to change the names of only certain types of files, like .jpg files. You can do this easily by changing the Get-ChildItem command. Here’s how you can target only .jpg files:
Get-ChildItem -Filter *.jpg | Rename-Item -NewName { 'MyPrefix_' + $_.Name }
Rename files conditionally
There might be times when you want to change names based on certain conditions, like renaming only those files that were changed in the last week.
Get-ChildItem | Where-Object { $_.LastWriteTime -gt (Get-Date).AddDays(-7) } | Rename-Item -NewName { 'Recent_' + $_.Name }
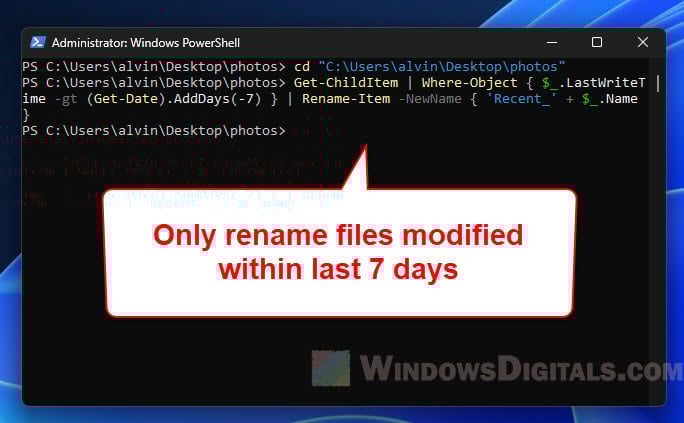
In this command, Where-Object picks the files based on the condition given, making sure only recently changed files get the ‘Recent_’ prefix.
About undoing changes
PowerShell’s renaming actions happen right away and don’t come with an “undo” button. To handle such situations, you should:
- Always back up the files you are about to change before running any scripts. If something goes wrong, you can get your files back to how they were.
- Try your renaming script on a few files first to make sure it works as you expect.
- If you rename something by accident, you might be able to write a script to change it back. This can be a bit difficult depending on what changes were made.
Avoid overwrite existing files
When renaming files, make sure the new names don’t clash with names already in the directory. If two files end up with the same name, one will replace the other, causing you to lose data.
Rename files recursively
If you need to rename files not just in one directory but also in its subdirectories, use the -Recurse option with Get-ChildItem:
Get-ChildItem -Recurse | Rename-Item -NewName { 'MyPrefix_' + $_.Name }
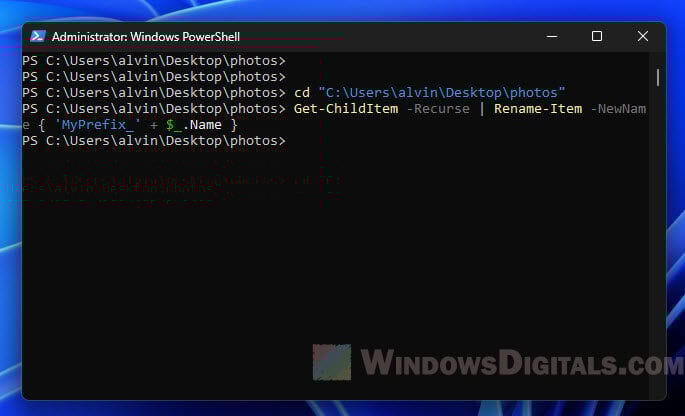
Know that using -Recurse will affect a lot of files, so always check you’re making changes to the right folders.
Some common issues when adding prefix or suffix to filenames
Even when you’re well-prepared, sometimes things don’t go as planned. Below, we’ll talk about some usual problems people run into when renaming files with PowerShell and how to fix them.
Permission denied error
If you see an error saying “Access to the path is denied”, it usually means there’s a problem with permissions.
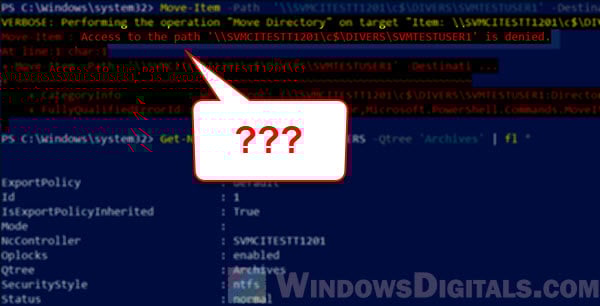
Solution:
- Make sure the files aren’t being used by another program.
- Check if the file is set as ‘Read-Only’ in its properties.
- Run PowerShell as an Administrator. Right-click the PowerShell icon and choose “Run as administrator”.
Invalid characters in filenames
Some characters are not allowed in filenames in Windows. If your prefix or suffix has any of these characters (<, >, :, ", /, \, |, ?, *), you might run into problems.
Solution:
- Make sure your prefix or suffix doesn’t have any of these characters. If it does, think about changing or leaving them out.
File name too long error
Windows has a limit on how long file paths can be (260 characters by default). If your new filename is too long because of the prefix or suffix, you’ll get an error.
Solution:
- Try shorter prefixes or suffixes.
- Move the files to a directory with a shorter path before renaming them.
Files not being renamed
If you see that files aren’t changing names and there are no errors, it might be that the script isn’t looking at the right files or folder.
Solution:
- Double-check your directory path with the
cdcommand to make sure you’re in the right place. - If you’re using filters with
Get-ChildItem, make sure they’re set up right.
Renamed files have double extensions
If your renamed files end up like filename.jpg.jpg, it means the original file extension got added twice.
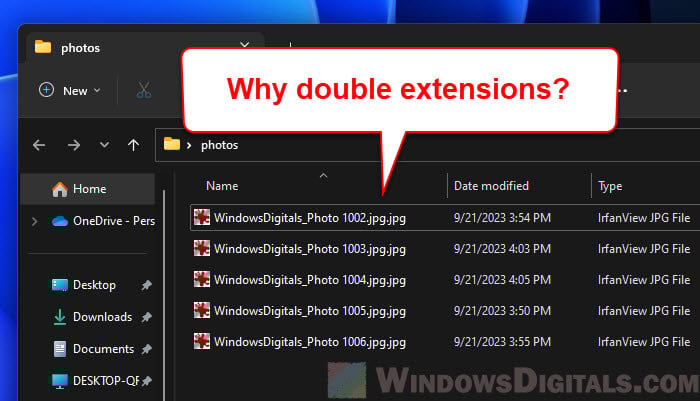
Solution:
- Check your renaming script. Make sure you’re using
$_.BaseNameto get the name without the extension and only adding$_.Extensiononce.
Some final notes
Changing file names one by one can take a lot of time, especially if you have so many files that doing it manually is practically impossible. Though there are many scripts, commands, and tools you can use to automate this, it’s important to find a way that’s both quick and doesn’t cost much. Among all the options, PowerShell is likely the best choice if you don’t want to install any third-party software. But if you need more controls, you might want to look into apps that focus on renaming files.