If you’ve been using your Windows computer for a long time without a reformat, you might have noticed that the “C:\Windows\Installer” folder has grown into a giant-sized folder, which keeps increasing in size over time. This can be quite a big issue if your Windows system is on a rather small-sized SSD hard drive. Users often reported that the folder can grow to a massive 50 GB or sometimes even more.
The question is, is it safe to delete or cleanup the Windows Installer folder? How should we deal with the huge sized Windows Installer folder in Windows 11 or Windows 10?
Also see: How to Delete a Ghost File or Folder in Windows 11/10
Page Contents
Delete or cleanup Windows “Installer” folder in Windows 10/11
Well, it is certainly not safe to just delete the entire Windows Installer folder because some of the files in it are used by your system for proper functioning of Windows 10 or Windows 11. Some guides suggest identifying and deleting the no longer needed MSI and MSP files in the “Installer” folder, which is kind of difficult and troublesome.
In this guide, instead of taking the risk to delete the Installer folder, we will show you how to create a symbolic link of the Installer folder on another drive to save a huge amount of disk space on your system drive.
Linked issue: Delete Windows.Old Folder in Windows 11/10, Access Denied?
Creating a Symbolic link for the Windows “Installer” folder to save space
Update: After recent Windows updates, it seems that creating symbolic link or directory junction for the Windows\Installer folder would cause installation issue such as “The system cannot open the device or file specified – Error 2755” error especially when you run a “.msi” installer. As a precaution, it’s recommended that you avoid creating symlinks for the installer folder until it is safe to do so. However, if you choose to proceed and encounter installation problems, you can reverse the changes by following the steps below.
If you have previously implemented a symlink or directory junction for the installer folder and are experiencing installation issues, you can reverse the changes by simply copying the Installer folder back to C:\Windows (temporarily renaming it to something like “Installer – Copied” since two folders with the same name can’t coexist). Then, run the command “rmdir /s /q C:\Windows\Installer” and rename your previously renamed “Installer – Copied” folder back to “Installer“.
If you insist on trying to create a symbolic link, follow the steps below and be sure to back up the Windows “Installer” folder (just make a copy of it elsewhere) before proceeding:
By creating a symbolic link for the Windows Installer folder, it means that we will first copy the Windows Installer folder to another drive (e.g., from C: to D:) where you can spare more space. We will then delete the original Installer folder from the Windows directory and create a symbolic link from the Windows directory to the Installer folder you’ve copied earlier on another drive.
It works like a shortcut to the folder, which means you can have the actual folder on another drive, but it will work as if the folder is there on the original system drive after creating the symlink. Please know that a Symbolic link is different from a shortcut. Simply creating a shortcut to the Installer folder will not work and will possibly cause serious issues.
If you still don’t understand how it works, don’t worry. We will show you a detailed step-by-step guide on how to do it below.
However, as we mentioned before, deleting the Installer folder may risk corrupting your Windows. Since deleting the folder is a procedure in this guide, if you did it wrong, your Windows may still be corrupted. Therefore, please proceed at your own risk.
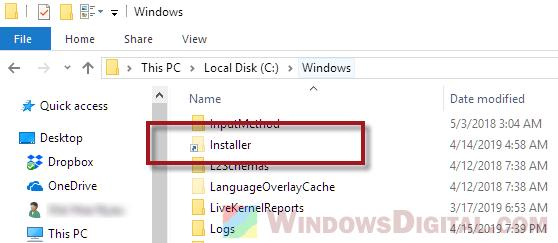
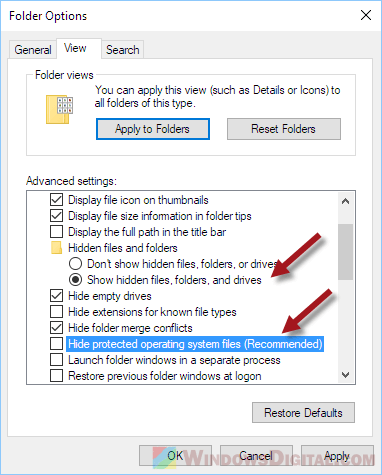
Step 1: Unhide the Windows Installer folder
First off, the Installer folder is hidden by default, even with the “show hidden files and folders” option enabled. To unhide the folder in Windows 10 or Windows 11, open File Explorer and go to View from the top menu. Select Options, then Change folder and search options. Click on the View tab and then disable the “hide protected operating system files (recommended)” option. Also, make sure the “Show hidden files, folders and drives” option is enabled.
Step 2: Copy the Installer folder to another drive
Now that you can see the Installer folder in the Windows directory, copy the entire Windows Installer folder to another drive of your choice, such as from C:\Windows\Installer to D:\Important\Windows\Installer. This copy process may take quite a while, depending on how massive your Installer folder is.

It is recommended to make one more copy of the Installer folder on another place as a backup, just in case anything goes wrong.
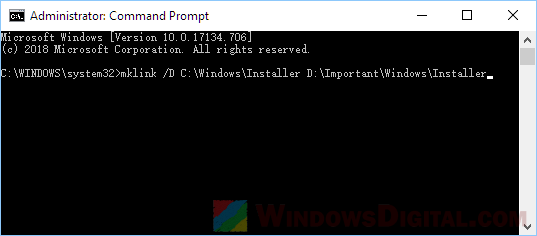
Step 3: Creating the Symlink using CMD
After the copying is done, go to the start menu or Cortana, search for Command Prompt or CMD, and then run it as administrator. In the elevated command prompt, enter the following commands, each line at a time. Note that you have to replace the drive letter and/or folder path in the commands if your Windows folder is at a different path.
rmdir /s /q C:\Windows\Installer
The above command removes the C:\Windows\Installer directory and deletes the folder entirely.
mklink /D C:\Windows\Installer D:\Important\Windows\Installer
After the first command is successfully completed, execute the second command as shown above to create the Symbolic link from C:\Windows\Installer to D:\Important\Windows\Installer.
That’s it. The “shortcut” for the Windows Installer folder is now created, and a ton of disk space is freed up on your system drive. From now on, any request for files in the Installer folder will be diverted to those on the D: drive.