When editing pictures, resizing them is almost always necessary. If you want to make an image smaller or bigger, you might think you need special software. But if you use Windows 11 or 10, you can resize your images right from the default Photos app while you’re viewing them, no extra software needed.
The Photos app only gives you a few fixed resizing choices. These choices are in megapixels (MP), not resolution. This means you can only make images smaller, not bigger. If you need to change the size of your images in a very specific way, the Photos app might not be sufficient, and you might need a different software instead.
Also see: How to Resize Multiple Images At Once in Windows 11
How to resize images in Windows 11 or 10 using the default Photos App
To quickly resize an image or photo in Windows 10 or 11 using the Photos app while viewing the image, follow the steps below:
- Right-click on the image or photo that you want to resize and select Open with.
- Select the Photos app from the list of programs to open the image.
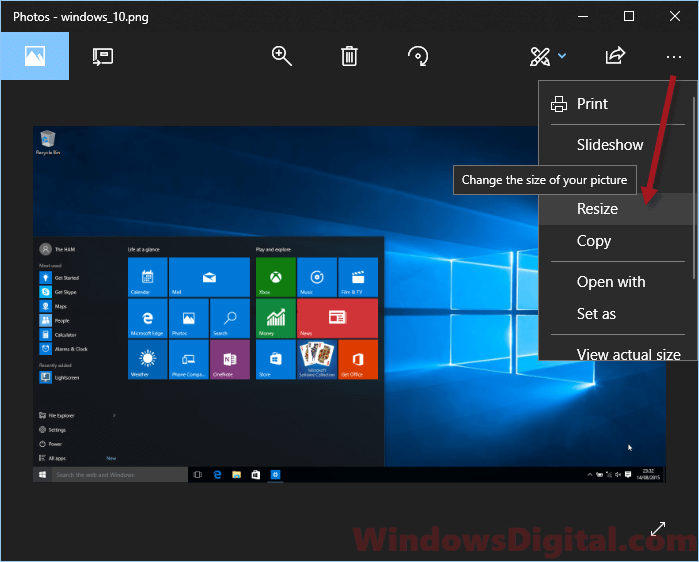
- Click on the triple-dotted icon located on the top right corner of the Photos app.
- Select Resize.
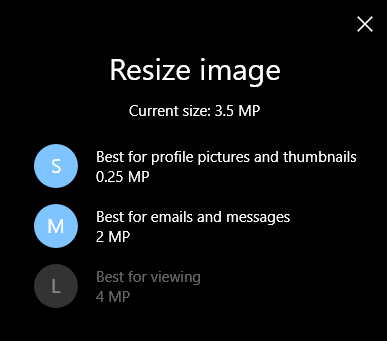
The photo can be resized into one of the following fixed sizes, choose one that best suit your needs:
-
- Small 0.25 MP, which is the standard size for thumbnails and best for profile pictures.
- Medium 2 MP, which is the most casual looking size and best for emails and messages.
- Large 4 MP, which is the largest size available and is usually the best option for high-quality viewing.
Note that you can only make an image smaller, not larger than its original size. While the Photos app doesn’t allow for custom sizes, it’s still very useful for quick, standard resizing without needing extra software.
Resizing photos and images using Paint
Another method to resize images in Windows 10 and 11 is by simply using Microsoft Paint. This is probably the most widely used method for resizing photos in Windows without relying on any third-party software, due to it being one of the oldest built-in software in the history of Windows.
Follow the steps below to resize an image or photo in Windows 10 and 11 using Paint:
- Go to the start menu or Cortana.
- Search for Paint and open it.
- In Paint, click on File, then Open to select your desired image or photo.
- Under the Home tab, click on Resize.
- You can then enter a custom size for your image or photo by Percentage or Pixels.
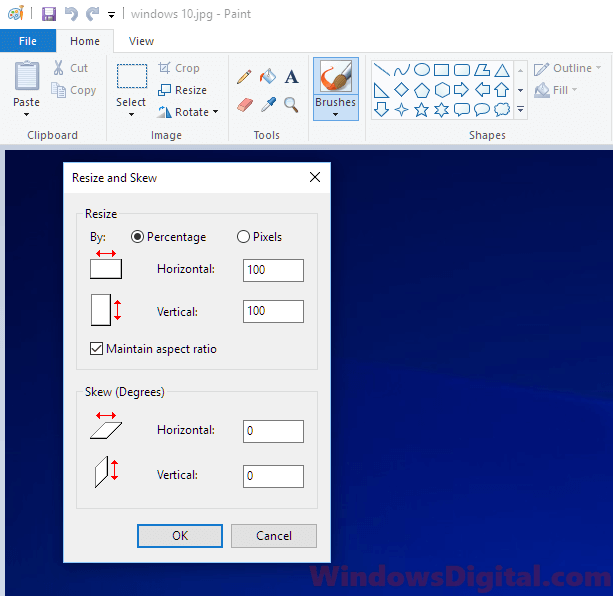
- Click OK to resize the image.
Resizing your images using Paint can sometimes significantly reduce the quality of the resized image. The difference can be so obvious that you will notice the image becomes blurry after being resized. Nevertheless, it’s still one of the most convenient and common ways most users who are not so tech-savvy use when it comes to resizing photos in Windows.
Other things to consider
When resizing images, try to keep the original aspect ratio to avoid distortion. The aspect ratio is the width-to-height relationship of the image, and you can maintain it by simply selecting the “Lock aspect ratio” or “Constrain proportions” option.
If you’re resizing your images for online use, you need to consider their file size and format. For example, you might want to try reducing the file size as much as you can without affecting the quality of the images too much. You might also want to use the PNG file format if your images have a transparent background.
If you need more advanced image resizing features, you might want to use other better third party software such as Adobe Photoshop or GIMP. If you need to bulk resize multiple images at once, you will need different software, like a batch processing tool.
Lastly, if you only need to do simple editing work like cropping, rotating or applying filters while resizing your images, the default Photos app that comes with Windows 11 and 10 should be sufficient.