Windows Command Prompt, or CMD, can be a handy tool for tweaking network settings. It lets you change IP addresses and DNS settings with commands like “netsh interface ip set address” and “netsh interface ip set dns“. This guide will show you how to do just that in Windows 11 or 10 using either CMD or PowerShell.
Also see: How to Check IP Address in Windows 11
Page Contents
Getting to know the “Netsh Interface IP” command
Netsh, or “network shell,” is a command-line tool in Windows that helps you manage network settings. It’s great for working with IP addresses and DNS settings. You can use netsh interface ip to handle IP addresses and netsh interface ip set dns for DNS configuration.
Related concern: What is Netsh.exe & its Popup and Crashing issues in Windows 11
Why use the command line?
Although many would argue that it would be more convenient to just adjust things through the GUI available like the network adapter’s properties to configure things like IP addresses and DNS, using command line, particularly the Netsh tool, will give you more freedom and some benefits:
- It’s quick. Commands run faster than navigating through menus.
- Great for automation. You can script these commands to set up many computers at once.
- Handy for remote management. Manage settings on computers across your network from anywhere.
- Helpful for troubleshooting. Get detailed info that can help fix network problems.
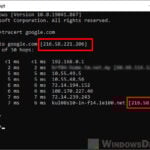
Pro tip: How to Find The IP Address of a Website in Windows 10 / 11
How to assign a Static IP Address
Setting a static IP address is useful for devices that need a constant address, like servers. Here’s how to do it with CMD:
First up, open Command Prompt as an admin
Hit the Win key, search for cmd or Command Prompt, right-click the result, and pick Run as administrator. PowerShell works too.

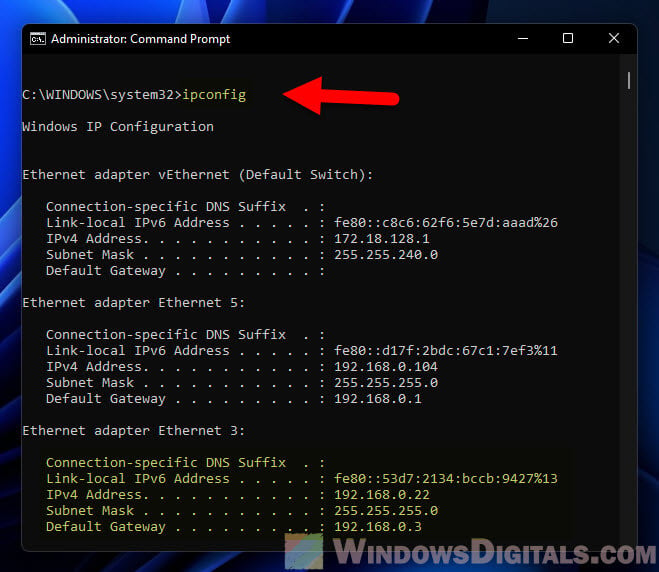
Next, see your network interfaces
Type this to list them:
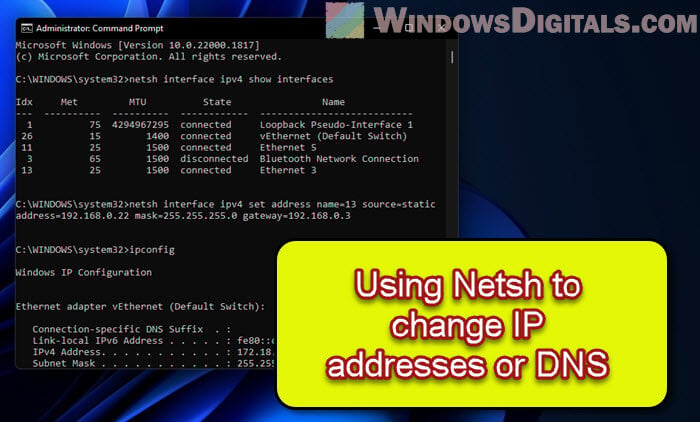
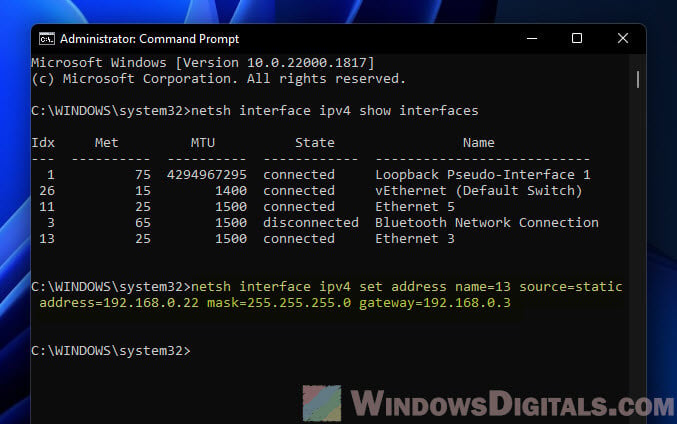
netsh interface ipv4 show interfaces
Find the one you’re working with and remember its index number.

Now, set your IP, subnet mask, and gateway
Use this template, swapping in your own values:
netsh interface ipv4 set address name=<index> source=static address=<ip_address> mask=<subnet_mask> gateway=<gateway>
For instance, to assign 192.168.1.10 to interface number 3, you’d type:
netsh interface ipv4 set address name=3 source=static address=192.168.1.10 mask=255.255.255.0 gateway=192.168.1.1
Lastly, make sure it worked
Type ipconfig to see if your new settings are listed.
Related issue: Windows 11 Ethernet “Unidentified Network” (How to Fix)
Switching to a Dynamic IP Address
Dynamic IP addresses, given out by a DHCP server, are the go-to for most networks. Here’s how to set one up:
Step 1: Open Command Prompt as an administrator
Just like before.
Step 2: View the list of network interfaces
Run netsh interface ipv4 show interfaces to see your options and pick one.
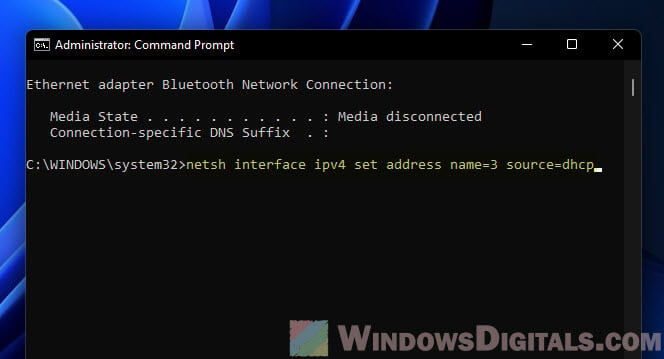
Step 3: Switch to DHCP
Here’s the command, don’t forget to use your interface’s index:
netsh interface ipv4 set address name=<index> source=dhcp
For example, for interface 3, it’s:
netsh interface ipv4 set address name=3 source=dhcp
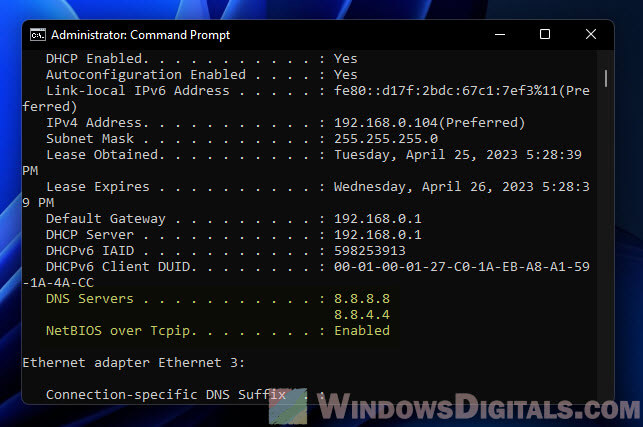
Step 4: Verify the changes
Run ipconfig to see if it’s set to get an IP address by itself.
Additional resource: Find MAC Address on Windows 11/10 with or without CMD
Setting up DNS Settings
DNS settings are what turn website names into IP addresses. Here’s how to tweak them:
See also: Change DNS to Google or Cloudflare in Windows 11/10
Step 1: Open Command Prompt as an administrator
As mentioned earlier.
Step 2: View the list of network interfaces
Use netsh interface ipv4 show interfaces to find the one to configure.
Step 3: Pick a primary DNS server
Replace the placeholders with your actual details:
netsh interface ipv4 set dns name=<index> static <primary_dns> primary
To use 8.8.8.8 as your primary DNS on interface 3:
netsh interface ipv4 set dns name=3 static 8.8.8.8 primary

Step 4: Add a backup DNS server (if you want)
Here’s how, just change <index> and <secondary_dns> to fit your setup:
netsh interface ipv4 add dns name=<index> addr=<secondary_dns> index=2
To set 8.8.4.4 as a backup for interface 3:
netsh interface ipv4 add dns name=3 addr=8.8.4.4 index=2
Step 5: Double-check everything
Run ipconfig /all to make sure your DNS settings are spot on.
Going back to default DNS Settings
If you want your DNS settings to go back to automatic, here’s what to do:
Step 1: Open Command Prompt as an administrator
Same process as before.
Step 2: View the list of network interfaces
Check your interfaces again with netsh interface ipv4 show interfaces.
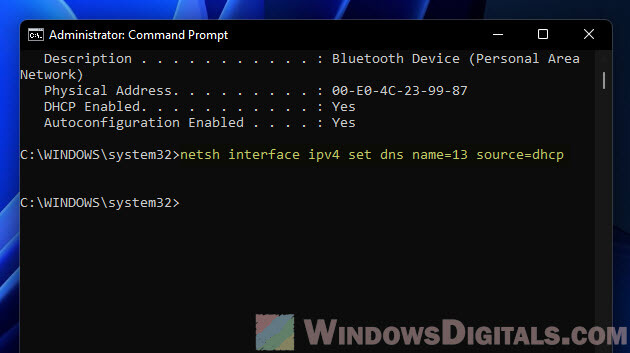
Step 3: Reset your DNS settings
Here’s how, remember to swap in your interface index:
netsh interface ipv4 set dns name=<index> source=dhcp
To reset interface 3‘s DNS:
netsh interface ipv4 set dns name=3 source=dhcp
Step 4: Make sure it’s all set
Run ipconfig /all to see if your computer is back to getting DNS settings on its own.
My two cents
Using the “netsh interface ip set address” and “netsh interface ip set dns” in CMD to adjust IP and DNS settings on Windows is especially useful when you need to manage a big network. If you are looking to automate stuffs like setting IP and DNS for a lot of computers in the network, this will certainly be one of the best ways.