OneDrive is a preinstalled software in Windows and is a pretty widely used cloud storage service for people who are looking to back up (by syncing) their files on the cloud. With Windows 11, OneDrive has become even more woven into the system. But, like any app, you might encounter random problems with it, and you might end up needing to give it a fresh start or reinstall it completely.
In this guide, we’ll show you step-by-step instructions on how to reset or reinstall OneDrive in Windows 11.
Also see: How to Disable or Remove OneDrive From Windows 11
Page Contents
Why reset or reinstall OneDrive?
You might want to reset or reinstall OneDrive on your Windows 11 device for a few reasons:
- If your files aren’t syncing right, resetting or reinstalling OneDrive can often fix it.
- If OneDrive is slow or using too much computer power, giving it a reset or reinstall might help.
- If the files or settings in OneDrive get messed up, resetting or reinstalling can make it work like new.
- If another program is causing trouble with OneDrive, resetting or reinstalling might solve the issue.
Resetting OneDrive in Windows 11
Resetting OneDrive makes it go back to its original settings, which can fix many problems. There are two ways to do it: through the Run dialog box or the Command Prompt.
Using the reset OneDrive command
Here’s how to reset OneDrive using the Run dialog box:
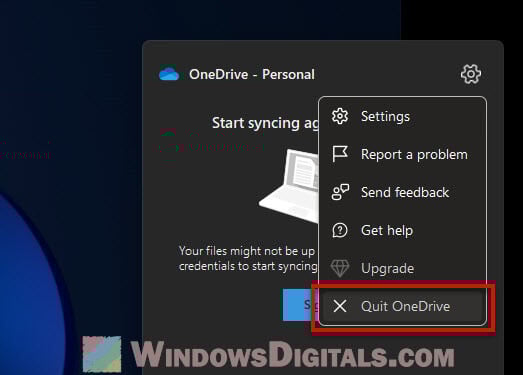
- First, close OneDrive by right-clicking its icon in the system tray, hitting the Settings icon, and choosing “Quit OneDrive.”
- Press Win + R to open the Run dialog box. Type or paste in this command:
%localappdata%\Microsoft\OneDrive\onedrive.exe /reset
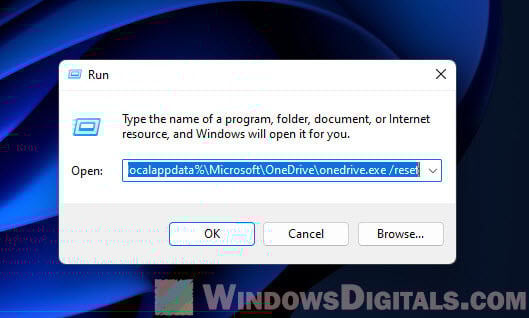
- Hit Enter. OneDrive will close and reset, which might take a few minutes.
- After it resets, restart your computer to make sure everything works smoothly.
Reset OneDrive using Command Prompt
If you like using Command Prompt, follow these steps to reset OneDrive:
- Open the Start menu and look up “Command Prompt”.
- Right-click Command Prompt in the search results and choose “Run as administrator”.

- In Command Prompt, type or paste this command to force OneDrive to close:
taskkill /f /im OneDrive.exe
- Hit Enter. If OneDrive was open, it’ll close.
- Next, type or paste this command to reset OneDrive:
%localappdata%\Microsoft\OneDrive\onedrive.exe /reset
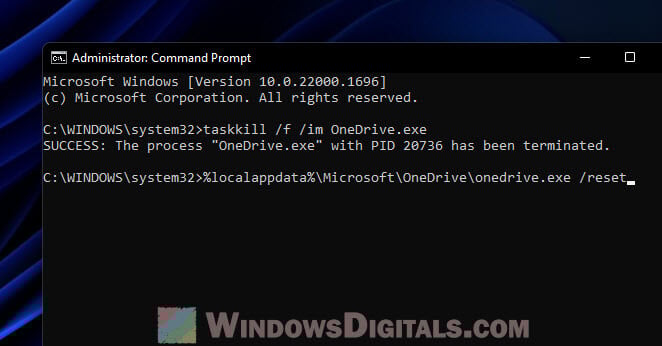
- Press Enter. OneDrive will reset, which might take a bit.
- After the reset, restart your computer to make sure all is well.
Reinstalling OneDrive in Windows 11
If resetting didn’t fix the problem, you might need to remove OneDrive completely and then put it back on your computer. Here are the steps to do just that in Windows 11.
Step 1: Completely uninstall OneDrive
There are a few ways to get rid of OneDrive in Windows 11. If one way doesn’t work, try another to make sure it’s gone for good.
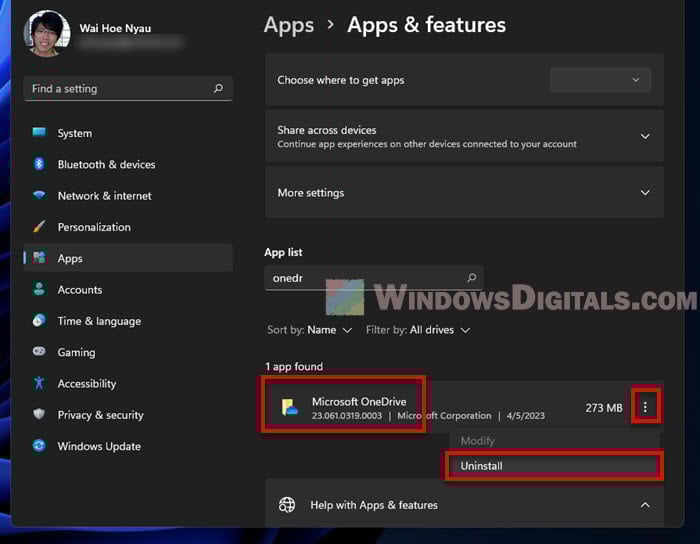
Using the Settings app
The usual way to uninstall OneDrive is through the Apps & features settings.
- Hit Win + i to open the Settings app.
- Click “Apps” then “Apps & features”.
- Find Microsoft OneDrive, click the three-dot menu next to it, and choose “Uninstall”.
Using Command Prompt
You can also uninstall OneDrive with a command. Here’s how:
- Press Win + X and select “Command Prompt (Admin)”.
- In Command Prompt, type or paste this command to uninstall OneDrive:
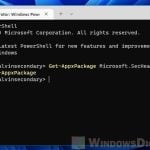
%SystemRoot%\SysWOW64\OneDriveSetup.exe /uninstall
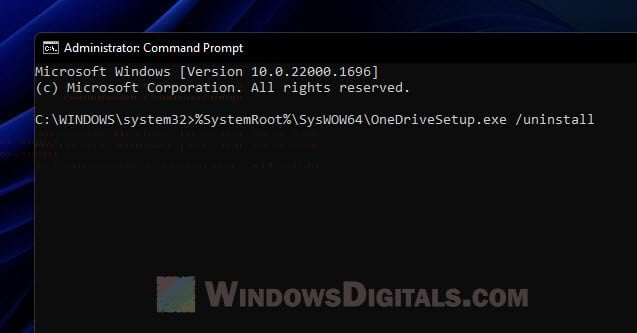
- Hit Enter. OneDrive will be removed, which might take a few minutes.
- Restart your computer to finish up.
Delete the OneDrive Registry
If you’re seeing messages like “A newer version of OneDrive is installed – You need to uninstall it first before installing this version” or other signs that OneDrive wasn’t fully uninstalled, you might need to clean up the registry.
Warning: Editing the Windows registry can be risky. Be super careful. Wrong changes can cause big problems. It’s a good idea to create a system restore point first, just in case.
- Type “regedit” in the Start menu to open Registry Editor.
- Go to
HKEY_CURRENT_USER\Software\Microsoft\OneDrive. - Right-click “OneDrive” and select “Delete”.
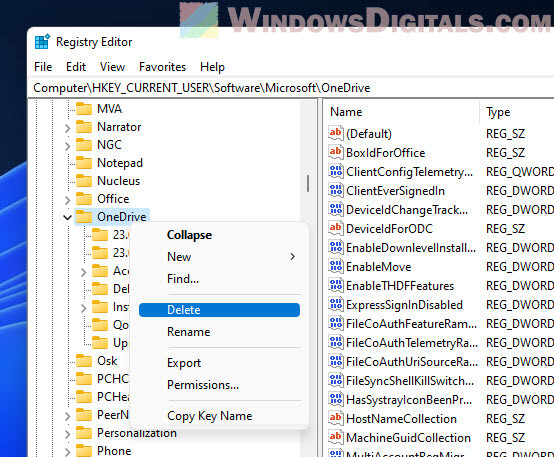
- Restart your computer.
- After restarting, follow the next steps to put OneDrive back on your computer.
Step 2: Download and install OneDrive
Now that OneDrive is completely gone, let’s get it back on there.
Download OneDrive from Microsoft
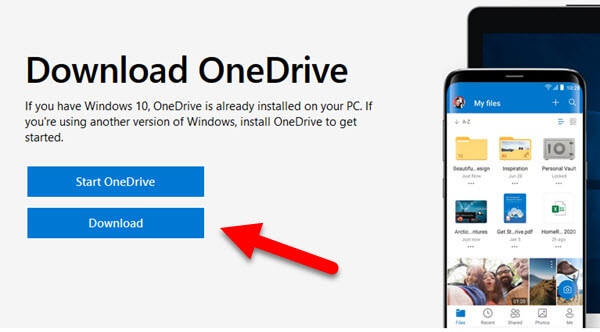
For the latest version of OneDrive, go straight to Microsoft’s website:
- Visit the OneDrive download page.
- Hit the “Download” button to get the OneDrive installer.
- Open the downloaded file to start putting OneDrive back on your computer.
- Follow the steps on the screen to finish up.
Use the local OneDriveSetup.exe
Or, you can use the OneDriveSetup.exe file already on your computer:
- Press Win + R to open Run. Type or paste this command:
%SystemRoot%\SysWOW64\OneDriveSetup.exe
Or find it here:
%localappdata%\Microsoft\OneDrive\Update\OneDriveSetup.exe
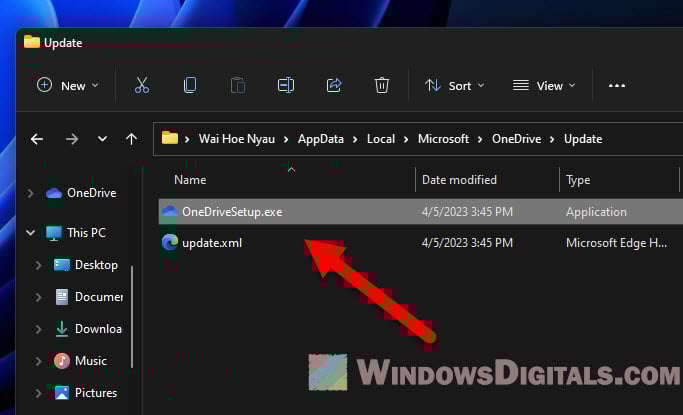
- Hit Enter. OneDrive will reinstall. Wait a few minutes for it to finish.
- Restart your computer to make sure OneDrive works right.
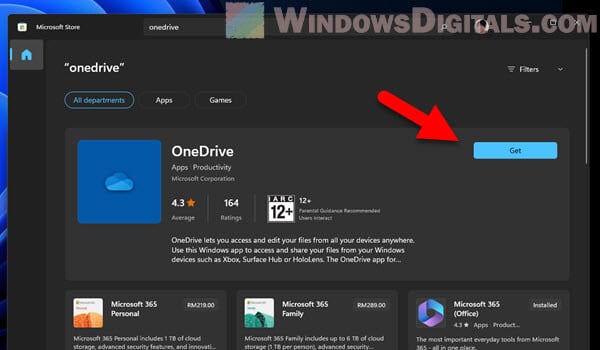
Install the app from Microsoft Store
Getting OneDrive from the Microsoft Store is another great option:
- Open the Microsoft Store from the taskbar or Start menu.
- Search for “OneDrive” and pick the Microsoft OneDrive app.
- Click “Get” to add OneDrive back to your system.
- After it’s back, restart your computer to see the changes.
Other troubleshooting tips for OneDrive issues
If you’re still having trouble with OneDrive, here are some more things to try:
Verify file and folder names
Make sure your file and folder names follow these rules to avoid sync problems:
- Don’t use these characters:
~ " # % & * : < > ? / \ { | } - Keep names under 400 characters
- Don’t start or end names with a space
Check the DisableFileSync registry value
Sometimes, registry settings might stop OneDrive from syncing files properly. Here’s how to check:
- Press Win + R, type
regedit, and hit Enter. - Look in these registry keys:
HKEY_LOCAL_MACHINE\SOFTWARE\Policies\Microsoft\Windows\OneDrive

HKEY_LOCAL_MACHINE\SOFTWARE\Policies\Microsoft\Windows\Skydrive
- Find any values named DisableFileSyncNGSC or DisableFileSync.
- If they’re there, set them to 0. If not, you’re good to go.
Re-link Your OneDrive Account
If syncing issues are about your account, try linking it again:
- Right-click the OneDrive icon, choose Settings, then go to the Account tab.
- Click “Unlink this PC”.
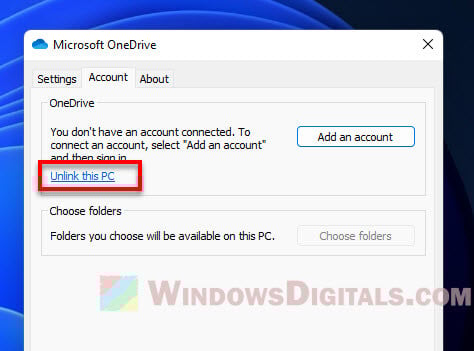
- Log back in with your Microsoft account details.
Check for conflicting applications
Some apps, like antivirus or firewall software, might mess with OneDrive. Turning these off temporarily can help figure out if they’re the problem. If it works, think about making an exception for OneDrive in those apps.
Update Windows and OneDrive
Make sure both Windows 11 and OneDrive are up-to-date to avoid bugs and improve performance:
- Press Win + I for Settings, click “Windows Update”, then “Check for updates”. Install any that show up.
- Go to the Microsoft Store, hit the three-dot menu, and choose “Downloads and updates”. Look for OneDrive updates and get them.
Just one more thing
If you’ve reset or reinstalled OneDrive, you should double-check your OneDrive settings again. This is because, sometimes, these actions can revert settings back to their defaults. Take a minute and go through your OneDrive preferences and see if everything is set up the way you like it.