Back in the day before Windows 10, when we wanted to take a quick screenshot on the desktop or in any full-screen app or game, we would do it by pressing the PrtScr (Print Screen) button, pasting it into Windows Paint, and then saving it, which was quite a hassle but the only practical way to do that.
Fortunately, since Windows 10 (and still applicable in Windows 11), there is now a much easier built-in way to take a screenshot instantly without the need to use Paint or any other software.
If you need to do some edits to your screenshot, like highlighting things or adding some markings, etc. before saving it, you can skip the first method and scroll down to the next method to learn about how to use the Snipping Tool instead.
Page Contents
The magic Win Key + PrtScr button
To take a screenshot in Windows 10 using this combination, follow these steps:
- On the screen which you would like to capture, hold the Windows Key, then press the PrtScr printscreen button.
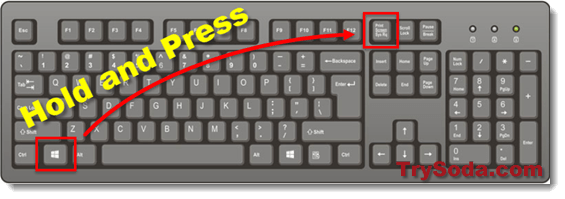
- Windows will capture the entire screen and save it to the Picture folder automatically.
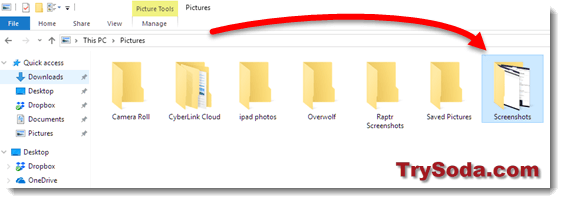
- Go to This PC. Open the Pictures folder, then the Screenshots folder. You should see the screenshot you’ve just taken in the folder.
To summarize what it does, when the Win + PrtScr keys are pressed, Windows will immediately take a snapshot of wherever your screen is right now and save it into the default Pictures folder. Read below to learn how you can change the default save location for a screenshot.
It’s just that easy. The only disadvantage of taking a screenshot this way is that you can’t edit the screenshot before the system saves the image. You would have to use an image editing software such as Paint to crop, resize, or highlight your screenshot, and then save it again.
The screenshot can also be taken even when you are in your full-screen app, such as full-screen games, most of the time. In some rare games, though, taking a screenshot this way will only result in a total black image when saved. If that’s the case, you will have to use the built-in screenshot function provided by the game itself to take a screenshot in that game.
How to change the default save location of screenshots you take in Windows
By default, Windows 10 will save the screenshot it takes to the Pictures folder. If you want it to save to somewhere else, here’s how to change the save location.
- Go to This PC, then open the Pictures folder. If you don’t see the folder, go to the following directory.
C:\users\username\Pictures
Replace username with your actual Windows username.
- Right click the Screenshots folder, then select Properties.
- Go to the Location tab.
- Enter the new location where you want your screenshot to be saved to. You can use the Move button to browse to your desired folder.
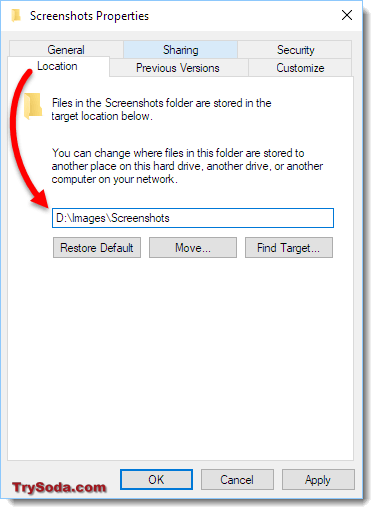
- Click Apply, then OK.
- Your screenshots will now be saved in that set location.
Using Snipping Tool to take screenshot in Windows
If you always need to crop and edit a screenshot before saving it, we recommend you use the Snipping Tool instead.
Snipping Tool is a screenshot taking app that comes built-in with Windows 10. You can use it to directly crop a part of your screen and do your editing right on the spot before deciding where it should be saved. Here’s how to use Snipping Tool to take a screenshot in Windows 11 or Windows 10.
- Go to Start Menu. Search for Snipping Tool. Open it.
- Alternatively, you can right click it and pin to Start or pin to taskbar for quick access.
- On the snipping tool app, click Mode and select any mode you like. We usually just use the rectangular snip. You should experiment with each one of them to learn what they can do for taking screenshot.
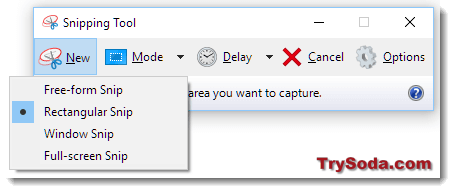
- Click New to begin cropping your screen.
- After taking the screenshot, you can edit it in the next screen.
- When you’ve done editing it, go to File > Save as, to save the screenshot to wherever you like.
One last thing
Well, taking a screenshot in Windows 10 or Windows 11 is now actually easier than ever with only the Win Key + PrtScr button combination. This method will automatically save the captured screenshot to the Pictures folder, which is super convenient.
Also, if you need to edit your screenshot before saving it, which is sometimes a must when you need to highlight or mark something on the screenshot, you should probably try the built-in Snipping Tool first before going for a third party screenshot software. It allows you to crop and edit the screenshot before saving it to your desired location. Additionally, changing the default save location for screenshots taken by “Win+PrtScr” is not that hard (as shown above) and can be done in just a few steps.