The tar command, which is very common in Unix and Linux systems for archiving and compressing files (also known as zipping), is also available in Windows 11 and Windows 10. It mainly helps you pack many files and folders into one file, called a tarball. In this guide, we’ll show you how to use the tar command in Windows to make ZIP archives.
Also see: How to Open or Extract .Gz, Tar.gz or .Tar File in Windows 11/10
Page Contents
Check if you have tar installed in Windows 11
Before we start making ZIP files with the tar command, make sure you have all the needed tools on your Windows 11 or Windows 10 PC. Starting with Windows 10’s Fall Creators Update and also in Windows 11, the tar command is built-in and you can use it from Command Prompt or PowerShell. Below is how you can check if tar is on your computer and install it if it’s not.
- Open Command Prompt or PowerShell.
- Type
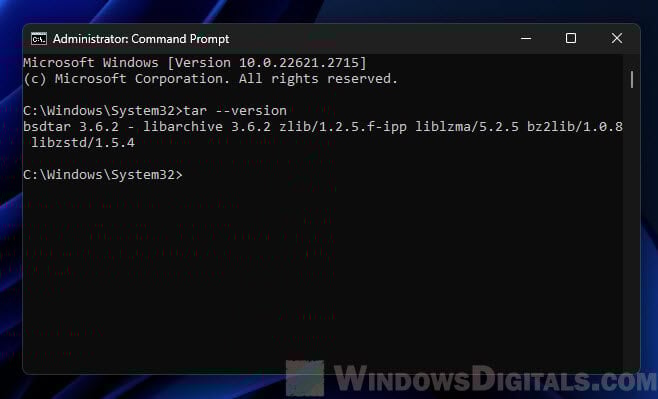
tar --versionand press Enter. - If you see a version number, tar is already on your computer. If you get an error or the command doesn’t work, you need to install it.
- If tar is not on your computer, the simplest way to install it is by turning on the Windows Subsystem for Linux (WSL).
- Go to the Windows search bar, type “Turn Windows features on or off”, and click on it.
- In the Windows Features window, tick the box for “Windows Subsystem for Linux” and click OK.
- Restart your computer when asked.
- After restarting, you can install the Linux version you like from the Microsoft Store, like Ubuntu.
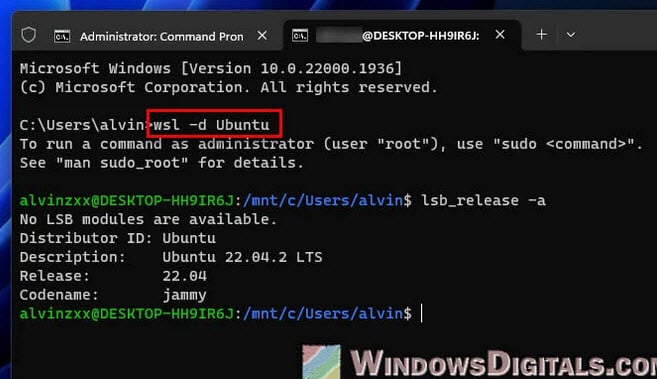
- Once you have WSL with your chosen Linux version installed, you can use tar by starting the Linux app from the Start menu.
- You can also use tar directly in Windows Command Prompt or PowerShell.
With tar ready to use on your Windows machine, you can now start making ZIP archive files. In the next part, we’ll go through the basic commands and how to use them.
Suggested read: How to Zip Files and Folders in Windows 11/10 Without Any Software
Create ZIP archives with tar command
Now that you have tar ready on your Windows computer, let’s see how to use it to make ZIP archive files. It’s quite simple and uses basic command line steps.
- Start Command Prompt or PowerShell, whichever you like more.
- Move to the folder where your files are by using the
cdcommand. For instance,cd C:\Users\Username\Desktop\.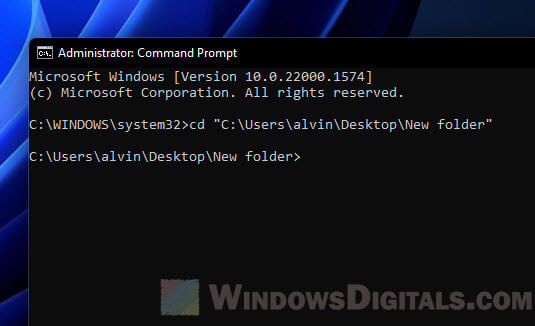
- The basic way to make a ZIP file with
taris like this:tar -a -c -f archive_name.zip file_or_directory_to_compress
- Here,
-apicks the ZIP format automatically,-cmeans create, and-fnames the archive. - To make a ZIP archive of a folder called MyFolder, the command would be:
tar -a -c -f myarchive.zip MyFolder
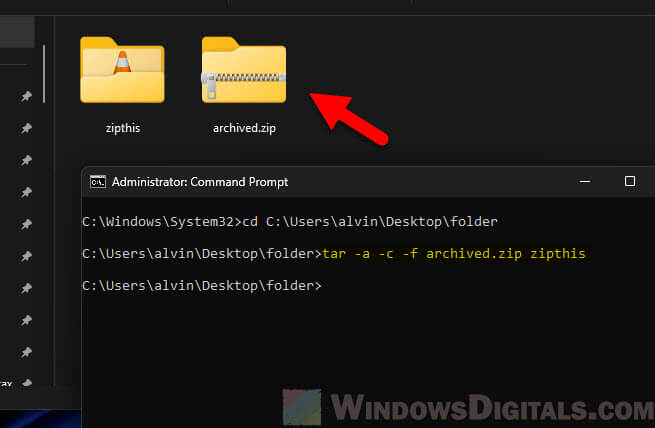
- This command makes a ZIP file named myarchive.zip with MyFolder inside.
- You can also pack several files or folders in one go:
tar -a -c -f myarchive.zip file1.txt file2.txt MyFolder
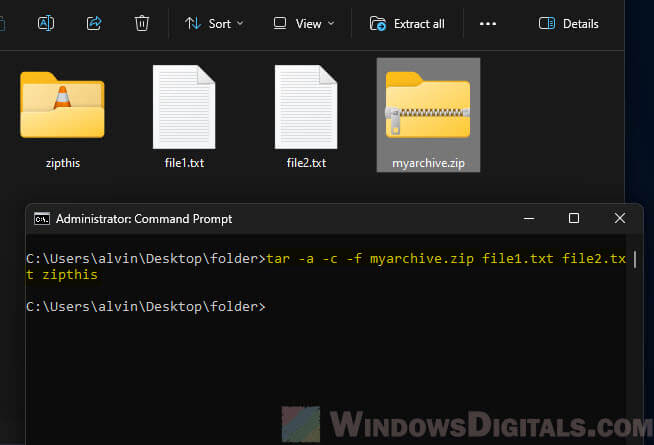
- This makes a ZIP file with file1.txt, file2.txt, and the MyFolder folder inside.
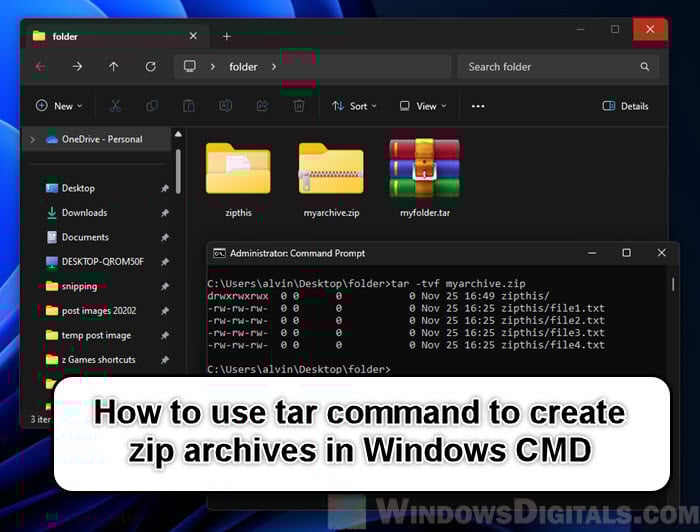
- To check if your files are correctly packed, you can list what’s in the ZIP file:
tar -tf myarchive.zip
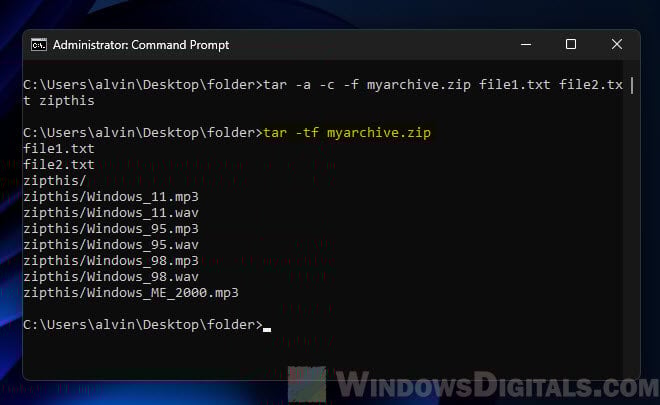
- This shows the files in myarchive.zip.
Pro tip: How to Split a File Into Multiple Files in Windows 11
In the next part, we’ll share some extra tips to make your ZIP archiving with tar even better.
Some tips for more efficient ZIP archiving with tar command
The basic tar command for making ZIP files is simple, but there are more options and tricks that can help you archive better and fit your needs.
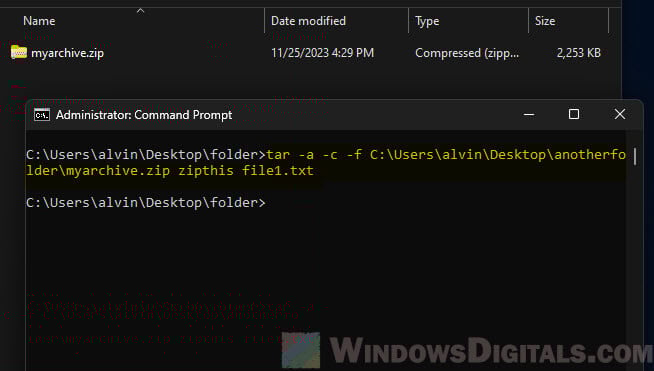
- Usually,
tarmakes the ZIP file right where you are. To make the archive in a different place, add the path to the archive name. For example:tar -a -c -f C:\Archives\myarchive.zip MyFolder
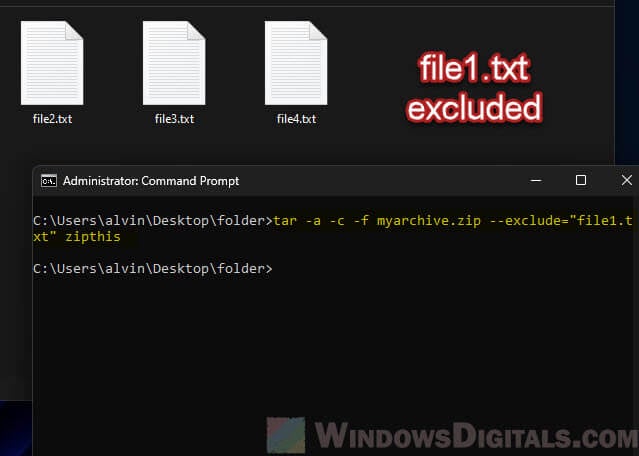
- Sometimes, you might not want to include certain files or folders in the archive. Use the
--excludeoption for this:tar -a -c -f myarchive.zip --exclude="file1.txt" MyFolder
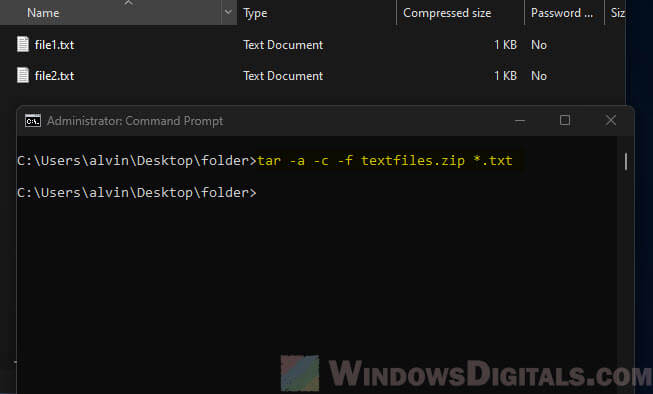
- You can use wildcards (*) to pack files that match a certain pattern. For example, to pack all
.txtfiles:tar -a -c -f textfiles.zip *.txt
- If you want to see the files being packed, add the
-v(verbose) option:tar -a -cvf myarchive.zip MyFolder
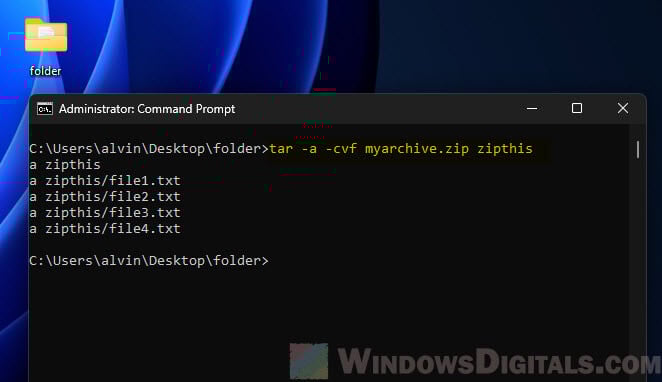
- This will show each file as it’s added to the archive.
- After making an archive, it’s good to check if it’s all okay. Do this by:
tar -tvf myarchive.zip
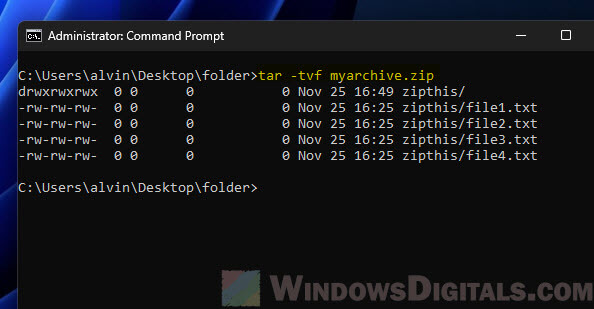
- This not only shows the contents but also checks if the files are fine.
- While
-apicks ZIP compression by itself, you can choose other compression methods like gzip or bzip2 with-zor-j:tar -czf myarchive.tar.gz MyFolder tar -cjf myarchive.tar.bz2 MyFolder
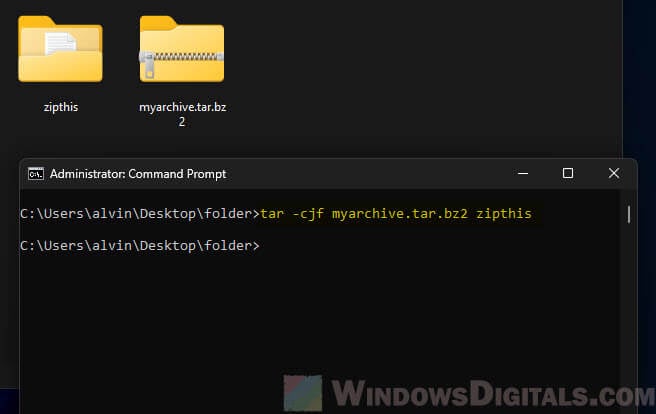
- Note that these commands make
.tar.gzor.tar.bz2files, not ZIP. - For batch archiving multiple directories into separate archives, you can use a simple script or loop in the command line. For example, in PowerShell:
foreach ($folder in Get-ChildItem -Directory) {
tar -a -c -f "$($folder.Name).zip" "$folder"
}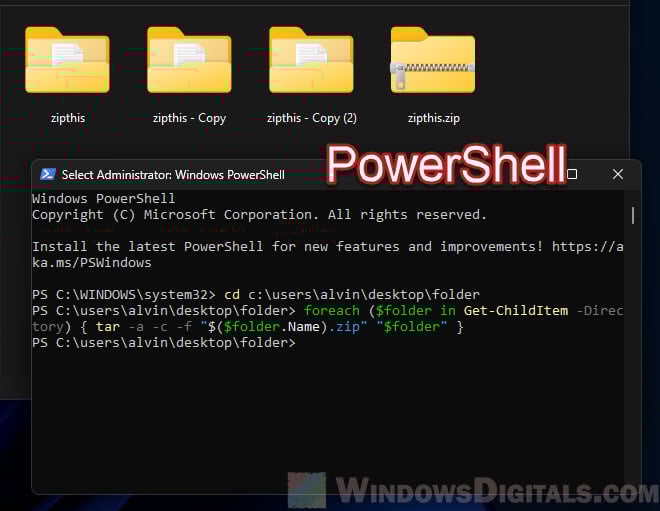
Useful guide: Move All Files from Subfolders to Main Folder (Windows)
Create tar.gz and tar archives with tar command in Windows 11
Besides making ZIP files, the tar command in Windows can also make .tar.gz (tarball compressed with gzip) and .tar (uncompressed tarball) archives. These types are very common in Unix and Linux systems and are useful for many things, like backing up and sharing software.
Create a tar.gz archive
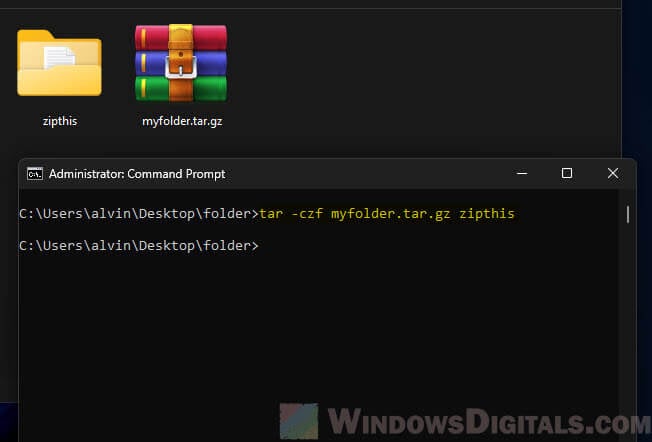
- To make a .tar.gz archive, use the
-zoption for gzip compression. The basic command looks like this:tar -czf archive_name.tar.gz file_or_directory_to_compress
- Here,
-cmeans create,-zapplies gzip compression, and-fnames the archive file. - To compress a folder called MyFolder into a .tar.gz archive, the command is:
tar -czf myfolder.tar.gz MyFolder
Create a tar archive
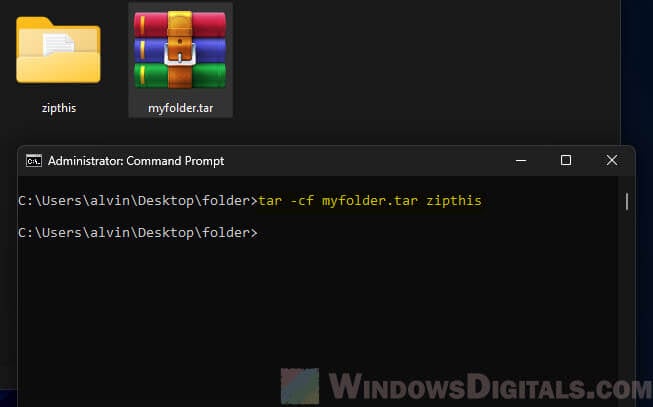
- Making an uncompressed tar archive is simple. Just leave out the compression option (
-zfor gzip or-jfor bzip2). The command goes like this:tar -cf archive_name.tar file_or_directory_to_compress
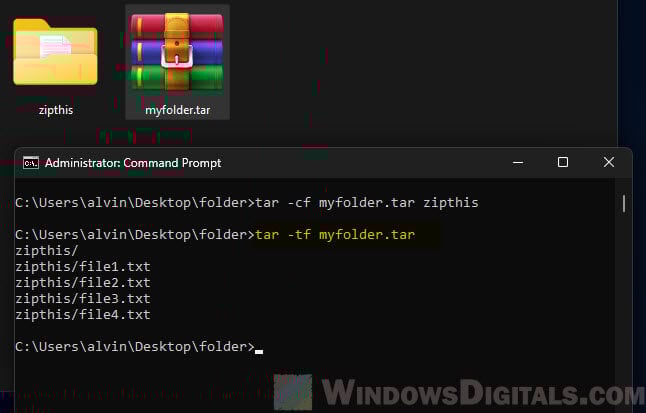
- To pack MyFolder into a .tar file, use:
tar -cf myfolder.tar MyFolder
Some other options
- Just like with ZIP archiving, you can use the
-v(verbose) option to see the files being added to the archive. - The
--excludeoption works the same way as with ZIP files, letting you leave out specific files or folders. - Use
tar -tf archive_name.tar.gzortar -tf archive_name.tarto list what’s in your .tar.gz or .tar archive.