Setting CPU priority and/or affinity is a good way to manage the sharing of CPU resources when you need to run multiple CPU intensive apps or games. For most apps and programs that run on only one .exe process, you can create a shortcut for the app to always start with certain priority and CPU affinity. To learn how to do so, go to: How to Set Process CPU Affinity or Priority Permanently in Windows 11/10.
For other apps that run more than one executable processes, for example, processes run by most modern web browsers such as Google Chrome (chrome.exe), Mozilla Firefox (firefox.exe) or Microsoft Edge (msedge.exe), the shortcut method won’t work because it only applies to the first process the app runs. In that case, you can use a PowerShell script instead to mass/bulk set the priority and affinity for multiple processes automatically, even for processes with the same name.
Auto set CPU priority and affinity in Windows 11/10
This tutorial will show you how to create a PowerShell script to automatically set the CPU priority and/or processor affinity for apps that run multiple processes such as Chrome in Windows 11 or Windows 10.
In the example below, I’ll create a PowerShell script to automatically set the priority for all chrome.exe processes to “Low”, and set the affinity for all processes that contains the name “chrome” to “CPU 7” only. You can follow the same steps and change the value according to your need.
Step 1: Create a PowerShell script
Create a text file and name it any name you like but with an extension of .ps1. PS1 file is a script file that can contain a series of PowerShell commands which can be executed upon running.
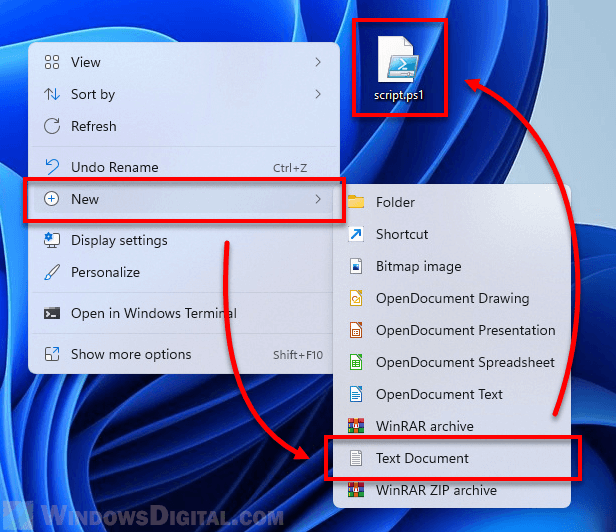
Once created, open the .ps1 file with Notepad or any other compatible text editor.
Step 2: Enter the command to auto set process priority
Enter the following command line into the PowerShell script to automatically set the priority for any process with a certain name.
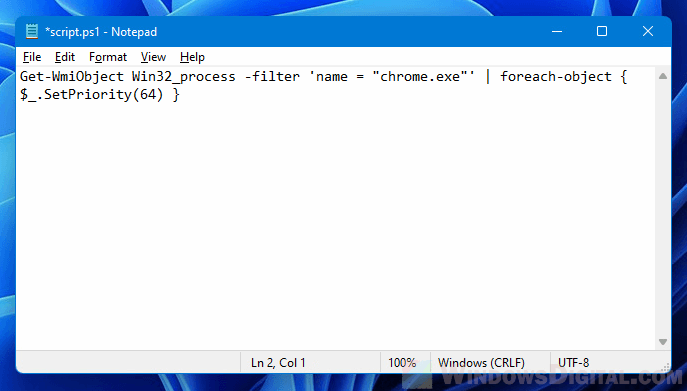
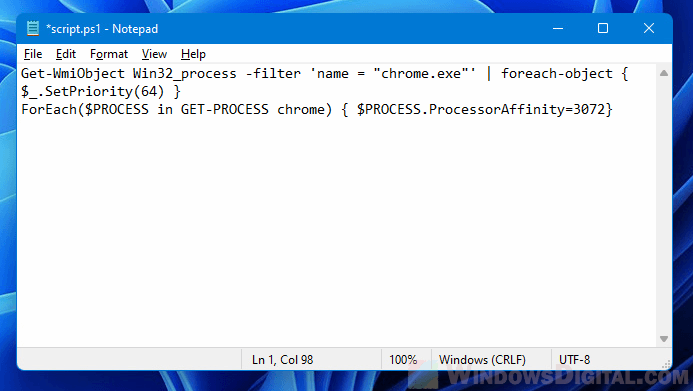
Get-WmiObject Win32_process -filter 'name = "chrome.exe"' | foreach-object { $_.SetPriority(64) }
This command above will search the process list for any process called “chrome.exe” and then set its process priority to “Low” (the value for low priority is 64). Replace chrome.exe with the name of the process you want to set priority for, and the priority value in the SetPriority(value) to the value according to the table shown below.
| Realtime | 256 |
| High | 128 |
| Above normal | 32768 |
| Normal | 32 |
| Below normal | 16384 |
| Low | 64 |
If you do not want to set the CPU affinity for any process with this script, skip to step 5.
Step 3: Find out the decimal value of the CPU cores (affinity) you want to use for the process
Because the PowerShell command in the next step requires the decimal value of the CPU core(s) you want to use for a process, you need to first find this decimal value. You will need this value in the command later.
To find out the decimal value, you need to first figure out the binary number of the CPU cores you want to use for a process.
The length of binary number is determined by how many CPU cores you have. In the CPU binary number, 0 means “off” and 1 means “on”. For each CPU core that you want to use for the process, change 0 to 1.
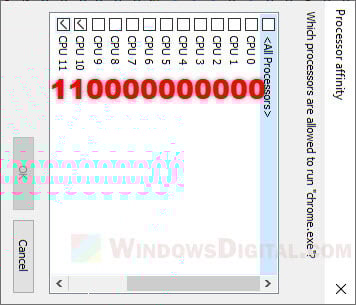
For example, in the screenshot above, I have a 12-cores CPU and I want to use only CPU 10 and CPU 11 for chrome processes. Thus, the binary number of CPU I want to use is 110000000000.
As an extra example, if you have a 8-cores CPU and you want to use only CPU 0 and CPU 1 for your app or game, the binary number to be used will be 00000011.
As the command line requires not the binary number but the decimal number of the CPU cores, you need to convert the binary number to decimal number using a converter. You can use the binary to decimal converter in this page.
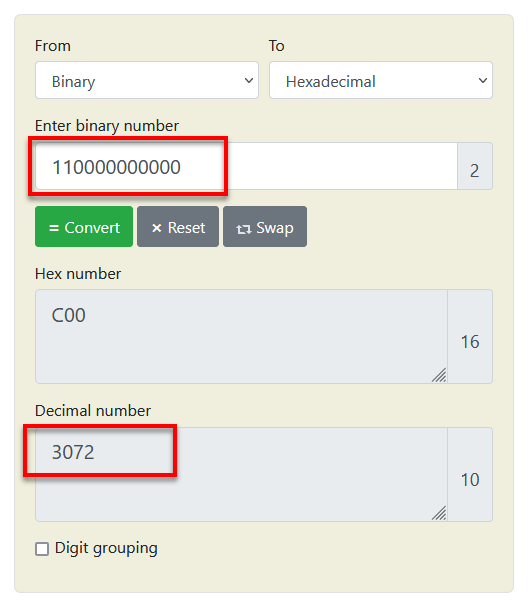
In my example, the decimal value of the CPU cores (CPU 10 and CPU 11) I want to use is 3072. Once you get the decimal value, proceed to next step.
Step 4: Enter the command to auto set CPU affinity
For single process:
If you want to set the CPU affinity for only one process, enter the command line below into the PowerShell script.
$Process = Get-Process Messenger; $Process.ProcessorAffinity=3072
This command will look for a process called Messenger and set its processor affinity to 3072 which is the CPU core 10 and 11. Replace the name of the process and the CPU affinity value accordingly.
For multiple processes with the same name:
To set the CPU affinity for all processes with the same name, for example, chrome.exe, firefox.exe or msedge.exe, enter the command line below into the PowerShell script.
ForEach($PROCESS in GET-PROCESS chrome) { $PROCESS.ProcessorAffinity=3072}
The command above will search all running processes for any process that contain the name “chrome” and set the CPU affinity to 3072 (CPU 10 and CPU 11) for each process it finds.
Replace “chrome” with the name of the process you want to set the CPU affinity for, and the affinity value with the decimal value you get earlier from step 3.
Step 5: Run the script
The screenshot below is what it looks like in my PowerShell script. This script will look for all processes called chrome.exe and set their priority to Low (the first command line), and will also look for all processes that contain the name “chrome” and set their CPU affinity to only using CPU 10 and CPU 11 in a 12-cores CPU computer (second command line).
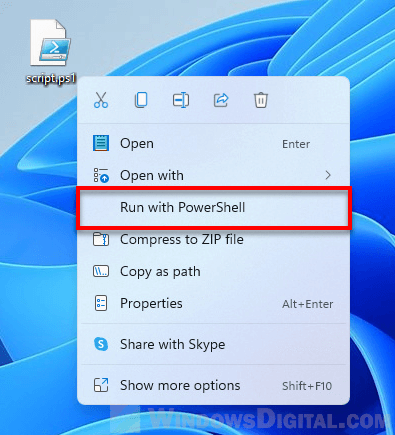
To run the script, right-click the .ps1 file you’ve edited, and select Run with PowerShell.
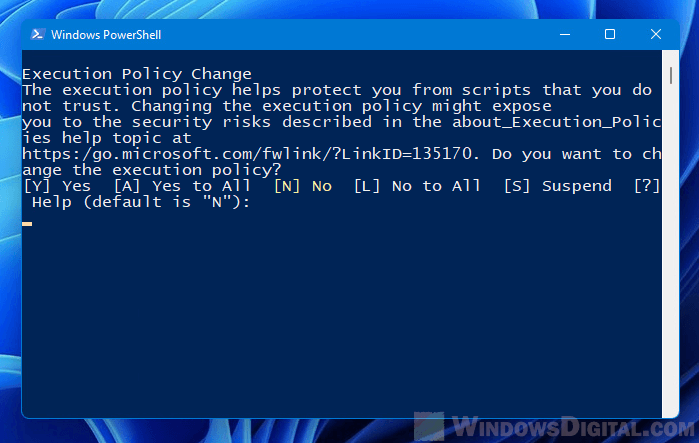
When you run the script, it will prompt you a warning about Execution Policy Change. By default, Windows does not allow any script to run on the system. To allow your script to run, press Y. The script will then run and immediately close itself after executing all the commands in it.
After running the script, check the processes via Task Manager. You should see that the CPU affinity and priority of the processes are set accordingly.
Cannot run the script due to execution policy
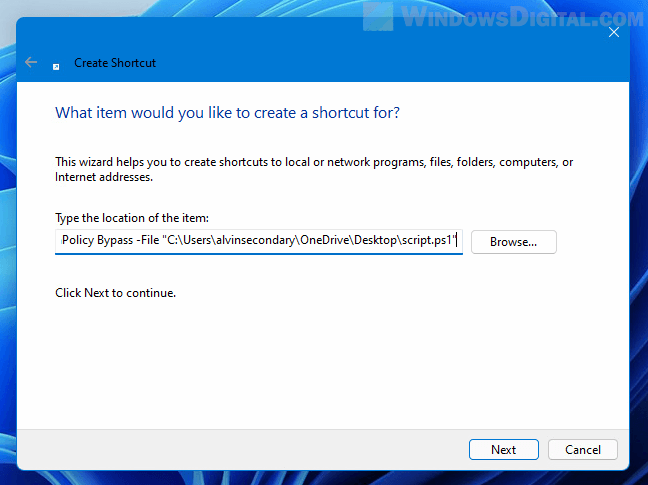
If you have no admin rights or there is any problem running the script due to execution policy, you can create a shortcut pointing to the ps1 script you’ve created earlier with parameter that bypass the execution policy.
To do so, right-click anywhere on the desktop, select New > Shortcut. In the Create Shortcut wizard, enter the following line into the “Type the location of the item” field.
C:\Windows\System32\WindowsPowerShell\v1.0\powershell.exe -noexit -ExecutionPolicy Bypass -File "C:\Users\alvinsecondary\OneDrive\Desktop\script.ps1"
Note: Replace “C:\Users\alvinsecondary\OneDrive\Desktop\script.ps1” with the actual path to your PS1 script file. If your Windows is not in C: drive or your powershell is installed elsewhere, replace the “C:\Windows\System32\WindowsPowerShell\v1.0\powershell.exe” with the path to the powershell.exe on your system.
The -noexit parameter is optional. This parameter tells the shortcut to not close the window after finish running the script.
Next, give the shortcut any name you like. This shortcut will be able to run your PS1 script by bypassing the Execution Policy in Windows.